background image

EMX-BSWP 

User’s Manual 

22 EMX-BSWP 

User’s Manual 


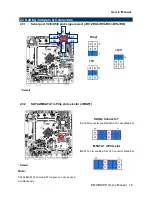
2.3.7 

Serial port 1/2 connector (COM1/2) 


Signal 

PIN  PIN 

Signal 

NDCD # 

NRXD 

NTXD 

NDTR# 

GND 

NDSR# 

NRTS # 

NCTS# 

NRI# 

10 

NC 


2.3.8 

Serial port 3/4/5/6 connector (COM3/4/5/6) 


Signal 

PIN  PIN 

Signal 

NC 

10 

NRI# 

NCTS# 

NRTS# 

NDSR# 

GND 

NDTR# 

NTXD 

NRXD 

NDCD# 


COM2 

COM1 

COM3 

COM4 

COM5 

COM6 

Summary of Contents for EMX-BSWP

Page 1: ...Part No E2047EMSW02R EMX BSWP Intel Celeron Processor N3160 Mini ITX Motherboard User s Manual 2nd Ed 08 April 2016 ...

Page 2: ...E USER WILL BE REQUIRED TO CORRECT THE INTERFERENCE AT HIS OWN EXPENSE Notice This guide is designed for experienced users to setup the system within the shortest time For detailed information please always refer to the electronic user s manual Copyright Notice Copyright 2016 Avalue Technology Inc ALL RIGHTS RESERVED No part of this document may be reproduced copied translated or transmitted in an...

Page 3: ...ably expected to cause the failure of the life support device or system or to affect its safety or effectiveness A Message to the Customer Avalue Customer Services Each and every Avalue s product is built to the most exacting specifications to ensure reliable performance in the harsh and demanding conditions typical of industrial environments Whether your new Avalue device is destined for the labo...

Page 4: ...acement materials service time and freight Please consult your dealer for more details If you think you have a defective product follow these steps 1 Collect all the information about the problem encountered For example CPU type and speed Avalue s products model name hardware BIOS revision number other hardware and software used etc Note anything abnormal and list any on screen messages you get wh...

Page 5: ...21 2 3 6 LCD Inverter connector JBKL1 21 2 3 7 Serial port 1 2 connector COM1 2 22 2 3 8 Serial port 3 4 5 6 connector COM3 4 5 6 22 2 3 9 Serial Port 1 RS485 422 Mode connector JRS485 23 2 3 10 General purpose I O connector DIO1 23 2 3 11 SATA Power connector 1 2 SPWR1 2 24 2 3 12 Power connector PWR1 24 2 3 13 USB connector 3 4 USB3 4 25 2 3 14 Battery connector BT1 25 2 3 15 LVDS connector LVDS...

Page 6: ...ration 49 3 6 2 4 1 Serial Port 1 Configuration 50 3 6 2 4 2 Serial Port 2 Configuration 51 3 6 2 4 3 Serial Port 3 Configuration 52 3 6 2 4 4 Serial Port 4 Configuration 53 3 6 2 4 5 Serial Port 5 Configuration 53 3 6 2 4 6 Serial Port 6 Configuration 54 3 6 2 5 H W Monitor 55 3 6 2 6 S5 RTC Wake Settings 56 3 6 2 7 Serial Port Console Redirection 57 3 6 2 8 CPU Configuration 58 3 6 2 8 1 Socket ...

Page 7: ...tion 93 3 6 4 Security 97 3 6 4 1 Secure Boot menu 98 3 6 4 1 1 Key Management 99 3 6 5 Boot 100 3 6 6 Save and exit 104 4 Drivers Installation 106 4 1 Install Chipset Driver 107 4 2 Install VGA Driver 108 4 3 Install USB3 0 Driver 109 4 4 Install Serial IO Driver 110 4 5 Install SMSC Hub Driver 111 4 6 Install Audio Driver For Realtek ALC662 HD Audio 112 4 7 Install LAN Driver For Intel I211AT 11...

Page 8: ... the PC chassis Caution Always ground yourself to remove any static charge before touching the CPU card Modern electronic devices are very sensitive to static electric charges As a safety precaution use a grounding wrist strap at all times Place all electronic components in a static dissipative surface or static shielded bag when they are not in the chassis 1 2 Packing List Before you begin instal...

Page 9: ...User s Manual EMX BSWP User s Manual 9 1 3 Document Amendment History Revision Date By Comment 1st January 2016 Avalue Initial Release 2nd April 2016 Avalue Add System Specifications Note ...

Page 10: ... carefully before attempting to set up EMX BSWP or change the standard configurations Whilst all the necessary information is available in this manual we would recommend that unless you are confident you contact your supplier for guidance Please be aware that it is possible to create configurations within the CMOS RAM that make booting impossible If this should happen clear the CMOS settings see t...

Page 11: ... Through jumper 1 x full size Mini PCI e support WiFi module 1 x SIM card slot 1 x PCI e x1 1 x SD card slot support SD SDHC 3 0 Card Optional Parts Optional Infineon SLB9665 support TPM 2 0 Optional eMMC 32GB S3 S4 Yes S0 S3 S4 S5 Display Resolution HDMI 3840 x 2160 30 Hz 2560 x 1600 60 Hz VGA 2560 x 1600 60 Hz 2CH 18 24bits LVDS 1920 x 1080 Chrontel CH7511B eDP to LVDS Converter HDMI VGA LVDS Tr...

Page 12: ...5 pin pitch 2 54mm connector for front panel 2 1 x 2 x 20 pin pitch 1 25mm connector for LVDS must be using DF13 2S 1 25C connector 1 x 1 x 5 pin pitch 2 00mm Wafer connector for LCD inverter backlight connector 5V 12V 1 x 1 x 3 pin pitch 2 54mm connector LCD backlight brightness adjustment PWM DC 1 x 2 x 5 pin pitch 2 54mm connector for front Audio 1 x 3 pin pitch 2 54mm connector for S PDIF 1 x ...

Page 13: ...se selection with ACPI mode during OS install OS cannot find eMMC to install B Windows OS must use Microsoft Win 8 1 Pro with update version of OS image to install 2 Brightness control method choose OS driver due to Win7 VGA Driver will cause brightness at 100 Backlight adjustment only support to maximum voltage to 2 5V Therefore should change item value string as Image 1 when choose Brightness co...

Page 14: ...EMX BSWP User s Manual 14 EMX BSWP User s Manual 1 6 Architecture Overview Block Diagram The following block diagram shows the architecture and main components of EMX BSWP ...

Page 15: ...User s Manual EMX BSWP User s Manual 15 2 Hardware Configuration ...

Page 16: ...EMX BSWP User s Manual 16 EMX BSWP User s Manual 2 1 Product Overview ...

Page 17: ... or floppy drives In addition the board has a number of jumpers that allow you to configure your system to suit your application If you have any doubts about the best hardware configuration for your application contact your local distributor or sales representative before you make any changes The following tables list the function of each of the board s jumpers and connectors Jumpers Label Functio...

Page 18: ...1 2 USB connector 1 2 USB3 4 USB connector 3 4 5 x 2 header pitch 2 54mm SPDIF1 Sony Philips Digital Interface 3 x 1 header pitch 2 54 mm LAN1 2 RJ 45 Ethernet 1 2 PCIE1 PCIe connector LED1 LED indicator connector 1 4 x 1 header pitch 2 00mm LED2 LED indicator connector 2 4 x 1 header pitch 2 00mm KBMS1 PS 2 keyboard mouse connector 5 x 2 header pitch 2 00 mm BT1 Battery connector 2 x 1 wafer pitc...

Page 19: ...RI1 JRI2 JRI3 JRI4 JRI5 JRI6 Default Ring 5V 12V 2 3 2 SATA2 MSATA1 mPCIe slot selector JMSW1 Default Note SATA2 MSATA1 shared SATA signal can not be used simultaneously SATA2 Connector SATA2 Connector enabled MSATA1 slot Disabled MSATA1 mPCIe slot MSATA1 slot enabled SATA2 Connector Disabled JRI3 JRI1 JRI4 JRI6 JRI5 JRI2 ...

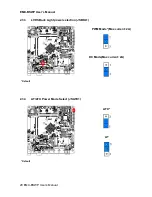
Page 20: ...EMX BSWP User s Manual 20 EMX BSWP User s Manual 2 3 3 LVDS Back Light power selection JSBKL1 Default PWM Mode Max current 2A DC Mode Max current 2A 2 3 4 AT ATX Power Mode Select JSATX1 Default ATX AT ...

Page 21: ...User s Manual EMX BSWP User s Manual 21 2 3 5 Clear CMOS CMOS1 Default Protect Clear CMOS 2 3 6 LCD Inverter connector JBKL1 PIN Signal Max current 1 12V 2A 2 GND 3 LVDS_BKLTEN 4 LVDS_BKLADJ 5 5V 2A ...

Page 22: ... connector COM1 2 Signal PIN PIN Signal NDCD 1 2 NRXD NTXD 3 4 NDTR GND 5 6 NDSR NRTS 7 8 NCTS NRI 9 10 NC 2 3 8 Serial port 3 4 5 6 connector COM3 4 5 6 Signal PIN PIN Signal NC 10 9 NRI NCTS 8 7 NRTS NDSR 6 5 GND NDTR 4 3 NTXD NRXD 2 1 NDCD COM2 COM1 COM3 COM4 COM5 COM6 ...

Page 23: ...l Port 1 RS485 422 Mode connector JRS485 Signal PIN PIN Signal GND 6 5 5V 422RX 4 3 485TX 422RX 2 1 485TX 2 3 10 General purpose I O connector DIO1 Signal PIN PIN Signal 5V 12 11 GND SMB_DATA 10 9 SMB_CLK DO3 8 7 DI3 DO2 6 5 DI2 DO1 4 3 DI1 DO0 2 1 DI0 ...

Page 24: ... 24 EMX BSWP User s Manual 2 3 11 SATA Power connector 1 2 SPWR1 2 PIN Signal Max current 1 V5S_SATA 3A 2 GND 3 GND 4 V12S_SATA 3A 2 3 12 Power connector PWR1 Signal PIN PIN Signal GND 1 2 GND VIN_12V 3 4 VIN_12V SPWR1 SPWR2 ...

Page 25: ... BSWP User s Manual 25 2 3 13 USB connector 3 4 USB3 4 Signal PIN PIN Signal V5A_USB01 1 2 V5A_USB01 USB_DN0 3 4 USB_DN1 USB_DP0 5 6 USB_DP1 GND 7 8 GND 10 NC 2 3 14 Battery connector BT1 Signal PIN 3V 1 GND 2 USB4 USB3 ...

Page 26: ...AP0 10 9 LVDS_DATAP1 LVDS_DATAN0 12 11 LVDS_DATAN1 GND 14 13 GND LVDS_DATAP2 16 15 LVDS_DATAP3 LVDS_DATAN2 18 17 LVDS_DATAN3 GND 20 19 GND LVDS_DATAP4 22 21 LVDS_DATAP5 LVDS_DATAN4 24 23 LVDS_DATAN5 GND 26 25 GND LVDS_DATAP6 28 27 LVDS_DATAP7 LVDS_DATAN6 30 29 LVDS_DATAN7 GND 32 31 GND LVDS_CLK1P 34 33 LVDS_CLK2P LVDS_ CLK1N 36 35 LVDS_ CLK2N GND 38 37 GND 12V 40 39 12V ...

Page 27: ...ignal PIN PIN Signal LINE2_JD 10 9 LINE2_L 7 SENSE_B MIC2_JD 6 5 LINE2_R AUD_FRONT_DET 4 3 MIC2_R GND 2 1 MIC2_L 2 3 16 1 Signal Description Front Audio connector FAUD1 Signal Signal Description LINE2_JD AUDIO IN LINE_RIN LIN sense pin MIC2_JD MIC IN MIC_RIN LIN sense pin ...

Page 28: ...ignal PIN PIN Signal GND 10 9 LPC_SERIRQ LPC_DEG_CLK 8 7 LPC_AD3 LPC_FRAME 6 5 LPC_AD2 PLT_RST 4 3 LPC_AD1 3 3V 2 1 LPC_AD0 2 3 18 EC_Program EC1 Signal PIN PIN Signal EC_SMDATA_DBG 10 9 EC_SMCLK_DBG NC 8 7 EC_HOLD EC_FSMOSI 6 5 EC_FSMIOSO EC_FSCK 4 3 EC_FSCE GND 2 1 3 3A_ECSPI ...

Page 29: ... 19 PS 2 keyboard mouse connector KBMS1 Signal PIN PIN Signal NC 10 9 NC NC 8 7 NC MSCK 6 5 MSDAT 5VSB 4 3 GND KBCK 2 1 KBDAT 2 3 20 SPI connector SPI1 Signal PIN PIN Signal VSPI_BIOS 1 2 GND SPI_CS0 3 4 SPI_CLK SPI_MISO 5 6 SPI_MOSI SPI_HOLD 7 ...

Page 30: ...EMX BSWP User s Manual 30 EMX BSWP User s Manual 2 3 21 Sony Philips Digital Interface SPDIF1 Signal PIN GND 3 SPDIF_OUT 2 5V 1 2 3 22 Speaker connector SPK1 Signal PIN RSPK 4 RSPK 3 LSPK 2 LSPK 1 ...

Page 31: ...set 7 8 PWR_BNT NC 9 2 3 24 Miscellaneous setting connector 2 FPT2 Signal PIN PIN Signal Speaker 1 2 BLK_VR 10K NC 3 4 BLK_UP NC 5 6 BLK_DN Speaker 7 8 GND GND 9 10 Note 1 Pin2 with GND Control LVDS Backlight by use Variable Resistor 2 BLK_UP with GND BLK_DN with GND Step control LVDS Backlight by use button and BIOS must to be set BR Button Please refer to page 88 ...

Page 32: ...32 EMX BSWP User s Manual 2 3 25 LED indicator connector 1 LED1 Signal PIN L1_1000 _LED 4 L1_100 _LED 3 L1_ACT_N 2 L1_ACT_P 1 2 3 26 LED indicator connector 2 LED2 Signal PIN L2_1000 _LED 4 L2_100 _LED 3 L2_ACT_N 2 L2_ACT_P 1 ...

Page 33: ...User s Manual EMX BSWP User s Manual 33 2 3 27 CPU fan connector FAN1 Signal PIN GND 1 12V 2 CPU_FANIN 3 CPU_FANOUT 4 ...

Page 34: ...EMX BSWP User s Manual 34 EMX BSWP User s Manual 3 BIOS Setup ...

Page 35: ...ol over to the operating system While the BIOS is in control the Setup program can be activated in one of two ways By pressing Del or F2 immediately after switching the system on or By pressing the Del or F2 key when the following message appears briefly at the left top of the screen during the POST Power On Self Test Press Del or F2 to enter SETUP If the message disappears before you respond and ...

Page 36: ...nu Quit and not save changes into NVRAM Status Page Setup Menu and Option Page Setup Menu Exit current page and return to Main Menu key Increase the numeric value or make changes key Decrease the numeric value or make changes F1 key General help only for Status Page Setup Menu and Option Page Setup Menu F2 key Previous Values F3 key Optimized defaults F4 key Save Exit Setup Navigating Through The ...

Page 37: ...puter no longer is able to boot the AMI BIOS supports an override to the NVRAM settings which resets your system to its defaults The best advice is to only alter settings which you thoroughly understand To this end we strongly recommend that you avoid making any changes to the chipset defaults These defaults have been carefully chosen by both BIOS Vendor and your systems manufacturer to provide th...

Page 38: ... appear on the screen The Main Menu allows you to select from several setup functions and exit choices Use the arrow keys to select among the items and press Enter to accept and enter the sub menu 3 6 1 Main Menu This section allows you to record some basic hardware configurations in your computer and set the system clock ...

Page 39: ...ystem time option to set the system time Manually enter the hours minutes and seconds Note The BIOS setup screens shown in this chapter are for reference purposes only and may not exactly match what you see on your screen Visit the Avalue website www avalue com tw to download the latest product and BIOS information 3 6 2 Advanced Menu This section allows you to configure your CPU and other system ...

Page 40: ...EMX BSWP User s Manual 40 EMX BSWP User s Manual 3 6 2 1 Driver Health ...

Page 41: ...User s Manual EMX BSWP User s Manual 41 3 6 2 2 Trusted Computing ...

Page 42: ...EMX BSWP User s Manual 42 EMX BSWP User s Manual ...

Page 43: ...User s Manual EMX BSWP User s Manual 43 ...

Page 44: ...ort Disable Enable Default Enables or Disables BIOS support for security device O S will not show Security Device TCG EFI protocol and INT1Ainterface will not be available TPM State Disabled Enabled Default Enable Disable Security Device NOTE Your Computer will reboot during restart in order to ...

Page 45: ...t during restart in order to change State of Security Device Platform Hierarchy Disabled Enabled Default Enable or Disable Platform Hierarchy Endorsement Hierarchy Disabled Enabled Default Enable or Disable Endorsement Hierarchy HashPolicy Sha 1 Default Sha 2 Select the Hash policy to use SHA 2 is most secure but might not be supported by all Operating Systems 3 6 2 3 APCI Settings ...

Page 46: ...EMX BSWP User s Manual 46 EMX BSWP User s Manual ...

Page 47: ...User s Manual EMX BSWP User s Manual 47 ...

Page 48: ... ability to Hibernate OS S4 Sleep State This option may be not effective with some OS ACPI Sleep State Suspend Disabled S3 Suspend to RAM Default Select the highest ACPI sleep state the system will enter when the SUSPEDN button is pressed ErP Function Disabled Default Enabled ErP Function Deep S5 PWR On After PWR Fail Off Default On Last state AC loss resume Watch Dog Disabled Default 30 sec 40 se...

Page 49: ...this item to set up or change the IT8528 Super IO configuration for serial ports Please refer to 3 6 2 4 1 3 6 2 4 6 for more information Item Options Description Serial Port 1 Configuration Set Parameters of Serial Port 1 COMA COM2 CIR Selection CIR COM2 Default Switch to select UART B CIR ...

Page 50: ...t 2 COMB Serial Port 3 Configuration Set Parameters of Serial Port 3 COMC Serial Port 4 Configuration Set Parameters of Serial Port 4 COMD Serial Port 5 Configuration Set Parameters of Serial Port 5 COME Serial Port 6 Configuration Set Parameters of Serial Port 6 COMF 3 6 2 4 1 Serial Port 1 Configuration ...

Page 51: ... 10 11 12 Select an optimal setting for Super IO Device UART 232 422 485 UART 232 Default UART 422 UART 485 Change the Serial Port as RS232 422 485 3 6 2 4 2 Serial Port 2 Configuration Item Option Description Serial Port Enabled Default Disabled Enable or Disable Serial Port COM Change Settings Auto Default IO 2F8h IRQ 3 IO 3F8h IRQ 3 4 5 6 7 9 10 11 12 IO 2F8h IRQ 3 4 5 6 7 9 10 11 12 IO 3E8h IR...

Page 52: ...on Description Serial Port Enabled Default Disabled Enable or Disable Serial Port COM Change Settings Auto Default IO 3E8h IRQ 5 IO 3E8h IRQ 3 4 5 6 7 10 11 12 IO 2E8h IRQ 3 4 5 6 7 10 11 12 IO 200h IRQ 3 4 5 6 7 10 11 12 IO 208h IRQ 3 4 5 6 7 10 11 12 Select an optimal setting for super IO Device ...

Page 53: ...rt Enabled Default Disabled Enable or Disable Serial Port COM Change Settings Auto Default IO 2E8h IRQ 5 IO 3E8h IRQ 3 4 5 6 7 10 11 12 IO 2E8h IRQ 3 4 5 6 7 10 11 12 IO 200h IRQ 3 4 5 6 7 10 11 12 IO 208h IRQ 3 4 5 6 7 10 11 12 Select an optimal setting for super IO Device 3 6 2 4 5 Serial Port 5 Configuration ...

Page 54: ...O 200h IRQ 3 4 5 6 7 10 11 12 IO 208h IRQ 3 4 5 6 7 10 11 12 Select an optimal setting for super IO Device 3 6 2 4 6 Serial Port 6 Configuration Item Option Description Serial Port Enabled Default Disabled Enable or Disable Serial Port COM Change Settings Auto Default IO 208h IRQ 5 IO 3E8h IRQ 3 4 5 6 7 10 11 12 IO 2E8h IRQ 3 4 5 6 7 10 11 12 IO 200h IRQ 3 4 5 6 7 10 11 12 IO 208h IRQ 3 4 5 6 7 10...

Page 55: ...User s Manual EMX BSWP User s Manual 55 3 6 2 5 H W Monitor Item Options Description Smart Fan Function Enabled Disabled Default Enable or Disable Smart Fan ...

Page 56: ...tings Item Options Description Wake system from S5 Disabled Default Fixed Time Dynamic Time Enable or disable System wake on alarm event Select Fixed Time system will wake on the hr min sec specified Select Dynamic Time System will wake on the current time Increase minute s ...

Page 57: ...User s Manual EMX BSWP User s Manual 57 3 6 2 7 Serial Port Console Redirection Item Options Description Console Redirection Disabled Default Enabled Console Redirection Enable or Disable ...

Page 58: ...EMX BSWP User s Manual 58 EMX BSWP User s Manual 3 6 2 8 CPU Configuration Use the CPU configuration menu to view detailed CPU specification and configure the CPU ...

Page 59: ...User s Manual EMX BSWP User s Manual 59 ...

Page 60: ...Ratio 0 255 Max Freq Ratio Intel Virtualization Technology Disabled Enabled Default When enabled a VMM can utilize the additional hardware capabilities provided by Virtualization Technology Power Technology Disabled Energy Efficient Custom Default Enable the power management features ...

Page 61: ...Default Enable Disable Intel SpeedStep Turbo Mode Disabled Enabled Default Turbo Mode P STATE Coordination HW_ALL Default SW_ALL SW_ANY Change P STATE Coordination type Package C State limit C1 Default 3 6 7 Package C State limit 3 6 2 8 1 Socket 0 CPU Information ...

Page 62: ...EMX BSWP User s Manual 62 EMX BSWP User s Manual 3 6 2 9 SATA Configuration ...

Page 63: ...User s Manual EMX BSWP User s Manual 63 ...

Page 64: ...ions Description SATA Controller Disabled Enabled Default Enable Disable SATA Device SATA Mode Selection AHCI Default Determines how SATA controller operate SATA Interface Speed Gen1 Gen2 Gen3 Default Select SATA Interface Speed CHV A1 always with Gen 1 Speed ...

Page 65: ...WP User s Manual 65 Port0 1 Disabled Enabled Default Enable Disable SATA Port 3 6 2 10 Miscellaneous Configuration Item Options Description BOM Config Win8 Legacy System WIN 7 Default Yocto Linux Select OS type to install ...

Page 66: ...EMX BSWP User s Manual 66 EMX BSWP User s Manual 3 6 2 11 LPSS SCC Configuration ...

Page 67: ...User s Manual EMX BSWP User s Manual 67 ...

Page 68: ...tem Options Description SCC eMMC Support D16 F0 ACPI Mode PCI Mode Disabled Default SCC eMMC power management function support selection eMMC Secure Erase Enabled Disabled Default Disable Enable eMMC Secure Erase When enabled all the data on eMMC will ...

Page 69: ...abled SCC SDIO Support Enable Disable SCC SD Card Support D18 F0 ACPI Mode PCI Mode Default Disabled SCC SD Card Support Enable Disable eMMC Driver Operating Mode Basic Frequency Up to 26MHz Up to 52MHz Auto Detect Default Select the operating frequency in eMMC driver 3 6 2 12 Network Stack Configuration ...

Page 70: ...EMX BSWP User s Manual 70 EMX BSWP User s Manual Item Options Description Network Stack Enabled Disabled Default Enable Disable UEFI Network Stack 3 6 2 13 CSM Configuration ...

Page 71: ...User s Manual EMX BSWP User s Manual 71 ...

Page 72: ...EMX BSWP User s Manual 72 EMX BSWP User s Manual ...

Page 73: ...User s Manual EMX BSWP User s Manual 73 ...

Page 74: ...ly Default This option controls Legacy UEFI ROMs priority Network Do not launch Default UEFI Legacy Controls the execution of UEFI and Legacy PXE OpROM Storage Do not launch UEFI Legacy Default Controls the execution of UEFI and Legacy Storage OpROM Video Do not launch UEFI Legacy Default Controls the execution of UEFI and Legacy Video OpROM Other PCI devices Do not launch UEFI Default Legacy Dete...

Page 75: ...O Configuration Item Options Description SDIO Access Mode Auto Default ADMA SDMA PIO Auto Option Access SD device in DMA mode if controller supports it otherwise in PIO mode DMA Option Access SD device in DMA mode PIO Option Access SD device in PIO mode ...

Page 76: ...EMX BSWP User s Manual 76 EMX BSWP User s Manual 3 6 2 15 USB Configuration The USB Configuration menu helps read USB information and configures USB settings ...

Page 77: ...User s Manual EMX BSWP User s Manual 77 ...

Page 78: ...EMX BSWP User s Manual 78 EMX BSWP User s Manual ...

Page 79: ...legacy support if no USB devices are connected DISABLE option will keep USB devices available only for EFI applications XHCI Hand off Enabled Disabled Default This is a workaround for OSew without XHCI hand off support The XHCI ownership change should be claimed by XHCI driver USB Mass Storage Driver Support Enabled Default Enable Disable USB Mass Storage Driver ...

Page 80: ...lay Auto Default Manual Maximum time the device will take before it properly reports itself to the Host Controller Auto uses default value for a Root port it is 100ms for a Hub port the delay is taken form Hub descriptor Generic SD MMC 1 00 Auto Default Floppy Forced FDD Hard Disk CD ROM Mass storage device emulation type AUTO enumerates devices according to their media format Optical drives are e...

Page 81: ...User s Manual EMX BSWP User s Manual 81 Item Options Description Intel RMT Support Disabled Default Enabled Intel RMT Ready Mode Technology SSDT table will be loaded if enabled 3 6 3 Chipset ...

Page 82: ...EMX BSWP User s Manual 82 EMX BSWP User s Manual 3 6 3 1 North Bridge Item Option Description Max TOLUD 2 GB 3 GB Default Maximum Value of TOLUD ...

Page 83: ...User s Manual EMX BSWP User s Manual 83 3 6 3 1 1 Intel IGD Configuration ...

Page 84: ... Enabled Disabled Setting Enabled Default Disabled Enable GOP Driver will unload VBIOS Disable it will load VBIOS Primary Display IGD PCIe Auto Default Select which of IGD PCI Graphics device should be Primary Display GFX Boost Enabled Disabled Default Enable Disable GFX Boost ...

Page 85: ...User s Manual EMX BSWP User s Manual 85 3 6 3 1 2 IGD LCD Control ...

Page 86: ...EMX BSWP User s Manual 86 EMX BSWP User s Manual ...

Page 87: ...l 87 Item Option Description Active LVDS Ch7511 Enabled Default Disabled Active Internal LVDS eDP Ch7511 to LVDS CH7511 EDID Panel Option 1024x768 24 1 Default 800x600 18 1 1024x768 18 1 Port1 EDP to LVDS Chrontel 7511 Panel EDID Option ...

Page 88: ... 1920x1080 24 2 1680x1050 24 2 Brightness Control Method BIOS Default BR Button OS driver LVDS Brightness Control Method 1 BIOS 2 Brightness Button 3 Variable Resistor Note BR Button Must be use FPT 2 Pin4 and Pin6 LVDS Back Light PWM 00 25 50 75 100 Default Select LVDS back light PWM duty LVDS Back Light PWM Frequency 200 Default 300 400 500 700 1k 2k 3k 5k 10k 20k Select LVDS back light PWM Freq...

Page 89: ...User s Manual EMX BSWP User s Manual 89 3 6 3 2 South Bridge 3 6 3 2 1 Azalia Configuration ...

Page 90: ...EMX BSWP User s Manual 90 EMX BSWP User s Manual ...

Page 91: ...ction of the Azalia device Disabled Azalia will be unconditionally disabled Enabled Azalia will be unconditionally Enabled Azalia HDMI Codec Port B Enabled Default Disabled Enable Disable HDMI Port codec for Azalia AUD Gain Setting 11db 14db 19db Default 25db Select db Value of the AUD Gain 3 6 3 2 2 USB Configuration ...

Page 92: ...s Manual 92 EMX BSWP User s Manual Item Option Description XHCI Mode Enabled Default Disabled Mode of operation of xHCI controller USB Standby Power Setting Enabled Default Disabled Enabled Disabled USB Standby Power ...

Page 93: ...User s Manual EMX BSWP User s Manual 93 3 6 3 2 3 PCI Express Configuration 3 6 3 2 3 1 PCIE Express Root Port1 ...

Page 94: ...EMX BSWP User s Manual 94 EMX BSWP User s Manual ...

Page 95: ...User s Manual EMX BSWP User s Manual 95 ...

Page 96: ... EMX BSWP User s Manual Item Option Description PCI Express Root Port 1 2 3 4 Enabled Default Disabled Control the PCI Express Root Port ASPM Disabled Default L0s L1 L0sL1 Auto PCI Express Active State Power Management settings ...

Page 97: ...EMX BSWP User s Manual 97 PCIe Speed Auto Default Gen 2 Gen 1 Configure PCIe Speed CHV A1 always with Gen 1 Speed 3 6 4 Security Administrator Password Set setup Administrator Password User Password Set User Password ...

Page 98: ... EMX BSWP User s Manual 3 6 4 1 Secure Boot menu Item Option Description Secure Boot Disabled Default Enabled Secure Boot can be enabled if 1 System running in User mode with enrolled Platform Key PK 2 CSM function is disabled ...

Page 99: ...cure Boot mode selector Custom Mode enables users to change Image Execution policy and manage Secure Boot Keys 3 6 4 1 1 Key Management Item Option Description Provision Factory Default Keys Enabled Disabled Default Install Factory default Secure Boot Keys when System is in Setup Mode ...

Page 100: ...EMX BSWP User s Manual 100 EMX BSWP User s Manual 3 6 5 Boot ...

Page 101: ...User s Manual EMX BSWP User s Manual 101 ...

Page 102: ...EMX BSWP User s Manual 102 EMX BSWP User s Manual ...

Page 103: ...oard NumLock state Quiet Boot Disabled Default Enabled Enables or disables Quiet Boot option Fast Boot Disabled Default Enabled Enables or disables boot with initialization of a minimal set of devices required to launch active boot option Has no effect for BBS boot options New Boot Option Policy Default Default Place First Place Last Controls the placement of newly detected UEFI boot options Boot ...

Page 104: ...on Expert mode DQV mode Default Expert mode Switch Expert mode or DQV mode Save Changes and Reset Reset the system after saving the changes Discard Changes and Reset Any changes made to BIOS settings during this session of the BIOS setup program are discarded The setup program then exits and ...

Page 105: ... all BIOS settings to the factory default This option is useful if the controller exhibits unpredictable behavior due to an incorrect or inappropriate BIOS setting Launch EFI Shell from filesystem device Attempts to Launch EFI Shell application Shellx64 efi from one of the available filesystem devices ...

Page 106: ...WP User s Manual 106 EMX BSWP User s Manual 4 Drivers Installation Note Installation procedures and screen shots in this section are for your reference and may not be exactly the same as shown on your screen ...

Page 107: ... automatically If not locate Index htm and choose the product from the menu left Note The installation procedures and screen shots in this section are based on Windows 8 1 operation system If the warning message appears while the installation process click Continue to go on Step 3 Click Install Step1 Click Next Step 4 Click Finish to complete setup Step 2 Click Accept ...

Page 108: ...ue s products automatically If not locate Index htm and choose the product from the menu left Note The installation procedures and screen shots in this section are based on Windows 8 1 operation system Step 3 Click Next Step 1 Click Next to continue installation Step 4 Click Next Step 2 Click Yes to accept license agreement Step 5 Click Finish to complete setup ...

Page 109: ...e index page of Avalue s products automatically If not locate Index htm and choose the product from the menu left Note The installation procedures and screen shots in this section are based on Windows 8 1 operation system Step 3 Click Next Step 1 Click Next to continue setup Step 4 Click Finish to complete the setup Step 2 Click Next ...

Page 110: ...ve and it should show the index page of Avalue s products automatically If not locate Index htm and choose the product from the menu left Note The installation procedures and screen shots in this section are based on Windows 8 1 operation system Step 1 Click Next to continue setup Step 2 Click Finish to complete the setup ...

Page 111: ...d it should show the index page of Avalue s products automatically If not locate Index htm and choose the product from the menu left Note The installation procedures and screen shots in this section are based on Windows 8 1 operation system Step 1 Click Install to continue setup Step 2 Click Yes to complete the setup ...

Page 112: ...dex page of Avalue s products automatically If not locate Index htm and choose the product from the menu left Note The installation procedures and screen shots in this section are based on Windows 8 1 operation system If the warning message appears while the installation process click Continue to go on Step1 Click Next to Install Step 2 Select Finish to complete Installation ...

Page 113: ...e index page of Avalue s products automatically If not locate Index htm and choose the product from the menu left Note The installation procedures and screen shots in this section are based on Windows 8 1 operation system Step 3 Click Next Step 1 Click Next to continue installation Step 4 Click Install Step 2 Click Next Step 5 Wait while installing ...

Page 114: ...EMX BSWP User s Manual 114 EMX BSWP User s Manual Step 6 Click Finish to complete setup ...

Page 115: ...User s Manual EMX BSWP User s Manual 115 5 Mechanical Drawing ...

Page 116: ...EMX BSWP User s Manual 116 EMX BSWP User s Manual Unit mm ...

Reviews: