background image

EAX-Q77 

User’s Manual 

70 EAX-Q77 

User’s Manual 


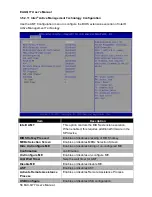
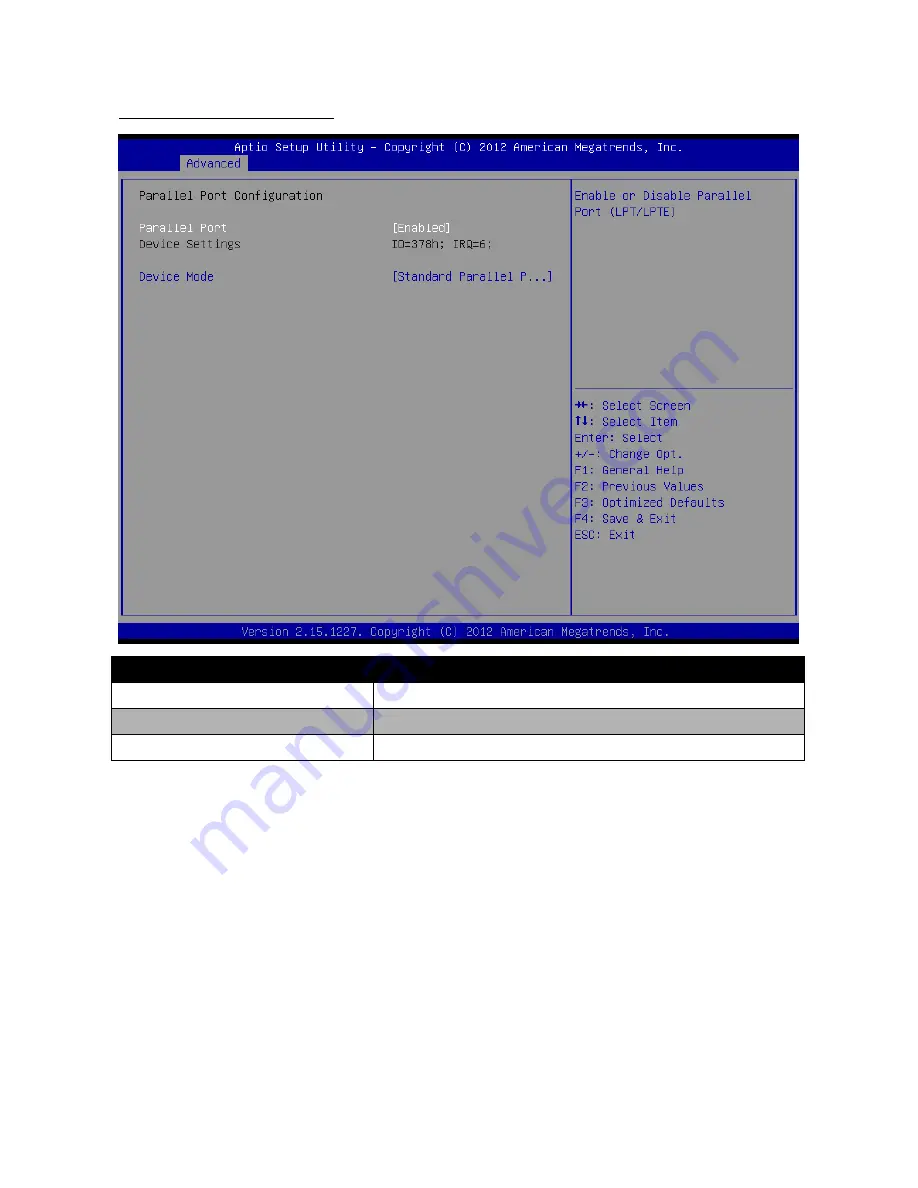
Parallel Port Configuration 


Item 

Description 

Parallel Port 

Enables or disables the parallel port.


Device Settings 

Displays the device settings.


Device Mode 

Sets the parallel port mode. 


Summary of Contents for EAX-Q77

Page 1: ...Part No E2047AQ7700R EAX Q77 Intel Q77 with Core i7 i5 i3 ATX Motherboard User s Manual 1st Ed 16 November 2012 ...

Page 2: ...ime For detailed information please always refer to the electronic user s manual Copyright 2012 Avalue Technology Inc ALL RIGHTS RESERVED No part of this document may be reproduced copied translated or transmitted in any form or by any means electronic or mechanical for any purpose without the prior written permission of the original manufacturer Brand and product names are trademarks or registere...

Page 3: ...value s product is built to the most exacting specifications to ensure reliable performance in the harsh and demanding conditions typical of industrial environments Whether your new Avalue device is destined for the laboratory or the factory floor you can be assured that your product will provide the reliability and ease of operation for which the name Avalue has come to be known Your satisfaction...

Page 4: ... 2 8226 2777 Information sales avalue com tw Service service avalue com tw Avalue Technology Inc 9 Timber Lane Marlboro NJ 07746 1443 Tel 732 414 6500 Fax 732 414 6501 Information sales avalue usa com Service support avalue usa com BCM Advanced Research Avalue Europe BCM Advanced Research an Avalue Company 7 Marconi Irvine CA92618 Tel 1 949 470 1888 Fax 1 949 470 0971 Information BCMSales bcmcom c...

Page 5: ...cement materials service time and freight Please consult your dealer for more details If you think you have a defective product follow these steps 1 Collect all the information about the problem encountered For example CPU type and speed Avalue s products model name hardware BIOS revision number other hardware and software used etc Note anything abnormal and list any on screen messages you get whe...

Page 6: ...6 2 Serial Port 2 5V 12V Power Select Jumper JCOM2 25 2 6 3 Serial Port 1 Signal Select Jumpers JRS1 JRS2 JRS3 26 2 6 4 Power Mode Select Jumper AT_CN 27 2 6 5 COM Port Headers COM2 COM3 COM4 COM5 COM6 28 2 6 6 Front Panel Audio Header F_AUDIO 30 2 6 7 USB Pin Header F_USB5 31 2 6 8 USB 3 0 Header F_USB1 F_USB2 F_USB3 F_USB3 F_USB4 32 2 6 9 CPU Fan Header CPU_FAN 33 2 6 10 Power Fan Header PWR_FAN...

Page 7: ...K_OUT 40 3 BIOS Setup 41 3 1 Introduction 41 3 2 Starting Setup 41 3 3 Using Setup 42 3 4 In Case of Problems 43 3 5 BIOS setup 43 3 5 1 Main Menu and System information 44 3 5 2 Advanced Settings 45 3 5 3 Chipset Settings 75 3 5 4 Boot Settings 77 3 5 5 Security Settings 79 3 5 6 Save and Exit Settings 81 ...

Page 8: ... ground yourself to remove any static charge before touching the CPU card Modern electronic devices are very sensitive to static electric charges As a safety precaution use a grounding wrist strap at all times Place all electronic components in a static dissipative surface or static shielded bag when they are not in the chassis 1 2 Packing List Before you begin installing the single board make sur...

Page 9: ...mmend that you read this manual carefully before attempting to install the EAX Q77 series or change the standard configurations Whilst all the necessary information is available in this manual it is recommend to contact your supplier for guidance for any queries and concern Please be aware that it is possible to create configurations within the CMOS RAM that may make booting impossible If this sho...

Page 10: ...PU overheats TPM Infineon TPM1 2 SLB9635 Expansion 4 x PCI 1 x PCIe x 16 Gen 3 1 x PCIe x 4 1 x PCIe x 1 1 x mini PCI E does not support USB signal Smart Fan Control Yes Display Chipset Intel GMA HD 4000 3000 supports DirectX 11 OpenGL 3 1 OpenCL 1 1 Dual Display HDMI VGA HDMI DVI VGA DVI VGA Max resolution 2048 x 1536 HDMI Max resolution 1920 x 1200 DVI Max resolution 1920 x 1200 Audio Chipset Re...

Page 11: ...1 SPDIF Connector 4 USB Connector supports 2 USB Ports USB2 0 1 USB Connector supports 1 USB Port USB2 0 1 CPU Fan Connector 1 System Fan Connector 1 Power Fan Connector 1 GPIO Connector 1 LPT Connector 1 LPC Connector 1 4 pin ATX Power Connector DC 12V input 1 24 pin ATX Power Connector Power Power Management ATX Power Type AT ATX mode selectable by Jumper ACPI Single power ATX Support S0 S1 S3 S...

Page 12: ...EAX Q77 User s Manual 12 EAX Q77 User s Manual 1 5 Architecture Overview Block Diagram The following block diagram shows the architecture and main components of EAX Q77 ...

Page 13: ...O 3 PCI Slot PCI3 4 Speaker Out Header SPK_OUT 5 PCI Slot PCI2 6 PCI Slot PCI1 7 PCI Express x4 Slot PCIE4X 8 System Fan Header SYS_FAN 9 PCI Express x1 Slot PCIE1X 10 PCI Express 3 0 x16 Slot PCIE16X 11 COM1 RS232 422 485 Jumpers JRS1 JRS2 JRS3 12 COM Port Header COM2 13 Serial Port 5 12V Power Select Jumper JCOM2 ...

Page 14: ...ATA 2 Connectors SATAII_1 4 25 Printer Port Header LPT 26 Power Fan Header PWR_FAN 27 Power Mode Select Jumper AT_CN 28 General Purpose I O Connector GPIO_CN 29 GPIO 15 pin header GP15_CPT 30 Mini PCI Express Slot MIN_PCIE1 31 Front Panel Header F_PANEL 32 USB 2 0 Header F_USB1 33 USB 2 0 Header F_USB2 34 USB 2 0 Header F_USB3 35 USB 2 0 Header F_USB4 36 Clear CMOS Jumper CLR_CMOS 37 USB Pin Heade...

Page 15: ...rt Green 2 DB 15 VGA Port 3 DB 9 COM Port 4 LAN RJ 45 Ports 5 Line in Port Blue 6 PS 2 Keyboard Port Purple 7 DVI I Port 8 HDMI Port 9 USB 3 0 Port 10 Microphone Pink 11 Line out Port Green This chapter describes the installation procedures including the safety precautions one must observe before installation ...

Page 16: ...g on the motherboard Only experienced electronics personnel should open the PC chassis 1 Ensure that the motherboard can fit into the chassis 2 Always unplug the power cord before installing or removing the motherboard or any of its components 3 Use a grounded wrist strap or touch a grounded object before handling any of the components 4 When attaching screws to secure the motherboard to the chass...

Page 17: ...ng steps to install the CPU Note Before installing the CPU ensure that the surface of the CPU is clean and the pins are not bent 1 Press the lever and slide it out of the hook 2 Lift to open the socket cover 3 Install the CPU making sure the gold triangle is located in the correct direction ...

Page 18: ...Manual Warning Do not force to insert the CPU into the socket If the CPU does not fit check for proper orientation Forcing the CPU into the socket may damage the CPU 4 Close the socket cover 5 Press the lever down and slide it under the hook ...

Page 19: ... 3 Installing the CPU Fan and Heat Sink Perform the following steps to install the CPU fan and heat sink 1 Apply the thermal grease onto the center of the CPU socket surface 2 Align and install the CPU fan and heat sink 3 Tighten the heat sink screws ...

Page 20: ...r s Manual 4 Connect the fan header onto the CPU fan connector on the motherboard Note Make sure the heat sink and the CPU top surface are in total contact to avoid CPU overheating problems that may cause the system to hang or be unstable ...

Page 21: ...ds 2 Align a memory module on the slot taking note of the break on the module and the slot 3 Insert the memory module completely until the retaining clips at both ends lock up and the memory module is seated in place Note 1 Do not change any of the DDR3 DIMM parameters in BIOS setup without acquiring technical information in advance 2 Static electricity can damage the electronic components of the ...

Page 22: ... nose pliers may be helpful when working with jumpers Connectors on the board are linked to external devices such as hard disk drives a keyboard or floppy drives In addition the board has a number of jumpers that allow you to configure your system to suit your application If you have any doubts about the best hardware configuration for your application contact your local distributor or sales repre...

Page 23: ...MM slot DIMM3 240 pin DDR3 DIMM slot DIMM4 240 pin DDR3 DIMM slot F_AUDIO Front panel audio header F_PANEL Front panel header F_USB1 USB 2 0 header F_USB2 USB 2 0 header F_USB3 USB 2 0 header F_USB4 USB 2 0 header F_USB5 USB pin header GP15_CPT GPIO15 pin header GPIO_CN General Purpose I O connector LPC Low pin count header LPT Printer port header MIN_PCIE1 Mini PCI Express slot PCIEX16 PCI Expres...

Page 24: ...Manual 24 EAX Q77 User s Manual Label Function SATAII_2 Serial ATA 2 connector SATAII_3 Serial ATA 2 connector SATAII_4 Serial ATA 2 connector SPDIF_O SPDIF header SPK_OUT Speaker out header SYS_FAN System fan header ...

Page 25: ...etting Jumpers Connectors 2 6 1 Clear CMOS Jumper CLR_CMOS Default Clear CMOS PINS Signal 1 GND 2 RTCRST 2 6 2 Serial Port 2 5V 12V Power Select Jumper JCOM2 5V 12V Ring Default Signal PINS Signal VCC 1 2 RI2 5V 12V NRI2 3 4 RI2 5V 12V 12V 5 6 RI2 5V 12V ...

Page 26: ...JRS2 JRS3 JRS1 Signal PINS Signal RXD232 1 2 RD1 RXD 422 3 4 RD1 RXD 485 5 6 RD1 RS232 Default RS422 RS485 JRS2 Signal PINS Signal RS485_B 1 2 RS485_A NDCD1_D 3 4 NRXD1_D NDCD1 5 6 NRXD1 JRS3 Signal PINS Signal RS422_B 1 4 NTXD1_D RS422_A 2 5 NDTR1 NDTR1_D 3 6 NTXD1 RS422 RS485 RS232 RS422 RS232 ...

Page 27: ...s Manual 27 RS422 485 Pin Mapping PIN RS 232 RS 482 RS 422 1 DCD TXD TXD 2 RXD TXD TXD 3 TXD RXD 4 DTR RXD 5 GND GND GND 6 DSR 7 RTS 8 CTS 9 RI 2 6 4 Power Mode Select Jumper AT_CN PIN Signal 1 AT_PWR_F_BTN 2 PWRBT_F 3 NC AT ATX Default ...

Page 28: ...5 COM Port Headers COM2 COM3 COM4 COM5 COM6 COM2 Signal PIN PIN Signal NDCD2 1 2 NRXD2 NTXD2 3 4 NDTR2 GND 5 6 NDSR2 NRTS2 7 8 NCTS2 RI2 5V 12V 9 10 NC COM3 Signal PIN PIN Signal NDCD3 1 2 NRXD3 NTXD3 3 4 NDTR3 GND 5 6 NDSR3 NRTS3 7 8 NCTS3 NRI3 9 10 NC ...

Page 29: ...X Q77 User s Manual 29 COM4 Signal PIN PIN Signal NDCD4 1 2 NRXD4 NTXD4 3 4 NDTR4 GND 5 6 NDSR4 NRTS4 7 8 NCTS4 NRI4 9 10 NC COM5 Signal PIN PIN Signal NDCD5 1 2 NRXD5 NTXD5 3 4 NDTR5 GND 5 6 NDSR5 NRTS5 7 8 NCTS5 NRI5 9 10 NC ...

Page 30: ...M6 Signal PIN PIN Signal NDCD6 1 2 NRXD6 NTXD6 3 4 NDTR6 GND 5 6 NDSR6 NRTS6 7 8 NCTS6 NRI6 9 10 NC 2 6 6 Front Panel Audio Header F_AUDIO F_AUDIO Signal PIN PIN Signal MIC_L 1 2 AGND MIC_R 3 4 ACZ_DET HPOUT_R 5 6 SRTN1 FAUDIO_JD 7 HPOUT_L 9 10 SRTN2 ...

Page 31: ...T Active low when an Intel HD Audio dongle is connected HPOUT_R_H Front panel headphone right channel HPOUT_L_H Front panel headphone left channel SRTN1 Jack detection for front panel microphone SRTN2 Jack detection for front panel headphone FAUDIO_JD Front panel jack detect 2 6 7 USB Pin Header F_USB5 F_USB5 PIN Signal 5 USB Power 4 FUSBP12 3 FUSBP12 2 GND 1 GND ...

Page 32: ...r FUSBP5 3 4 FUSBP4 FUSBP5 5 6 FUSBP4 GND 7 8 GND 10 GND F_USB2 Signal PIN PIN Signal USB Power 1 2 USB Power FUSBP7 3 4 FUSBP6 FUSBP7 5 6 FUSBP6 GND 7 8 GND 10 GND F_USB3 Signal PIN PIN Signal USB Power 1 2 USB Power FUSBP9 3 4 FUSBP8 FUSBP9 5 6 FUSBP8 GND 7 8 GND 10 GND F_USB4 Signal PIN PIN Signal USB Power 1 2 USB Power FUSBP11 3 4 FUSBP10 FUSBP11 5 6 FUSBP10 GND 7 8 GND 10 GND ...

Page 33: ...r s Manual EAX Q77 User s Manual 33 2 6 9 CPU Fan Header CPU_FAN CPU_FAN PIN Signal 1 GND 2 12V 3 TACH_CPUFAN 4 PWM_CPUFAN 2 6 10 Power Fan Header PWR_FAN PWR_FAN PIN Signal 1 GND 2 12V 3 TACH_PWRFAN 4 PWM_PWMFAN ...

Page 34: ...System Fan Header SYS_FAN SYS_FAN PIN Signal 1 GND 2 12V 3 TACH_SYSFAN 4 PWM_SYSFAN 2 6 12 Low Pin Count Header LPC LPC Signal PIN PIN Signal LAD0 1 2 VCC3 LAD1 3 4 PFMRST LAD2 5 6 LFRAME LAD3 7 8 LPCCLK33_LPC SERIRQ 9 10 GND VCC 11 12 GND 5VDUAL 13 14 GND ...

Page 35: ...l PWRBT_F 1 2 GND SYS_RST 3 4 GND MPD 5 6 GND SATALED 7 8 HD INTRUDER 9 10 GND STB_LED 11 12 STB_LED 2 6 14 General Purpose I O Connector GPIO_CN GPIO_CN Signal PIN PIN Signal PCH_GPIO1 1 2 PCH_GPIO49 PCH_GPIO6 3 4 PCH_GPIO19 PCH_GPIO7 5 6 PCH_GPIO21 PCH_GPIO17 7 8 PCH_GPIO22 SMBCLK 9 10 SMBDATA VCC 11 12 GND ...

Page 36: ...l 2 6 15 Printer Port Header LPT LPT Signal PIN PIN Signal LPT1 1 2 LPT14 LPT2 3 4 ERR LPT3 5 6 LPT16 LPT4 7 8 LPT17 LPT5 9 10 GND LPT6 11 12 GND LPT7 13 14 GND LPT8 15 16 GND LPT9 17 18 GND ACK 19 20 GND BUSY 21 22 GND PE 23 24 GND SLCT 25 26 GND ...

Page 37: ...EAX Q77 User s Manual EAX Q77 User s Manual 37 2 6 16 ME Firmware Update Jumper ME_DIS ME_DIS PIN Signal 1 VCC3_DSW 2 HAD_SDOUT 2 6 17 GPIO 15 Pin Header GP15_CPT GP15_CPT PIN Signal 1 GPIO15 2 GND ...

Page 38: ... 18 SATA 3 Connectors SATAIII_1 SATAIII_2 SATAIII_1 SATAIII_2 SATAIII_1 PIN Signal 7 GND 6 SATAIIIRX0P 5 SATAIIIRX0N 4 GND 3 SATAIIITX0N 2 SATAIIITX0P 1 GND SATAIII_2 PIN Signal 7 GND 6 SATAIIIRX1P 5 SATAIIIRX1N 4 GND 3 SATAIIITX1N 2 SATAIIITX1P 1 GND ...

Page 39: ...1 PIN Signal 7 GND 6 SATAIIRX0P 5 SATAIIRX0N 4 GND 3 SATAIITX0N 2 SATAIITX0P 1 GND SATAII_2 PIN Signal 7 GND 6 SATAIIRX1P 5 SATAIIRX1N 4 GND 3 SATAIITX1N 2 SATAIITX1P 1 GND SATAII_3 PIN Signal 7 GND 6 SATAIIRX2P 5 SATAIIRX2N 4 GND 3 SATAIITX2N 2 SATAIITX2P 1 GND SATAII_4 PIN Signal 7 GND 6 SATAIIRX3P 5 SATAIIRX3N 4 GND 3 SATAIITX3N 2 SATAIITX3P 1 GND ...

Page 40: ...EAX Q77 User s Manual 40 EAX Q77 User s Manual 2 6 20 SPDIF Header SPDIF_O SPDIF_O PIN Signal 1 VCC 2 3 SPDIF 4 GND 2 6 21 Speaker Out Header SPK_OUT SPK_OUT PIN Signal 1 OUT_R 2 OUT_R 3 OUT_L 4 OUT_L ...

Page 41: ...ver to the operating system While the BIOS is in control the Setup program can be activated in one of the two ways By pressing Del immediately after switching the system on or By pressing the Del key when the following message appears briefly at the bottom of the screen during the POST Power On Self Test Press DEL to enter SETUP If the message disappears before you respond and you still wish to en...

Page 42: ...age and return to Main Menu key Increase the numeric value or make changes key Decrease the numeric value or make changes F1 key General help F2 key Previous values F3 key Optimized defaults F4 key Save and exit setup Navigating Through The Menu Bar Use the left and right arrow keys to choose the menu you want to be in Note Some of the navigation keys differ from one screen to another To Display a...

Page 43: ...rd and your systems manufacturer to provide the absolute maximum performance and reliability Even a seemingly small change to the chipset setup has the potential for causing you to use the override 3 5 BIOS setup Once you enter the BIOS Setup Utility the Main Menu will appear on the screen The Main Menu allows you to select from several setup functions and exit choices Use the arrow keys to select...

Page 44: ... to record some basic hardware configurations in your computer and set the system clock Item Description System Date Use the system Date option to set the system date Manually enter the day month and year System Time Use the system time option to set the system time Manually enter the hours minutes and seconds ...

Page 45: ...EAX Q77 User s Manual EAX Q77 User s Manual 45 3 5 2 Advanced Settings This section allows you to configure the CPU and other system devices for basic operation through its sub menus ...

Page 46: ...ices to be decoded in the above 4G address space Note Only if the system supports 64 bit PCI decoding PCI Latency Timer Controls how long the PCI device can hold the bus before another takes over It is recommended to set this to a mid range value VGA Palette Snoop Enables or disables VGA palette snooping PERR Generation Enables or disables PCI devices to generate PERR SERR Generation Enables or di...

Page 47: ...vice No Snoop option Maximum Payload Sets the maximum payload of PCI Express Devices Maximum Read Request Enables or disables the boot option for legacy network devices ASPM Support Enables or disables SPM support Enabling ASPM may cause some PCI E devices to fail Extended Synch Enables or disables generation of Extended Synchronization patterns Link Training Retry Sets the link training retry Lin...

Page 48: ... Use the APCI Settings menu to configure the ACPI sleep state when the system is suspended Item Description ACPI Sleep State Sets the sleep state that the system enters when it is suspended S3 Video Repost Enables or disables users to invoke VA BIOS POST during S3 mode ...

Page 49: ...EAX Q77 User s Manual EAX Q77 User s Manual 49 3 5 2 3 S5 RTC Wake Settings Use the S5 RTC Wake Settings menu to enable or disable the system to wake up on a specified time ...

Page 50: ... 4 Trusted Computing Use the Trusted Computing menu to view the current TCP status and enable or disable the system to support security devices When the Security Device Support field is set to Disabled the operating system will not show security devices ...

Page 51: ...Cores Sets the active processor cores Limit CPUID Maximum Enables or disables limitation of maximum CPUID Execute Disable Bit Enables or disables execution of disabled bit Intel Virtualization Technology Enables or disables Intel Virtualization Technology which utilizes the additional hardware capabilities Hardware Prefetcher Enables or disables hardware prefetching Adjacent Cache Line Prefetch En...

Page 52: ... 52 EAX Q77 User s Manual Primary Plane Current Value Sets the maximum instantaneous current allowed for the primary plane Secondary Plane Current Value Sets the maximum instantaneous current allowed for the secondary plane ...

Page 53: ...figuration Use the SATA Configuration menu to view and configure SATA devices Item Description SATA Controller s Enables or disables Serial ATA controller SATA Mode Selection Sets the SATA mode IDE Legacy Native Mode Selection Sets the IDE mode to Legacy or Native ...

Page 54: ... 3 5 2 7 Intel Rapid Start Technology Use the Intel Rapid Start Technology menu to enable or disable this feature The Intel Rapid Start Technology enables the system to get up and run faster from the deepest sleep saving time and power consumption ...

Page 55: ... Execution Technology Configuration Use the Intel TXT LT Configuration menu to enable or disable support of this feature Item Description Secure Mode Extensions SMX Enables or disables secure mode extensions Intel TXT LT Support Enables or disables Intel TXT LT support ...

Page 56: ... to view the firmware version mode type and other information as well as configure MDES BIOS Status Code and re flash ME firmware image Item Description MDES BIOS Status Code Enables or disables MDES BIOS status code Firmware Update Configuration Enables or disables firmware ME firmware image re flash function ...

Page 57: ...or disable this feature in BIOS However this feature is available for testing only Item Description Intel Anti Theft Technology Enables or disables Intel Anti Theft Technology Intel Anti Theft Technology Rec Sets the number of Intel Anti Theft Technology record Enter Intel AT Suspend Mode Enables or disables the system to enter suspend mode when theft is detected ...

Page 58: ...e in the SPI device BIOS Hotkey Pressed Enables or disables pressing of BIOS hotkey MEBx Selection Screen Enables or disables MEBx Selection Screen Hide Un Configure ME Confirmation Enables or disables hiding of un configured ME confirmation Un Configure ME Enables or disables un configure ME Amt Wait Timer Sets the wait timer for AMT Disable ME Enables or disables disable ME ASF Enables or disabl...

Page 59: ... EAX Q77 User s Manual 59 Item Description PET Progress Enables or disables PET Progress AMT CIRA Timeout Sets AMT CIRA Timeout WatchDog Enables or disables WatchDog OS Timer Sets the OS timer BIOS Timer Sets the BIOS timer ...

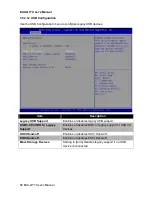
Page 60: ...cription Legacy USB Support Enables or disables legacy USB support USB 3 0 Port DOS Legacy Support Enables or disables DOS or legacy support of USB 3 0 devices XHCI Hand off Enables or disables XHCI Hand off EHCI Hand off Enables or disables EHCI Hand off Mass Storage Devices Setting to Auto disables legacy support if no USB device is connected ...

Page 61: ...13 F81214 Super I O Configuration COM1 COM2 Use the F81214 Super I O Configuration COM1 COM2 menu to configure serial ports 1 and 2 Select the Serial Port number to configure and then press the Enter key The Serial Port number Configuration screen appears ...

Page 62: ...EAX Q77 User s Manual 62 EAX Q77 User s Manual Serial Port 1 Configuration Item Description Serial Port Enables or disables the serial port Device Settings Displays the device settings ...

Page 63: ...EAX Q77 User s Manual EAX Q77 User s Manual 63 Serial Port 2 Configuration Item Description Serial Port Enables or disables the serial port Device Settings Displays the device settings ...

Page 64: ...14 F81214 Super I O Configuration COM3 COM4 Use the F81214 Super I O Configuration COM3 COM4 menu to configure serial ports 3 and 4 Select the Serial Port number to configure and then press the Enter key The Serial Port number Configuration screen appears ...

Page 65: ...EAX Q77 User s Manual EAX Q77 User s Manual 65 Serial Port 3 Configuration Item Description Serial Port Enables or disables the serial port Device Settings Displays the device settings ...

Page 66: ...EAX Q77 User s Manual 66 EAX Q77 User s Manual Serial Port 4 Configuration Item Description Serial Port Enables or disables the serial port Device Settings Displays the device settings ...

Page 67: ... Configuration menu to configure serial ports 5 and 6 and the parallel port Select the port to configure and then press the Enter key If one of the serial ports is selected the Serial Port number Configuration screen appears If Parallel Port Configuration is selected the Parallel Port Configuration screen appears ...

Page 68: ...EAX Q77 User s Manual 68 EAX Q77 User s Manual Serial Port 5 Configuration Item Description Serial Port Enables or disables the serial port Device Settings Displays the device settings ...

Page 69: ...EAX Q77 User s Manual EAX Q77 User s Manual 69 Serial Port 6 Configuration Item Description Serial Port Enables or disables the serial port Device Settings Displays the device settings ...

Page 70: ...s Manual 70 EAX Q77 User s Manual Parallel Port Configuration Item Description Parallel Port Enables or disables the parallel port Device Settings Displays the device settings Device Mode Sets the parallel port mode ...

Page 71: ...Description CPU FAN Fail Detect Enables or disables CPU fan fail detection System FAN Fail Detect Enables or disables system fan fail detection Power FAN Fail Detect Enables or disables power fan fail detection CPU SMART FAN Control Enables or disables CPU smart fan control SYS SMART FAN Control Enables or disables system smart fan control POWER SMART FAN Control Enables or disables power smart fa...

Page 72: ...al 72 EAX Q77 User s Manual 3 5 2 17 Platform Miscellaneous Configuration Use the Platform Miscellaneous Configuration menu to enable or disable PCI Express Native support This option is available only in Windows Vista OS ...

Page 73: ...EAX Q77 User s Manual EAX Q77 User s Manual 73 3 5 2 18 Intel Smart Connect Technology Use the Intel Smart Connect Technology menu to enable or disable this feature ...

Page 74: ...er Management PPM Item Description EIST Enables or disables Intel SpeedStep The Intel SpeedStep feature allows the system to dynamically adjust the processor voltage and core frequency which can decrease average power consumption and heat production CPU C3 Report Enables or disables CPU C3 report CPU C6 Report Enables or disables CPU C6 report ...

Page 75: ...EAX Q77 User s Manual EAX Q77 User s Manual 75 3 5 3 Chipset Settings This section allows you to configure the chipset settings ...

Page 76: ...alue Enables or disables the watchdog timer value LAN1 Controller Enables or disables LAN1 controller LAN1 PXE ROM Enables or disables LAN1 PXE ROM LAN2 Controller Enables or disables LAN2 controller LAN2 PXE ROM Enables or disables LAN2 PXE ROM Wake on LAN Enables or disables the system to wake on via LAN Modem Ring On Enables or disables modem to ring System Agent Configuration Enables or disabl...

Page 77: ...ate Sets the keyboard NumLock state during boot up Quiet Boot Enables or disables quiet boot Fast Boot Enables or disables fast boot GateA20 Active Sets the GateA20 mode Option ROM Messages Sets the option for ROM messages INT19 Trap Response Sets the INT19 trap response action time CSM parameters Sets the Compatibility Support Module CSM options See below ...

Page 78: ...rt Module CSM Item Description Launch CSM Enables or disables launching of CSM Boot option filter Sets the CSM boot option filter Launch Storage OpROM policy Sets the storage OpROM policy when launching CSM Launch Video OpROM policy Sets the video OpROM policy when launching CSM Other PCI device ROM priority Sets other PCI device ROM priority ...

Page 79: ...EAX Q77 User s Manual EAX Q77 User s Manual 79 3 5 5 Security Settings This section allows you to configure the security settings such as passwords and secure boot ...

Page 80: ...Item Description Administrator Password Sets the administrator password User Password Sets the user password Case Open Enables or disables opening of case detection Security option Sets the security option Secure Boot Enables or disables secure boot ...

Page 81: ...d Reset Discards any modifications and then resets the system Save Options Saves the options Save Changes Saves the modifications Discard Changes Discards the modifications and restores the current settings Restore Defaults Restores the factory default settings Save as User Defaults Saves the current settings as user default settings Restore User Defaults Restores the user default settings Launch ...

Reviews: