Avalonix 94200h User Manual Download Page 58


52 

Digital Video Recorder User Manual 

Step 5: Open IE browser, input IP address, or dynamic domain name and enter. If HTTP port is not 80, add the port number 
after IP address or domain name. 
Step 6: IE will download ActiveX automatically. Then a window pops up and asks for user name and password. Input name and 
password correctly, and enter to view. 


Note: If you cannot download and install ActiveX, please refer to Appendix A FAQ Q8.


2. Connect the DVR to internet directly. 

Step 1: Enter into the DVR’s Main Menu

Setup

Network interface to enable PPPoE and then input user name and password 

received from your ISP. Next, click ‘Apply’. The DVR will connect to the server and would give a confirmation message.   
Step 2: When accessing the remote interface of DVR, user can input WAN IP to access directly (user can enter into Main 
menu

Information

Network interface to check IP address). The browser will download Active X control 


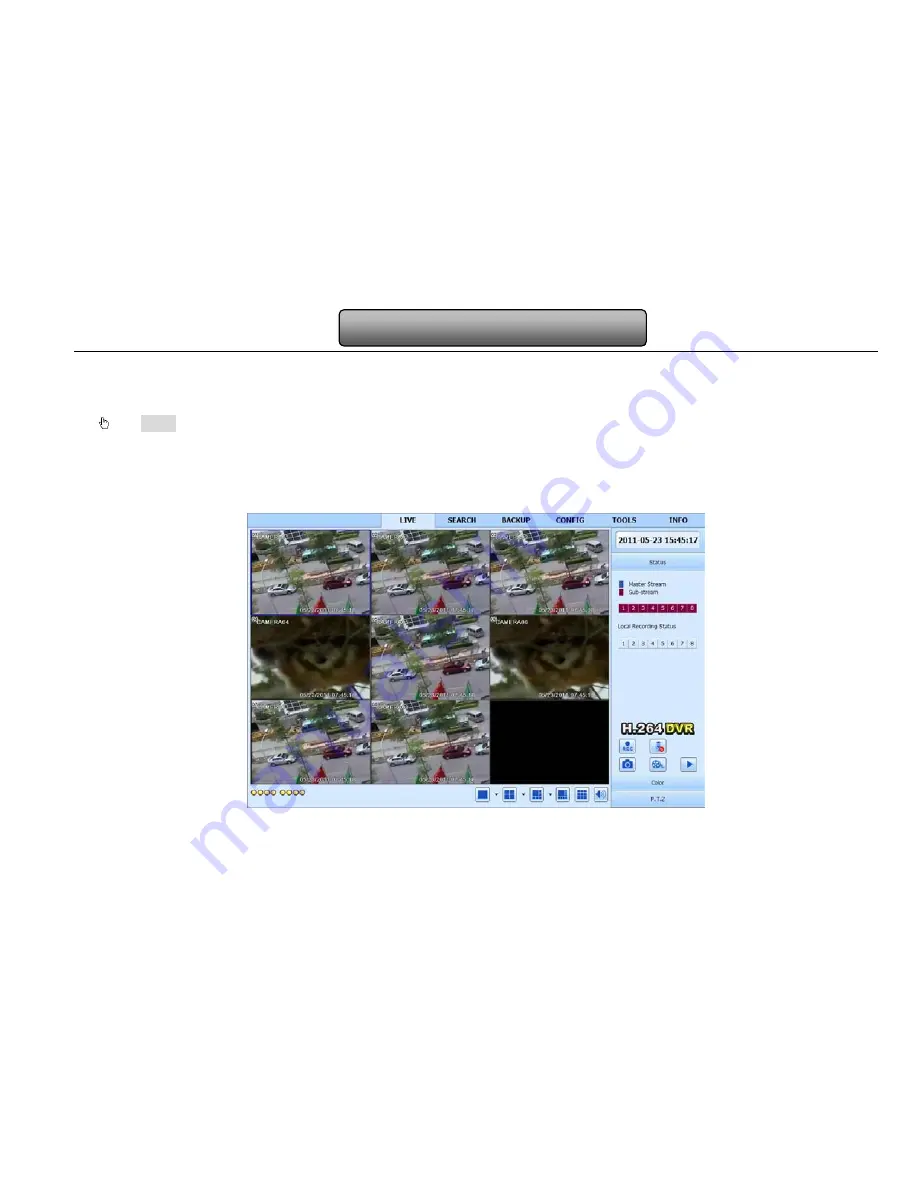
Fig 7-1 View with IE browser 

Summary of Contents for 94200h

Page 1: ...DVR User Manual For H 264 4 8 channel digital video recorder All rights reserved...

Page 2: ...ith a dry cloth Do not block any ventilation openings And ensure well ventilation around the machine Do not power off the DVR at normal recording condition The correct operation to shut off DVR is to...

Page 3: ...el Descriptions 5 2 3 Rear Panel Instructions 6 2 3 1 Rear Panel Interface 6 2 4 Remote Controller 8 2 5 Control with Mouse 10 2 5 1 Connect Mouse 10 2 5 2 Use Mouse 10 3 Basic Function Instruction 11...

Page 4: ...stream 21 4 3 3 Time 22 4 3 4 Stamp 23 4 3 5 Recycle record 24 4 3 6 Snap 24 4 4 Schedule configuration 24 4 4 1 Schedule 25 4 4 2 Motion 26 4 4 3 Sensor 26 4 5 Alarm configuration 27 4 5 1 Sensor 27...

Page 5: ...6 Manage DVR 49 6 1 Check system information 49 6 1 1 System information 49 6 1 2 Event information 49 6 1 3 Log information 49 6 1 4 Network information 49 6 1 5 Online information 49 6 2 Disk manage...

Page 6: ...iPhone mobile clients 71 8 4 The installation operation methods for Android mobile clients 80 8 5 Installation and operation Methods for BlackBerry Mobile phone Client 87 8 5 1 Installation instructi...

Page 7: ...emote control mobile view by phones etc which ensure its powerful functions and high stability Due to these distinctive characteristics it is widely used in banks telecommunication transportation fact...

Page 8: ...h mode time search event search and image search Support deleting and locking the recorded files one by one Support remote playback in Network Client through LAN or internet ALARM 1 channel alarm outp...

Page 9: ...to do remote view Support setup client connection amount Support dual stream Network stream is adjustable independently to fit the network bandwidth and environment Support picture snap and color adj...

Page 10: ...drives Please use the hard drive the manufacturers recommend specially for security and safe field 2 Please calculate HDD capacity according to the recording setting Please refer to Appendix B Calcula...

Page 11: ...e in setup 2 Enter backup mode in live SEARCH Enter search mode PLAY PAUSE 1 Enter play interface 2 Suspend playback FF Fast forward REW Rewind STOP ESC 1 Quit play mode 2 Exit the current interface o...

Page 12: ...ideo input channels from 1 4 3 Audio out Audio output connect to the sound box 4 Video out Connect to monitor 5 P Z Connect to speed dome 6 K B Connect to keyboard 7 ALARM OUT 1 ch relay output Connec...

Page 13: ...3 Audio out Audio output connect to the sound box 4 Video out Connect to monitor 5 P Z Connect to speed dome 6 K B Connect to keyboard 7 ALARM OUT 1 ch relay output Connect to external alarm 8 5V and...

Page 14: ...checking as following 1 Check batteries poles 2 Check the remaining charge in the batteries 3 Check IR controller sensor is mask If it still doesn t work Please change a new remote controller to try o...

Page 15: ...ller to control single DVR it s not necessarily to reset the device ID user can do operation directly when control multiple DVR with remote controller please refer to below steps Step1 Activate remote...

Page 16: ...want to input the value move cursor to the blank and click An input window will appear as Fig2 6 It supports digitals letters and symbols input Fig 2 6 Digital Numbers and Letters Input Window Users...

Page 17: ...o exit After the device power on if there is no menu or only has live image display user can long press ESC button to switch Notice this serial device can only display menu on VGA monitor or BNC monit...

Page 18: ...t Fig 3 1 Login Notice the default user name and password is admin and 123456 The concrete operation steps for change password add or delete user please refer to Fig 4 7 User management configuration...

Page 19: ...3 Digital Video Recorder User Manual 3 3 1 Live playback Click Play button to playback the record Refer to Figure3 3 User can do concrete operation by click the buttons on screen Fig 3 3 live playback...

Page 20: ...ck the channel which needs to amplify Click the right mouse select Zoom in button and then click the left mouse to amplify the image Press left mouse to drug the cursor user can view the image Double...

Page 21: ...e device name device ID video format max network users VGA resolution and language The definitions for every parameters display as below Device name the name of the device It may display on the client...

Page 22: ...te Step1 enter into system configuration basic configuration time date refer to Fig 4 4 Step2 set the date format time format time zone in this interface tick off sync time with NTP server to refresh...

Page 23: ...p camera name adjust colors brightness hue saturation and contrast Step1 enter into system configuration live configuration live refer to Fig 4 6 Note Click Camera Name to display a soft keyboard User...

Page 24: ...fault setting click OK button to save the setting Step4 user can setup all channels with same parameters Tick off all to do relevant setup Step5 click default button to resort default setting click ap...

Page 25: ...to save the setting click exit button to exit current interface 4 2 3 Spot Step1 enter into system configuration live configuration Spot refer to Fig 4 9 Fig 4 9 live configuration Spot Step2 select...

Page 26: ...mask Setup mask area click Setting button to enter into live image Press left mouse and drag mouse to set mask area referring to below picture Click Apply button to save the setting Delete mask area s...

Page 27: ...default setting click apply button to save the setting click exit button to exit current interface 4 3 2 Record stream Step1 enter into system configuration record configuration record bit rate refer...

Page 28: ...ptions 10s 15s 20s 30s 60s 120s 180s and 300s Expire time the hold time of saved records If the set date is overdue the record files will be deleted automatically Step2 user can setup all channels wit...

Page 29: ...r can overlap the channel name and time stamp on video Step1 enter into system configuration record configuration stamp refer to Fig 4 14 Fig 4 14 record configuration stamp Step2 tick off camera name...

Page 30: ...ation record configuration recycle record Step2 tick off recycle record to enable the recycle record function It will cover the earlier recorded files and keep recoding when HDD is full if disenabled...

Page 31: ...schedule Step2 select channel double click and a dialog box will pop up as Fig 4 16 Then user can edit week schedule Fig 4 16 schedule week schedule Click add button to add a certain day schedule clic...

Page 32: ...are familiar with schedule user can refer to 4 4 1 Schedule for details Fig 4 17 schedule configuration motion Note the default schedule of motion detection is full selected that is the color of sche...

Page 33: ...into system configuration alarm configuration sensor basic refer to Fig 4 19 Step2 enable sensor alarm and set the alarm type according to triggered alarm type Two option NO and NC Step3 user can setu...

Page 34: ...gned email box To alarm out When selecting the channel there will be triggered alarm out in the designated channel Click OK button to save the setting click Exit button to exit the current interface T...

Page 35: ...nus motion and schedule Motion Step1 enter into system configuration alarm configuration motion Please refer to Fig 4 23 Fig 4 23 alarm configuration motion Step2 enable motion alarm and set alarm hol...

Page 36: ...st its value according to the practical conditions click icon to set the whole area as detection area click icon and then the set detection area will be cleared click icon to test whether the sensitiv...

Page 37: ...channels with same parameters Step4 click apply button to save the setting click exit button to exit current interface Fig4 25 alarm configuration schedule Fig 4 26 alarm configuration video loss 4 5...

Page 38: ...exit button to exit current interface Fig4 27 other alarm 4 5 5 Alarm out Alarm out includes three sub menus alarm out schedule and buzzer Alarm out Step1 enter into system configuration alarm out re...

Page 39: ...yping IP address in IE address blank i e set HTTP port to 82 IP address http 192 168 0 25 user needs to input that address http 192 168 0 25 82 into IE browser Server port communication port Step3 Aft...

Page 40: ...o system configuration network configuration email refer to Fig 4 31 SMTP Server Port the name and port number of SMTP server After selecting This server requires a secure connection SSL user can setu...

Page 41: ...After selecting it the system will attach images when sending the emails Fig 4 31 network configuration email 4 6 4 Other settings Step1 enable DDNS server user needs to input user name password and...

Page 42: ...Wizard dialog box will pop up as shown as below picture press Next to continue After finished the installation of configuring components the UPnP icons will display Users can double click certain icon...

Page 43: ...example Note Users can self define the hostname username and password Input www dyndns com in the IE address bar user can access the domain name registration interface Click Create Free Hostname to re...

Page 44: ...DNS and select Dyndns at the DDNS Sever pull down list box and input user name and password Enter into configuration interface of the router to map the server port and IP address if the user enables U...

Page 45: ...r management configuration Step1 enter into system configuration user management configuration refer to Fig 4 33 Step2 After clicking Add button a dialog box will pop up as Fig 4 34 Fig 4 33 user mana...

Page 46: ...and binding PC MAC address Step4 select the user that user wants to delete in the user list box and then click Delete button to delete this user Step5 click Change password button to modify the passwo...

Page 47: ...k exit button to exit current interface Definitions and descriptions of network stream Advance Step1 enter into system configuration P T Z configuration advance refer to Fig 4 37 Parameter Meaning Add...

Page 48: ...a in the preset set interface click Setting button to see a window as Fig 3 39 Fig 4 39 preset set setting b user can control the dome rotates up up left down right down left left down right and up r...

Page 49: ...r right key can remerge it click icon to exit the current interface d in the preset interface click OK button to save the setting click Exit button to exit current interface Step3 in the Advance inter...

Page 50: ...k Exit button to exit current interface Step4 in the Advance interface click track Setting button to pop up a dialog box as Fig 4 42 Fig 4 42 track set a user can control the dome rotates up up left d...

Page 51: ...rch configuration time search Step2 select channel screen display mode the highlight date in the calendar means have record data Step3 select a date and press Search button Click the time grid to set...

Page 52: ...ation event search referring to Fig 5 2 Fig 5 2 Search configuration event search Step2 After clicking Search button the searched event information will displayed in the event list box User can select...

Page 53: ...will not be deleted or covered Unlock select a locked file and click Lock button to unlock this file Delete select an unlocked file and click Delete button to delete this file Step3 tick off All butt...

Page 54: ...2 Remote backup Step1 enter into backup configuration refer to Fig 5 4 Fig 5 4 backup configuration Step2 set the start end time select channels and click Search button to display the searched data in...

Page 55: ...files a character will show behind the channel ID 6 1 3 Log information In this interface user can check relevant log information according to set date User can export the data files into mobile stora...

Page 56: ...tric material of the disk analysis the potential problems of the disk and warn so as to protect its data 6 3 Upgrade At present it only supports USB update Get the software from your vendor when there...

Page 57: ...port is not 80 other number instead need add the port number after IP address For example set HTTP port as 82 need input IP address like 192 168 0 25 82 User name and password here are the same with...

Page 58: ...ad and install ActiveX please refer to Appendix A FAQ Q8 2 Connect the DVR to internet directly Step 1 Enter into the DVR s Main Menu Setup Network interface to enable PPPoE and then input user name a...

Page 59: ...2 bit mode so the safari browser shall start 32 bit mode If the browser is the earlier MACOS version the default setting is 32 bit mode and the setting can be skipped The Setting steps are as follows...

Page 60: ...54 Digital Video Recorder User Manual 7 2 1 On LAN Step 1 After starting Apple computer click icon The following window will pop up Please select System Preferences Internet Wireless click Network...

Page 61: ...e to manually input IP address Subnet Mask and Gateway according to the configuration of PC The network segment should be the same as the PC If using DHCP please enable DHCP in the DVR and router Step...

Page 62: ...to enter into the login interface of DVR 7 2 2 On WAN There are also two ways for DVR to connect to Internet 1 Connect the DVR to internet through router or virtual server Step 1 The network setups a...

Page 63: ...preview interface Fig 7 2 Remote live preview interface Symbol and function Definitions Channel indicator Screen display mode Volume Snapping picture Start manual record Start IE record Bidirectional...

Page 64: ...those picture in the Remote Preview interface Configuration Local configuration Color adjustment Drag the slide bar to adjust Brightness Contrast Hue and Saturation Click Default to reset them to orig...

Page 65: ...e right means the dome stop rotating Drag the scroll bar to adjust rotating speed of the dome Iris button Click button near Iris button to increase light of the dome Click button near Iris button to d...

Page 66: ...io enable or disenable audio Full screen the live preview picture will display with full screen the tool bar will be hided double click left mouse or click right mouse to return Zoom in Single channel...

Page 67: ...gital Video Recorder User Manual Fig 7 5 Play record file interface This DVR supports remote time search event search and file management By Time Search Step1 Enter into Search time search refer to Fi...

Page 68: ...eans have record data click those data select the record channels in area Step3 User can set the data playing time and display mode in the area as requi red Step4 Select certain item from the data inf...

Page 69: ...63 Digital Video Recorder User Manual Fig 7 7 Time search playback By Event Search Step1 Enter into Search event search refer to Fig 7 8...

Page 70: ...he highlight date and select record channels and then tick off the event type motion and sensor Click search button Step3 the events will be display in the event list box Double click certain item to...

Page 71: ...nd click Lock button to lock this file that ca not be deleted or overlaid Unlock select a locked file and click unlock button to unlock this file Delete select an unlock file and click delete button t...

Page 72: ...backup files click browse button to set the save path and then click backup button to start backup The backup files will be saved on user s PC 7 5 Remote System Configuration User can remote setup the...

Page 73: ...rs of a certain item others cannot setup this one Click Config to enter into the below interface refer to Fig 7 11 Fig 7 11 remote menu setup The sub menu lists and the options in every item are simil...

Page 74: ...on the DVR and refer to Chapter 4 6 Network configuration The below is the use instructions on mobile client end for two OS 8 1 By Phones with Windows mobile Step1 Firstly activate the network access...

Page 75: ...ight 8 2 By Phones with Symbian Please use the smart phones with symbian version supported by this unit The detail information is as follows Symbian S40 support Symbian UIQ support Symbian S80 support...

Page 76: ...me window will pop up and requires a package Click the software name to download Step4 A security windows will pop up after downloading and ask if install the package Click YES to install Step5 A Scam...

Page 77: ...ill connect the server and display pictures Refer picture in the left Notice User name and password here are the same with that used on the DVR The default is admin and 123456 Step10 In Live View user...

Page 78: ...72 Digital Video Recorder User Manual Step 3 Click SuperCam enter into introduce interface and then click FREE it will change into INSTALL...

Page 79: ...ep 4 Input iTunes Store password and then click OK the software will be installed automatically Note if it was the first time for user to operate please enter user ID if there is no Store account user...

Page 80: ...C and then login Step 2 Connect iPhone and PC Step 3 Enable search function to search SuperCam Step 4 Click free application button Step 5 Input apple ID and password then click acquire Step 6 Tick of...

Page 81: ...Click Remember server to save the setting click button can quick input saved server address user name and password 2 Main Interface Playback playback record file Image image view Log log record Serve...

Page 82: ...Current viewing channel Mark 2 Channel status Switch channels PTZ click to switch to Fig 2 interface Snap picture Record Close the video of the current channel Live audio Switch to the single image Sw...

Page 83: ...s the PTZ Stop rotating the PTZ Zoom In Focus In Iris Add Zoom Out Focus Out Iris Sub Preset elect the preset point Group Set the cruise line Speed Rotate speed of the PTZ H Reverse Horizontal Reverse...

Page 84: ...78 Digital Video Recorder User Manual Click the record file to playback 6 Server list Interface...

Page 85: ...isk space when the disk space is less than setup value the video will be stopped Display config Display mode User can select one live picture display or four live picture displays Remember display ord...

Page 86: ...80 Digital Video Recorder User Manual 8 4 The installation operation methods for Android mobile clients Software Installation Step 1 run Google Market program Step 2 search SuperCam...

Page 87: ...ideo Recorder User Manual Step 3 press Install button Step 4 click OK button Step 5 user can view the download and install process in notifications finished download the software will install automati...

Page 88: ...the setting click button can quick input saved server address user name and password Main menu Live view Playback playback record file Image image view Log log record Server List device list Live live...

Page 89: ...rk 1 Current viewing channel Mark 2 Channel status Switch channels PTZ click to switch to Fig 2 interface Snap record talk Live audio Full screen Return Upward rotates the PTZ Downward rotates the PTZ...

Page 90: ...Out Focus Out Iris Sub Preset Select the preset point Group Set the cruise line Image view Record playback Fig 3 Fig 4 Click the record file Fig 3 to playback Fig 4 Previous Next Zoom out Delete Zoom...

Page 91: ...85 Digital Video Recorder User Manual Server list Config interface...

Page 92: ...rameters of mobile video This function can be valid only insert SD card Path Save path for mobile video files the default catalog is SDCard Click button to change path Reserved disk space reserved SDC...

Page 93: ...t 8 5 1 Installation instruction for BlackBerry Mobile phone Client 1 Open the browser of BlackBerry phone and enter sever address 2 Click SuperCam to link 3 Click Download button on the popup interfa...

Page 94: ...3 Modify the option of Browser Configuration 1 Enter into Menu Option Browser Configuration configure referring to the following figure 2 Enter into Menu Option Cache Operations clear up browser cach...

Page 95: ...d Click Remember server to save the setting click button can quick input saved server address user name and password 2 Main interface Playback playback record file Image image view Live live view Log...

Page 96: ...90 Digital Video Recorder User Manual 3 Live view...

Page 97: ...h to Fig 2 interface Snap Full screen Background alarm Stop rotating the PTZ Upward rotates the PTZ Downward rotates the PTZ Leftward rotates the PTZ Rightward rotates the PTZ Zoom In Focus In Iris Ad...

Page 98: ...92 Digital Video Recorder User Manual 6 Information view...

Page 99: ...is not enough Please remove the HDD or change an adapter to try b The video format of the DVR is different from that of the monitor c Connection problem Please check the cable and the ports of monitor...

Page 100: ...one Q7 Cannot use mouse a wait 1 2 minutes after mouse connected b Not detected Plug unplug several times c The mouse is incompatible Please change a mouse Q8 Cannot download ActiveX control a IE brow...

Page 101: ...ain Second possible reason It is forced to stop because hard disk has disabled track which causes the system checking hard disk cannot skip Solution Change another new hard disk or reformat the broken...

Page 102: ...ows XP SP2 above VISTA DirectX 9 0 Q12 How to handle the situation when codec Control is blocked to install in the VISTA or Win7 system If user gets this problem may have two ways to fix it a Enter Co...

Page 103: ...28k 56 PAL CIF 25 Highest 1M 466 Higher 768k 295 Medium 512k 235 Low 384k 175 Lower 256k 112 Lowest 128k 56 4 The calculation format is Total Recording capacity Used space per hour MB h coverage rate...

Page 104: ...Seagate Barracuda LP ST3200542AS 2TB Seagate Barracuda 7200 11 ST31500341AS 1 5T Seagate SV35 3 ST31000340SV 1T Seagate Pipeline HD 2 500G Seagate Barracuda 7200 10 320G Seagate Barracuda 7200 10 ST32...

Page 105: ...Rate 100FPS PAL 120FPS NTSC Record Frame Rate 100FPS PAL 120FPS NTSC Audio input 8dB 22k RCA X4 Audio output 8Db 92dB RCA X1 Alarm input NO or NC 4CH Alarm output 1CH Record Mode Manual Sensor Timer...

Page 106: ...Rate 200FPS PAL 240FPS NTSC Record Frame Rate 200FPS PAL 240FPS NTSC Audio input 8dB 22k RCA X8 Audio output 8Db 92dB RCA X1 Alarm input NO or NC 8CH Alarm output 1CH Record Mode Manual Sensor Timer...

Reviews: