background image

Installation Instructions 

Installation Instructions 

1.


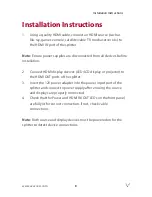
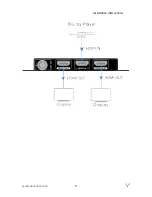
Using a quality HDMI cable, connect an HDMI source (such as 
Blu-ray, games console, satellite/cable TV, media server etc.) to 
the HDMI IN port of the splitter. 


Note:

 Ensure power supplies are disconnected from all devices before 

installation. 
 
2.


Connect HDMI display devices (LED/LCD display or projector) to 
the HDMI OUT ports of the splitter. 

3.


Insert the 12V power adapter into the power input port of the 
splitter and connect to power supply after ensuing the source 
and displays are properly connected. 

4.


Check that the Power and HDMI IN/OUT LEDs on the front panel 
are fully lit for correct connection. If not, check cable 
connections. 

 
Note:

 Both source and display devices must be powered on for the 

splitter to detect device connections.   

www.avaccess.com


Summary of Contents for 4KSP12-P

Page 1: ...4KSP12 P HDMI 2 0 Splitter 1 x 2 User Manual ...

Page 2: ...right to make improvements to this document and or product at any time and without notice Copyright Copy Reproduce Distribute and or Edit of this document or part of it as well as utilization of its contents and communication thereof to others without express authorization are prohibited Offenders will be held liable for payment of damages All rights created by patent grant or registration of a ut...

Page 3: ... ventilation openings with newspapers tablecloths curtains or similar items Do not install near any heat sources such as radiators heat registers stoves or other apparatus including amplifiers that produce heat Do not place sources of naked flames such as lighted candles on the unit Clean this apparatus only with dry cloth Unplug this apparatus during lightning storms or when unused for long perio...

Page 4: ...Table of Contents Overview 2 Package Contents 2 Front Panel 4 Rear Panel 5 EDID Management 6 Installation Instructions 8 Specification 10 Warranty 12 www avaccess com 1 ...

Page 5: ...MI source reliably outputs correct content for display It is an ideal choice for applications which require the distribution of an HDMI source signal to multiple outputs Distributes one HDMI sources to 2 HDMI displays HDMI 2 0 with 4K 60Hz 4 4 4 8 bit and HDCP 2 2 compliant Input output HDMI cable length up to 10m for 1080P 4K Threaded power port for locking or standard 12V DC connection Front pan...

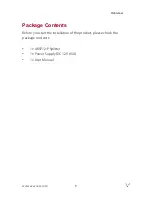
Page 6: ...Overview Package Contents Before you start the installation of the product please check the package contents 1 x 4KSP12 P Splitter 1 x Power Supply DC 12V 0 5A 1 x User Manual www avaccess com 3 ...

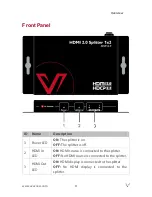
Page 7: ...ter is on OFF The splitter is off 2 HDMI In LED ON HDMI source is connected to the splitter OFF No HDMI source is connected to the splitter 3 HDMI Out LED ON HDMI display is connected to the splitter OFF No HDMI display is connected to the splitter www avaccess com 4 ...

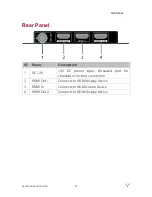
Page 8: ...cription 1 DC 12V 12V DC power input threaded port for standard or locking connection 2 HDMI Out1 Connects to HDMI display device 3 HDMI In Connects to HDMI source device 4 HDMI Out2 Connects to HDMI display device www avaccess com 5 ...

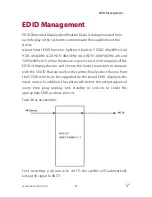
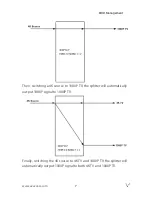
Page 9: ... it will compares all the EDID of display devices and choose the lowest resolution to compare with the 5 EDID that are built in the splitter finally select the one from the 5 EDID which can be supported by the lowest EDID display to the input source In addition the splitter will detect the output signals of every time plug unplug sink standby or sink on to select the appropriate EDID as above proc...

Page 10: ...4K source to 1080P TV the splitter will automatically output 1080P signal to 1080PTV Finally switching the 4K source to 4K TV and 1080P TV the splitter will automatically output 1080P signal to both 4K TV and 1080PTV www avaccess com 7 ...

Page 11: ...DMI display devices LED LCD display or projector to the HDMI OUT ports of the splitter 3 Insert the 12V power adapter into the power input port of the splitter and connect to power supply after ensuing the source and displays are properly connected 4 Check that the Power and HDMI IN OUT LEDs on the front panel are fully lit for correct connection If not check cable connections Note Both source and...

Page 12: ...Installation Instructions www avaccess com 9 ...

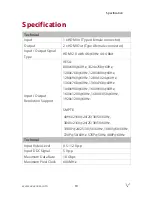
Page 13: ...768 60Hz 1280x768 60Hz 1280x800 60Hz 1280x960 60Hz 1280x1024 60Hz 1360x768 60Hz 1366x768 60Hz 1440x900 60Hz 1600x900 60Hz 1600x1200 60Hz 1680x1050 60Hz 1920x1200 60Hz SMPTE 4096x2160 24 25 30 50 60Hz 3840x2160 24 25 30 50 60Hz 1080P 24 25 30 50 60Hz 1080I 50 60Hz 720P 50 60Hz 576P 50Hz 480P 60Hz Technical Input Video Level 0 5 1 2 Vp p Input DDC Signal 5 Vp p Maximum Data Rate 18 Gbps Maximum Pixe...

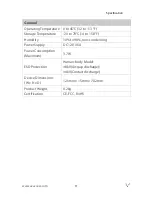
Page 14: ... C 4 to 158 F Humidity 10 to 90 non condensing Power Supply DC 12V 0 5A Power Consumption Maximum 3 7 W ESD Protection Human body Model 8kV Air gap discharge 4kV Contact discharge Device Dimensions W x H x D 126mm x 15mm x 70 2mm Product Weight 0 2kg Certification CE FCC RoHS www avaccess com 11 ...

Page 15: ...he product is repaired dismantled or altered by anyone that is not from an AVAccess Technology Limited authorized service partner The defects are caused by the fact that the product is used or handled improperly roughly or not as instructed in the applicable User Guide 4 The defects are caused by any force majeure including but not limited to accidents fire earthquake lightning tsunami and war 5 T...

Page 16: ...AV Access Technology Limited V1 0 2 ...

Reviews: