

This photo shows the backlight bulb completely removed from its guide in
the panel’s main electronics housing.
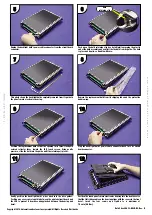
Remove the replacement bulb from its shipping tube and the protective
bubble wrap.
Plug the backlight bulb’s power cable connector back into its circuit
board connector.
Position the replacement bulb so that the opening in its three-sided gold
colored reflector faces toward the LCD touch screen. Using gentle
pressure, slide the bulb into the guide until the retaining clip locks.
Gently position the backlight bulb’s wires back into the wire guides.
Position any excess wire length in between the printed circuit board and
the LCD to prevent it from becoming pinched between the housing and
bezel.
Position the touch panel’s main electronics housing into the front bezel so
that the flat ribbon cable on the housing aligns with the recess in the front
bezel. Insert the four screws and tighten to a maximum of
70 oz-in [0.5 Nm].
Data Sheet: EA-12-BULB-DS, Rev. D
Copyright 2014,
Automationdirect.com
Incorporated/All Rights Reserved Worldwide
8
8
8
8
7
7
7
7
9
9
9
9
1
1
1
1
0
0
0
0
1
1
1
1
1
1
1
1
1
1
1
1
2
2
2
2
w
w
w
.
a
u
t
o
m
a
t
i
o
n
d
i
r
e
c
t
.
c
o
m
/
c
-
m
o
r
e
1
-
8
0
0
-
6
3
3
-
0
4
0
5
Unplug the backlight bulb’s power cable connector from the circuit board
connector.
Push up on the bulb retaining clip (see detail) while grasping the plastic
end of the bulb assembly and gently slide the bulb from its guide. The bulb
is glass and fragile, so handle with care.
6
6
6
6
5
5
5
5
Bulb
retaining clip


