background image

8

to the port.  When attaching the dust bag, push it onto 

the dust port firmly as far as it will go to prevent it from 

coming off during operation.

For the best results, empty the dust bag when it 

becomes approximately half full, tapping it lightly to 

remove as much dust as possible.

Notes:

 Prevent dust accumulation at the workplace. 

Dusts can easily ignite.

Operation

WARNING: 

Observe correct mains voltage! The voltage 

of the power source must agree with the voltage specified 

on the nameplate of the machine.

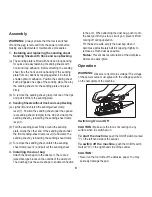
Switching On and Off

CAUTION: 

Make sure the tool is not resting on any 

surface when it is switched on.

To start the machine,

 push the On/Off siwtch marked 

“I” on the left hand side of the sander.

To switch off the machine,

 push the On/Off switch 

marked “O” on the right hand side of the sander.

CAUTION:

• Never run the tool without the abrasive paper. You may 

seriously damage the pad.

Assembly

WARNING: 

 Always ensure that the tool is switched 

off and the plug is removed from the power point before 

making any adjustments or maintenance procedures.

1.  


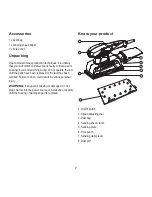
Installing and replacing the sanding sheet 

Sanding Sheets with Hook and Loop Backing

(a)  The sanding plate is fitted with hook and loop backing 

for quick and easy fastening of sanding sheets with 

hook and loop adhesion. Before attaching the sanding 

sheet, free the hook and loop backing of the sanding 

plate from any debris by tapping against it in order to 

enable optimum adhesion. Position the sanding sheet 

flush alongside one edge of the sanding plate, then lay 

the sanding sheet onto the sanding plate and press 

firmly.

(b)  To remove the sanding sheet, grasp it at one of the tips 

and pull it off from the sanding plate.

2.  Sanding Sheets without Hook and Loop Backing 

(a)  Lightly lift and unlatch the sanding-sheet clamp 

lever(

7

).  Position the sanding sheet under the opened 

rear sanding sheet clamp(4) to the stop and clamp the 

sanding sheet by reinserting the sanding-sheet clamp 

lever(

7

).

(b)  Fold the sanding sheet firmly around the sanding 

plate. Guide the other end of the sanding sheet under 

the front sanding-sheet clamp lever(

7

) and clamp the 

sanding sheet by reinserting the sanding-sheet clamp.

(c)  To remove the sanding sheet, unlatch the sanding-

sheet clamp lever(

7

) and pull out the sanding sheet.

3.  Installing the dust bag

Attach the dust bag onto the dust port. There are 2 

raised bar-type blocks on the outside of the dust port. 

The dust bag has the same shape to enable connection 

Summary of Contents for SA200-A

Page 1: ...INSTRUCTION MANUAL SA200 A 200W 1 3 SHEET SANDER ...

Page 2: ...r email help globalpowerbrands com or call 1800 909 909 CONTENTS Warranty Power Tools 2 Introduction 3 Description of symbols 3 Specifications 3 General safety rules 4 Safety Warnings for Sander 6 Accessories 7 Unpacking 7 Know your product 7 Assembly 8 Operation 8 Using the sander 9 Using the hole punch 9 Selecting the right grade of sandpaper 9 Maintenance 10 Lubrication 10 ...

Page 3: ...ia hook and loop 90 x 187mm Attachment via clamping 90 x 230mm Net weight 1 55 kg Length of cordset 2 m Introduction Your new AUTOMATIC power tool will more than satisfy your expectations It has been manufactured under stringent AUTOMATIC Quality Standards to meet superior performance criteria You will find your new tool easy and safe to operate and with proper care it will give you many years of ...

Page 4: ...ction Protective equipment such as dust mask non skid safety shoes hard hat or hearing protection used for appropriate conditions will reduce personal injuries This tool is double insulated There are two independent barriers of insulation to protect you from the possibility of electric shock General safety rules WARNING Read all safety warnings and all instructions Failure to follow the warnings a...

Page 5: ...ess they have been given supervision or instruction concerning use of the appliance by a person responsible for their safety c Prevent unintentional starting Ensure the switch is in the off position before connecting to power source and or battery pack picking up or carrying the tool Carrying power tools with your finger on the switch or energising power tools that have the switch on invites accid...

Page 6: ...ice with a residual current rating of 30mA or less Wear goggles Wear ear muffs Wear a breathing mask i Children should be supervised to ensure that they do not play with the appliance 5 Service a Have your power tool serviced by a qualified repair person using only identical replacement parts This will ensure that the safety of the power tool is maintained b Follow instruction for lubricating and ...

Page 7: ...roduction techniques it is unlikely that your AUTOMATIC Power Tool is faulty or that a part is missing If you find anything wrong do not operate the tool until the parts have been replaced or the fault has been rectified Failure to do so could result in serious personal injury WARNING If any part is missing or damaged do not plug t he tool into the power source or install any accessory until the m...

Page 8: ... and Loop Backing a The sanding plate is fitted with hook and loop backing for quick and easy fastening of sanding sheets with hook and loop adhesion Before attaching the sanding sheet free the hook and loop backing of the sanding plate from any debris by tapping against it in order to enable optimum adhesion Position the sanding sheet flush alongside one edge of the sanding plate then lay the san...

Page 9: ...ng try either going back to a coarser grade and sanding the marks out before recommencing with the original choice of grit or try using a new piece of Never force the tool Excessive pressure may decrease the sanding efficiency damage the abrasive paper or shorten tool life Hold the tool firmly Turn the tool on and wait until it attains full speed Then gently place the tool on the workpiece surface...

Page 10: ...arious types of commercial solvents and may be damaged by their use Use a clean cloth to remove dirt dust oil grease etc WARNING Do not allow brake fluids gasoline petroleum based products penetrating oils etc to come into contact with plastic parts They contain chemicals that can damage weaken or destroy plastic WARNING DO NOT attempt to modify tools or create accessories Any such alteration or m...

Page 11: ...11 DISTRIBUTED BY Global Power Brands International Pty Ltd PO Box 413 Mooroolbark VIC 3138 ABN 39 131 999 914 Ph 1800 909 909 help globalpowerbrands com ...

Reviews: