


Owner Installation Instructions
GDO-7v2 SecuraLift®
19
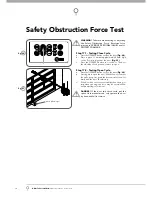
Adjusting Safety Obstruction Force
The Safety Obstruction Force is calculated automatically
during setup. Adjusting this is normally only necessitated
by environmental conditions such as windy or dusty areas,
and areas with extreme temperature changes.
WARNING:
Doors requiring over 400N of force to
move must have P.E. Beams fi tted for safety.
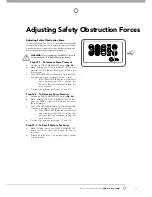
Step 18.1 - To Increase Force Pressure
Hold down FORCE MARGIN SET button
(Fig. 26)
While holding the FORCE MARGIN SET button,
press the PLUS (+) button. Each press increases the
force margin.
The OPEN LIMIT LED will fl ash each time the PLUS
(+) button is pressed to indicate a force increase
If the OPEN LIMIT LED fl ashes continuously
when pressing the PLUS (+) button this
indicates that the maximum setting has
been reached.
Test the force again as per Steps 17.1 and 17.2
Step 18.2 - To Decrease Force Pressure
Hold down FORCE MARGIN SET button
(Fig. 26)
While holding the FORCE MARGIN SET button,
press the MINUS (-) button. Each press decreases
the force margin.
The CLOSE LIMIT LED will fl ash each time the MINUS
(-) button is pressed to indicate a force increase
If the OPEN LIMIT LED fl ashes continuously
when pressing the PLUS (+) button this
indicates that the maximum setting has
been reached.
Test the force again as per Steps 17.1 and 17.2
Step 18.3 - To Recall Factory Set Force
While holding down the FORCE MARGIN SET
button, press the LIMIT SET button for two (2)
seconds.
Release both buttons. The default setting should
now be recalled.
a.
b.
c.
•
d.
a.
b.
c.
•
a.
a.
b.
26
fi g
Adjusting Safety Obstruction Forces


