


GDO-11V3 Ero
TM
Home Owner’s Manual
4
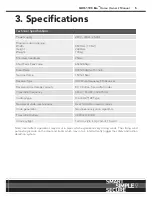
Warranty
Two (2) year/5,000 cycles full parts and labour
warranty on motor, electronics and mechanical
components of the opener when installed by an
Automatic Technology Dealer.
TrioCode
TM
128 Technology
Only transmitters with the TrioCode
TM
128
Technology can operate with the latest GEN2
Openers, reducing the chance of interference from
other radio frequency sources. TrioCode
TM
128
transmitters have the ability to code into earlier
model openers.
Code Hopping Technology
Every time a transmitter is used a new security
code is generated from over 100 billion possible
code combinations. This greatly enhances the
security of the system and makes “code grabbing”
a thing of the past!
Multi-Channel Transmitter
Multi-channel transmitters allow you to operate
other devices such as an adjoining garage door
or automated gate from the same handy unit.
S-ALPS (Semi Automatic Limits
Positioning System)
The S-ALPS system does away with manual
adjustment of the door’s limits position using
mechanical parts, such as cams and microswitches.
ISS (intelligent safety obstruction
system)
While the door is performing a close cycle,
should it hit an obstacle or be restricted in some
manner, it will automatically reverse. The amount
of force the door should encounter before
reversing is automatically adjusted by the doors
control system during the initial installation of the
automatic door opener. The door will also stop if
restricted whilst opening. The Safety Obstruction
Force should be checked monthly
.
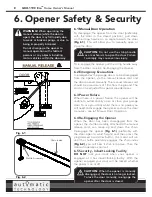
Manual Release
The manual release handle allows the door to
be operated by hand in the event of a power
failure.
Self Locking
There is no need to manually lock your garage
door, as the opener ‘positively’ locks the door
when closed.
Service Fault Indicator
Flashing LEDs on the control panel easily identify
operational problems or service requirements.
Dynamic Door Profiling
Changing door characteristics are automatically
compensated for and “learnt” with each
operation of the door.
Safety Beam (optional)
The opener has an input to connect a Safety
Beam for extra safety.
Vacation Mode
A transmitter can be programmed to disable
the garage door opener radio receiver. This is
ideal if the door is to be left idle for prolonged
periods. (Refer to 8.2 for information)
Pet (Pedestrian) Mode
A transmitter can be programmed to open
the door partially to allow pets access to the
garage. The default PET Mode height can be
adjusted to a desired position. (Refer to 7.4 for
information). To code a transmitter button to
operate PET mode refer to 8.4 for information.
Courtesy Light
The courtesy light comes on automatically for
three minutes whenever the door is activated.
The courtesy light automatically switches
on for approximately three (3) minutes
when operating the door. This can also
be programmed to turn on and off from a
transmitter. (Refer to 8.5 for information)
2. Features