background image


3


1.4. Initialization 


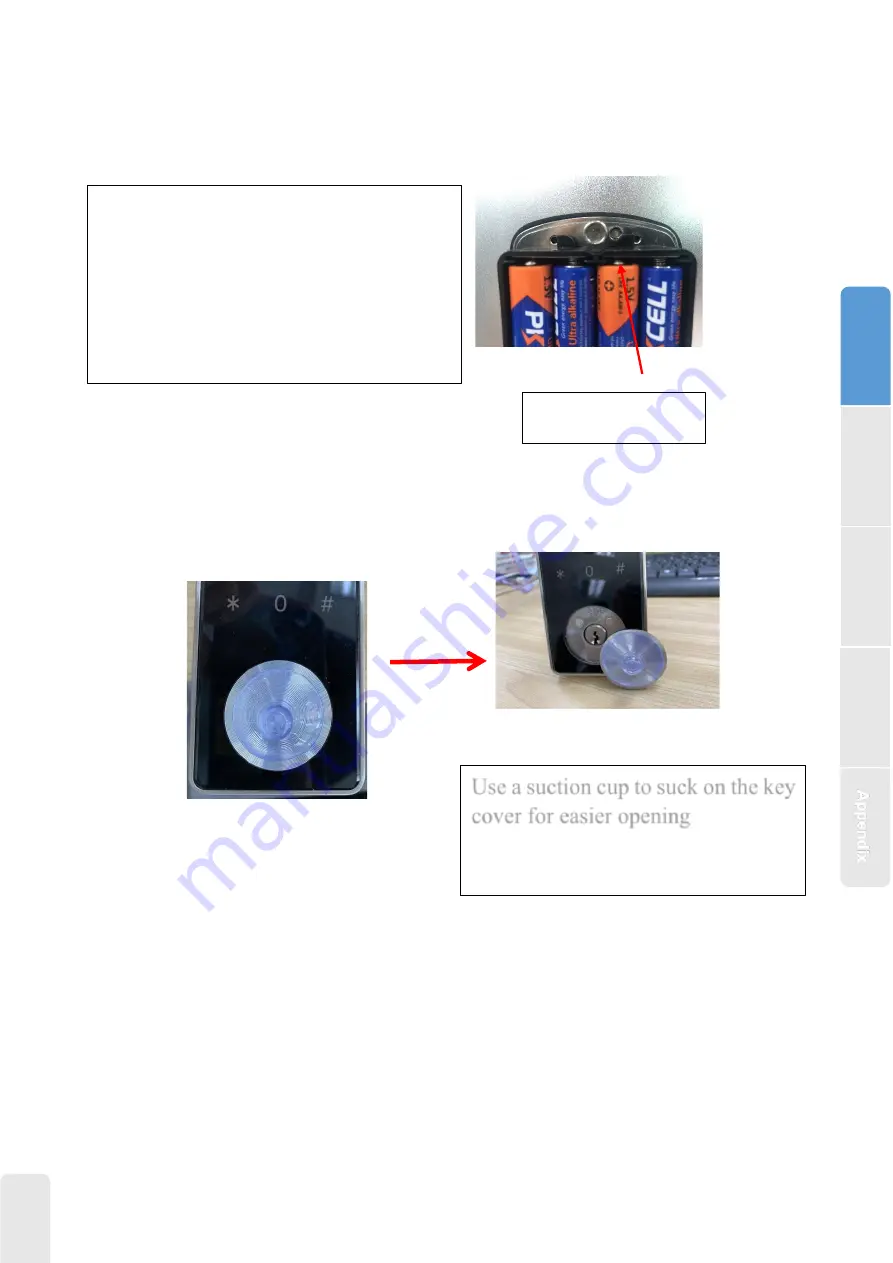
Tip: How to open the key cover? 


2.Installation 

  2.1Confirm opening direction


Use a suction cup to suck on the key 
cover for easier opening 

Long  press  the  reset  button  on  the  back  of  the 

front  panel  for  about  3s,  input  “000#”,  the 

initialization is successful when the buzzer short 

beep twice. 


Reset Button 

In

trod
u

c

tio

n


Intr
od
uc
tio

n


O

pe
rat
io

n


F&
Q


Ins
tal

lati
on
 

Summary of Contents for T11

Page 1: ...cal keys please keep outdoor just in case keys lock in doors 2 Please replace for the battery when low wattage alarm 3 Reading this manual carefully before installation and keep it for future reference Smart Dead Lock User Manual ...

Page 2: ...tubs M4 30mm 3 2 Back Panel 1 10 Screw Stubs M4 40mm 3 3 Mortise 1 11 Mortise Screws M4 25mm For Wooden Door 4 4 Card 3 12 Mortise Screws M5 10mm For Aluminum Door 4 5 Mechanical Key 2 13 M4 10mm Screws For Fixing Back Panel 4 6 Waterproof Rubber Plate 2 14 M4 30mm Screw 3 7 User Manual 1 15 M4 50mm Screw 3 8 Strike Strike Box 1 1 16 Sucker 1 Introduction Operation F Q Installation ...

Page 3: ...e 6V 4x AA Batteries Lock Weight 2 0KG Door Thickness to Fit 35 60mm Unlocking Way Bluetooth Fingerprint option Password Card Mechanical key Data Capacity Fingerprint 200 Password 150 Card 200 Color Silver Black Working Temperature 10 55 Low Wattage Alarm Less than 4 8V Working Humidity 0 95 Introduction Operation F Q Installation ...

Page 4: ... direction Use a suction cup to suck on the key cover for easier opening Long press the reset button on the back of the front panel for about 3s input 000 the initialization is successful when the buzzer short beep twice Reset Button Introductio Introduction Operation F Q Installation ...

Page 5: ...ep pull in 3 What is left open This we called left open show as image 4 Change to L or R position in the PCB of back panel 5 Deadbolt knob Attention Any of above is improper set will cause problem 2 2 Installation Diagram Step1 Install Mortise Step2 Install Screws Casing and Water Rubber Plate ...

Page 6: ... and Water Rubber Plate Step5 Connecting Front and Back Panels Step6 Fixed Back Panel Step7 Install Batteries Step8 Cover the battery box 3 Operation Introduction Operation F Q Installation Spindle always keep horizontal The deadbolt always keep PULL IN ...

Page 7: ...k needs to be added by the app after entering the add mode Generally a lock that has not been added as long as the lock keyboard is touched it will enter the add mode The default password is 123456 if not added by the phone H11 The software iOS version can be downloaded from the app store and the Android version can be downloaded from the application store of Google play Yingyongbao Baidu Ali 360 ...

Page 8: ... single clear cycle and custom You can share the Passcode to other user via WeChat SMS Email Messenger WhatsApp 3 4 3 Send e Key Click on the as shown in figure you can send the eKey to other users of Auslock to authorize the unlock the receiver must be download the APP and set up an account Select e key format Timed permanent One time Recurring Enter recipient s account of Auslock set the name an...

Page 9: ...to be performed by the APP beside the lock The fingerprint expiration data can be set it can be permanent or it can be limited After setting you can modify its validity period 3 4 6 e Key management Click The manager can delete ekey reset ekey send and adjust the ekey meanwhile he can search the lock record 3 4 7 Passcode management Click All generated passwords can be viewed and managed in the pa...

Page 10: ...ely view and calibrate the lock clock read the unlock record Meanwhile it can remotely delete and modify the password 3 5 1 Add Gateway 3 6 Electronic Locking Button Introduction Operation F Q Installation 1 If you want to have the Electronic Locking function first turn on privacy lock on the app 2 When the button is in the red state it is in the locked state and can only be unlocked through the a...

Page 11: ...s of the lock body are squeezed and the re wire 5 Unable to register fingerprint Check the fingers for dirt or wear check the fingerprint head on the lock for dirt and oil stains etc Check to see if the fingerprint is working properly Press to see if there is any responds 6 What is the reason why the smart lock consumes fast power a Large standby power consumption b Short circuit 7 There is no res...

Page 12: ...k net Customer Full Name Customer Contact No Place of Purchase store Purchase Date Product Name Product Model Note 1 Please keep this card so that you can use it when you need warranty service 2 We provide you with a one year warranty from the date of purchase Visit auslock net for Further Details 3 This warranty service is valid for customers in any country in the world ...

Reviews: