background image

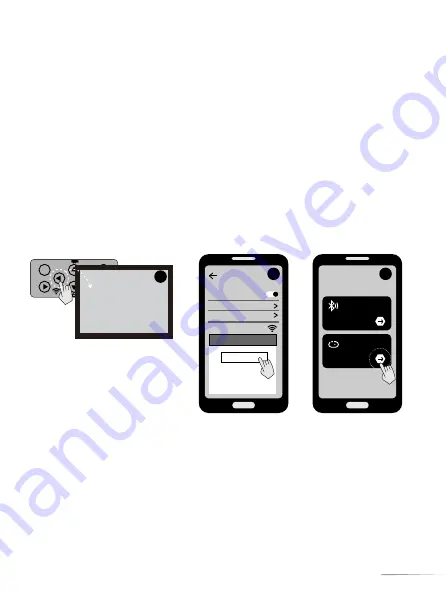
4.you can also open the WIFI on camera  Manually turn on WIFI: 
Schritt 1. Schalten Sie die Kamera in den „TEST“-Modus;

Schritt  2.  Drücken  Sie  die Taste  ◄.  Die  Kamera  wechselt  in  den  Wi-Fi-Modus. 
Auf dem Bildschirm wird „Wait for connecting“ angezeigt.

Schritt  3.  Öffnen  Sie  die App  „VENARI“  auf  Ihrem  Telefon  und  klicken  Sie  auf 
„Connect device Wi-Fi“.

Schritt  4.Für  Android-Telefone  wird  das  Fenster  für  die  Wi-Fi-Verbindung 
automatisch  auf  Ihrem  Telefon  angezeigt.  Aber  für  IOS-Smartphones  sollten 
Sie das Fenster Wi-Fi-Verbindung manuell öffnen. Suchen Sie die Wi-Fi-Hotline 
namens  „T C J48K1W“,  wählen  Sie  sie  aus  und  geben  Sie  das  Passwort 
„12345678“ ein, um eine Verbindung herzustellen. Wenn die Wi-Fi-Verbindung 
erfolgreich  hergestellt  wurde,  zeigt  die  Kamera  „WIFI  connected“  auf  dem 
Bildschirm an.

MENU

SHOT

OK

REPLAY

WIFI

wait for connection

SSID: TJ48K1W
Password: 12345678

WLAN

WLAN

View help

Network acceleration

ON

More settings

TJ48K1W

CONNECT

FORGET

CONCEL

Hunting Cam Pro

Connect device Wi-Fi

No device connected

Bluttooth turns on
Wi-Fi

TJ48K1W 

3

2

1

HINWEIS:

1. Wenn das WIFI auf eine Verbindung wartet, blinkt die Kontrollleuchte häufig

.

2.  Nachdem  die  WIFI-Verbindung  erfolgreich  war,  blinkt  die  Kontrollleuchte 
einmal alle 1S

5. In der APP können Sie eine Vorschau des aufgenommenen Bildes in Echtzeit 
a n z e i g e n ,  Vi d e o s  a u f n e h m e n ,  B i l d e r  a u f n e h m e n ,  M e n ü e i n s t e l l u n g e n , 
Dateiwiedergabe/-download/-löschen  und  Dateien  herunterladen,  können  im 
APP-Album angezeigt und gelöscht oder geteilt werden individuell.

25

Summary of Contents for G Series

Page 1: ...WIFI TRAIL CAMERA USER MANUAL Please read this guide carefully before use and keep it well for future reference Android IOS ...

Page 2: ...Contents 01 09 10 18 19 27 28 36 37 45 English Francais Deutsch Español 日本語 ...

Page 3: ...3 Fixing nut 4 DC interface 5 Lens 6 Infrared light 7 PIR indicator 8 WIFI Indicator 9 Microphone 10 PIR sensor 11 Fixed button 12 PIR sensor 3 LCD 1 4 1 SHOT button 5 1 Right button 16 Up button 17 MENU button 8 1 Left button WiFi ON OFF 19 REPLAY button Down button 20 21 OK button 22 TF slot 23 USB interface 24 Switch ON TEST OFF 2 Battery pack 5 01 ...

Page 4: ...3 Fixing nut 4 DC interface 5 Infrared light 6 PIR indicator 7 WIFI Indicator 8 Microphone 9 Lens 10 PIR sensor 11 Fixed button 12 PIR sensor 3 LCD 1 4 1 SHOT button 5 1 Right button 16 Up button 17 MENU button 8 1 Left button WiFi ON OFF 19 REPLAY button Down button 20 21 OK button 22 TF slot 23 USB interface 24 Switch ON TEST OFF 2 Battery pack 5 02 ...

Page 5: ...uantity 9999 SD TF Card Photo size Video resolution Photo Mode Note In the TEST mode if you do not operate for a long time the camera will enter the power saving mode and the screen will shut down The screen can be turned on by pressing any button on the camera 1 Power selection 1 1 Insert 8 1 5V AA battery into the battery compartment 1 2 When using the power adapter optional At the bottom of the...

Page 6: ...Write protect to lock the files so that you can t delete them The protected file has an icon Step3 Press REPLAY key to exit Browse photos video MENU Back OK Select Settings Delete current file Delete all files Activate slide show Write protect Mode PIR Level PIR Interval Capture Num Video Length MENU Settings Photo Video Photo video Middle Low High 1 2 3 Continuous photo taking 640x480P 1280x720P Code...

Page 7: ...Notification Motion sensors deactivated MENU Back OK Select Settings Timer Setting Hr Min Start 00 00 Stop 00 00 USB cable connection computer precautions Step1 Slide the switch to TEST position The screen is on Step2 Press Menu key to enter the setting interface Step3 Press to scroll through the setting options and the OK button to confirm the setting Step4 Press MENU key to exit Video Size 720P ME...

Page 8: ...n Wi Fi You will see a Bluetooth List Select the Hownic Step 3 For Android phone the Wi Fi Connection window will be popped up automatically on your phone But for IOS smart phone you should open the Wi Fi Connection window manually Find the Wi Fi Hotline named TCJ48K1W then choose it and enter the password 12345678 to connect Return to the App interface to operate all functions Diagram of connecti...

Page 9: ...r the Wi Fi mode The Screen will show Wait for connecting Step 3 Open the VENARI App on your phone and click Connect device Wi Fi Step 4 For Android phone the Wi Fi Connection window will be popped up automatically on your phone But for IOS smart phone you should open the Wi Fi Connection window manually Find the Wi Fi Hotline named TCJ48K1W then choose it and enter the password 12345678 to connec...

Page 10: ...th the camera pointed at a slight downward angle Keep the camera facing north or south NOT east or west due to sunrise and sunset could produce false triggers and overexposed images Clear all obstructions in front of camera to avoid obscuring camera lens or PIR sensor Otherwise the camera may be triggered by mistake during windy or hot days Photo and video browsing NOTE When connecting with Wi Fi ...

Page 11: ...ng the batteries Question Why only photos are produced when the setting is for both photos and videos Answer There is a heavy power consumption when the video function is started and the camera will only shoot photos with no videos if the power of battery pack goes down Please change batteries to ensure normal working of the camera In order to avoid false triggers you should adjust PIR sensitivity...

Page 12: ...crou de fixation 4 Entrée CC 5 Objectif 6 Lampe infrarouge 7 Indicateur PIR 8 Indicateur WIFI 9 Microphone 10 PIR capteur 11 Boucle de fixe 12 PIR capteur 3 LCD 1 4 1 Bouton SHOT 5 1 Bouton droit 16 Bouton supérieur 17 Bouton MENU 8 1 Bouton gauche 19 Bouton REPLAY Bouton inférieur 20 21 OK Bouton 22 Cran TF 23 Interface USB 24 Interrupteu TEST OFF ON 2 Boîte de piles 5 10 ...

Page 13: ...crou de fixation 4 Entrée CC 5 Lampe infrarouge 6 Indicateur PIR 7 Indicateur WIFI 8 Microphone 9 Objectif 10 PIR capteur 11 Boucle de fixe 12 PIR capteur 3 LCD 1 4 1 Bouton SHOT 5 1 Bouton droit 16 Bouton supérieur 17 Bouton MENU 8 1 Bouton gauche 19 Bouton REPLAY Bouton inférieur 20 21 OK Bouton 22 Cran TF 23 Interface USB 24 Interrupteu TEST OFF ON 2 Boîte de piles 5 11 ...

Page 14: ... alimentation externe qui prend en charge l alimentation DC12V 2A la taille de la prise d alimentation est de 3 5 x 1 35 mm 2 Insérez une carte de stockage micro SD Class 10 TF card FAT FAT32 Remarques Assurez vous que la caméra est éteinte avant d insérer ou de retirer des cartes SD ou des piles Veuillez formater la carte mémoire avant la première utilisation 3 Introduction de la fonction de comm...

Page 15: ...Fichier d affichage de diapositives Write protect Pour verrouiller les fichiers afin que vous ne puissiez pas les supprimer Le fichier protégé a une icône Étape 3 Appuyez sur la touche REPLAY pour sortir Parcourir les photos vidéos MENU retour OK Sélect Réglages Supprimer la sélection Activer le diaporama Protection en écriture Mode Sensibilité PIR PIR Intervalle Nombre de photo longueur vidéo MENU Set...

Page 16: ...mutateur en position TEST et l écran s allume Étape 2 Appuyez sur la touche Menu pour accéder au menu de configuration du système Étape 3 Appuyez sur pour faire défiler les options de paramètres et appuyez sur OK pour confirmer Étape 4 Appuyez sur MENU pour quitter le réglage Vous pouvez parcourir copier et supprimer les images et les vidéos sur votre ordinateur en connectant l appareil photo à votre...

Page 17: ... Fi Hunting Cam Pro Connect device Wi Fi No device connected Bluttooth turns on Wi Fi Bluetooth List Hownic Hunting Cam Pro Connect device Wi Fi No device connected Bluttooth turns on Wi Fi TJ48K1W 1 2 4 3 3 Activez la connexion WiFi à la caméra en trois étapes sur mobile Étape 1 Assurez vous que votre appareil photo est en mode ON ou TEST Étape 2 Ouvrez votre application sur votre téléphone Ensui...

Page 18: ...méra entrera en mode Wi Fi L écran affichera Wait for connecting Étape 3 Ouvrez l application VENARI sur votre téléphone et cliquez sur Connect device Wi Fi Étape 4 Pour le téléphone Android la fenêtre de connexion Wi Fi s ouvrira automatiquement sur votre téléphone Mais pour le téléphone intelligent IOS vous devez ouvrir la fenêtre de connexion Wi Fi manuellement Trouvez la hotline Wi Fi nommée TCJ...

Page 19: ...nt définis l appareil photo peut être utilisé sur le terrain Hauteur d installation de la caméra 0 5 2 mètres Position d installation de la caméra installez au nord ou au sud ne faites pas face à l est ou à l ouest du fait que le soleil se lève et se couche il produira de faux déclencheurs et des images surexposées Navigation photo et vidéo REMARQUE Lorsque vous vous connectez au Wi Fi assurez vous...

Page 20: ... des photos mais pas de vidéos lorsque l appareil photo fonctionne au mode Photo vidéo Réponse La fonction vidéo consomme beaucoup d énergie au démarrage si la batterie est faible l appareil photo ne prendra que des photos veuillez remplacer la pile pour vous assurer que l appareil photo fonctionne correctement Schématiquement Installation Angle PIR 120 130 90 3 0 3 0 Travel Path YES 120 Supprimez...

Page 21: ...aste 12 PIR Sensoren 3 LCD 1 14 SHOT Taste 5 1 Rechte Taste 16 Aufwärtstaste 17 MENU Taste 8 1 Linke Taste 19 REPLAY Taste Abwärtstaste 20 21 OK Taste 22 TF Kartenslot 23 USB Schnittstellen 24 Schalter TEST OFF ON 2 Der Batteriekasten 5 1 5 6 7 8 9 10 11 12 2 3 4 MENU SHOT OK REPLAY T F ON TEST OFF USB 13 14 15 16 17 18 19 20 21 25 22 23 24 Kameraansicht G SERIE 19 ...

Page 22: ...aste 12 PIR Sensoren 3 LCD 1 14 SHOT Taste 5 1 Rechte Taste 16 Aufwärtstaste 17 MENU Taste 8 1 Linke Taste 19 REPLAY Taste Abwärtstaste 20 21 OK Taste 22 TF Kartenslot 23 USB Schnittstellen 24 Schalter TEST OFF ON 2 Der Batteriekasten 5 Kameraansicht K SERIE MENU SHOT OK REPLAY T F ON TEST OFF USB 13 14 15 16 17 18 19 20 21 25 22 23 24 5 9 10 12 11 6 7 8 1 3 4 2 20 ...

Page 23: ...rd ausgeschaltet Der Bildschirm kann durch Drücken einer beliebigen Taste an der Kamera eingeschaltet werden 1 Wähle Macht 1 1 Legen Sie eine 8 1 5 V AA Batterie in das Batteriefach ein 1 2 Bei Verwendung des Netzteils optional An der Unterseite der Kamera befindet sich ein externer Stromversorgungsanschluss der DC12V 2A Strom unterstützt die Netzsteckergröße beträgt 3 5 x 1 35 mm 2 Legen Sie eine ...

Page 24: ...en Alle Aufnahmen lösche Um alle Dateien zu löschen Diashow aktivieren to slide show the files Schreibschutz So sperren Sie die Dateien damit Sie sie nicht löschen können Die geschützte Datei hat ein Symbol Schritt 3 Drücken Sie die Taste REPLAY um Ausfahrt Durchsuchen Sie Fotos Videos MENU Zurück OK Ausw Einstellungen Auswahl löschen Alle Aufnahmen lösch Diashow aktivieren Schreibschutz Modus PIR ...

Page 25: ...itt 2 Drücken Sie Menu um die Einstellungsoberfläche aufzurufen Schritt 3 Drücken Sie um durch die Einstellmöglichkeiten zu blättern und die Taste OK um die Einstellung zu bestätigen Schritt 4 Drücken Sie MENU um die Einstellungsoberfläche zu verlassen Sie können die Bilder und Videos auf Ihrem Computer durchsuchen kopieren und löschen indem Sie die Kamera mit einem USB Kabel an Ihren Computer ansch...

Page 26: ...n Sie Ihre App auf Ihrem Telefon Wählen Sie dann Bluetooth turns on Wi Fi Sie sehen eine Bluetooth Liste Wählen Sie Hownic Schritt 3 Für Android Telefone wird das Fenster für die Wi Fi Verbindung automatisch auf Ihrem Telefon angezeigt Aber für IOS Smartphones sollten Sie das Wi Fi Verbindungsfenster manuell öffnen Suchen Sie die Wi Fi Hotline namens TCJ48K1W wählen Sie sie aus und geben Sie das Pa...

Page 27: ...Verbindung herzustellen Wenn die Wi Fi Verbindung erfolgreich hergestellt wurde zeigt die Kamera WIFI connected auf dem Bildschirm an MENU SHOT OK REPLAY WIFI wait for connection SSID TJ48K1W Password 12345678 WLAN WLAN View help Network acceleration ON More settings TJ48K1W CONNECT FORGET CONCEL Hunting Cam Pro Connect device Wi Fi No device connected Bluttooth turns on Wi Fi TJ48K1W 3 2 1 HINWEI...

Page 28: ... die Kamera kehrt in den Modus T E S T oder O N zurück und die Kontrollleuchte erlischt Methode 2 Drücken Sie kurz die Taste an der Kamera um das WIFI zu verlassen Die Kamera kehrt zur TEST Schnittstelle zurück und die Kontrollleuchte erlischt Rückkehr Video Photo Startbildschirm Select Durchsuchen von Fotos und Videos HINWEIS Achten Sie beim Herstellen einer WLAN Verbindung darauf Ihr Telefon und...

Page 29: ...r Foto ohne Video A Wenn das Video beginnt verbraucht die Leistung mehr wenn die Batterieleistung reduziert wird die Kamera kann nur Foto ohne Video nehmen um die Energie zu sparen bitte ersetzen Sie die Batterien um sicherzustellen dass die Kamera nach der Funktion arbeitet Häufig gestellte Fragen und Antworten Travel Path YES 120 130 90 3 0 3 0 Entfernen Sie alle Hindernisse auf der Vorderseite d...

Page 30: ...bloqueo 3 Tuerca fijación 4 DC Entrada 5 Lente 6 Radiacóin infrarroja 7 Indicador PIR 8 Indicador WIFI 9 Micrófono 10 PIR Sensor 11 Hebilla fija 12 PIR Sensor 13 LCD 14 Botón SHOT 15 Botón derecho 16 Botón de arriba Botón MENU 17 Botón izquierdo 18 1 9 Botón REPLAY 20 Botón abajo 21 Botón OK 22 Ranura TF 23 Puerto USB 24 Cambiar TEST OFF ON 25 Caja de bateria 28 ...

Page 31: ...bloqueo 3 Tuerca fijación 4 DC Entrada 5 Radiacóin infrarroja 6 Indicador PIR 7 Indicador WIFI 8 Micrófono 9 Lente 10 PIR Sensor 11 Hebilla fija 12 PIR Sensor 13 LCD 14 Botón SHOT 15 Botón derecho 16 Botón de arriba Botón MENU 17 Botón izquierdo 18 1 9 Botón REPLAY 20 Botón abajo 21 Botón OK 22 Ranura TF 23 Puerto USB 24 Cambiar TEST OFF ON 25 Caja de bateria 29 ...

Page 32: ...horro de energía y la pantalla se apagará La pantalla se puede encender presionando cualquier botón de la cámara 1 Selección de potencia 1 1 Inserte una pila AA de 8 1 5 V en el compartimento de la pila 1 2 Cuando se usa el adaptador de corriente opcional En la parte inferior de la cámara hay un puerto de fuente de alimentación externa que admite alimentación DC12V 2A el tamaño del enchufe de alim...

Page 33: ...ivar presentación d Archivo de presentación de diapositivas Protección contra escri para bloquear los archivos para que no pueda eliminarlos El archivo protegido tiene un icono Paso 3 Presione la tecla REPLAY para salir Explorar fotos video MENU Retroce OK Selección Ajustes Borrar selección Borrar todas las imáge Activar presentación d Protección contra escri Mode Sensibilidad PIR PIR Intervalo Nú...

Page 34: ... card cannot be formatted via USB when connected to the computer 2 Before connecting USB please input the password if the camera is setting Paso 1 Deslice el interruptor a la posición TEST la pantalla está encendida Paso 2 Presione MENU para ingresar a la interfaz de configuración Paso 3 Presione para desplazarse por las opciones de configuración y confirme la configuración con OK Paso 4 Presione la t...

Page 35: ...oth turns on Wi Fi Verá una lista de Bluetooth Seleccione el Hownic Paso 3 Para el teléfono Android la ventana de Conexión Wi Fi aparecerá automáticamente en su teléfono Pero para el teléfono inteligente IOS debe abrir la ventana Conexión Wi Fi manualmente Busque la línea directa Wi Fi llamada TCJ48K1W luego selecciónela e ingrese la contraseña 12345678 para conectarse Regrese a la interfaz de la ...

Page 36: ...ará en modo Wi Fi La pantalla mostrará Wait for connecting Paso 3 Abra la aplicación VENARI en su teléfono y haga clic en Connect device Wi Fi Paso 4 Para el teléfono Android la ventana de Conexión Wi Fi aparecerá automáticamente en su teléfono Pero para el teléfono inteligente IOS debe abrir la ventana Conexión Wi Fi manualmente Busque la línea directa Wi Fi llamada TCJ48K1W luego selecciónela e ...

Page 37: ...po Altura de instalación de la cámara 0 5 2 metros La cámara está montada al norte o al sur sin mirar al este o al oeste porque el sol sube y baja produce falsos disparadores e imágenes sobreexpuestas Retire todas las obstrucciones en la parte frontal de la cámara para evitar que se obstruya la lente de la cámara o el sensor PIR De lo contrario la cámara puede activarse por error en clima ventoso ...

Page 38: ...de í resolver reemplazando las bater as í Pregunta Por qu solo se producen fotos cuando la configuración es para fotos y é videos Respuesta Hay un gran consumo de energ a cuando se inicia la función de video y í la c mara solo tomar fotos sin videos si la potencia de bater a disminuye Cambie á á í las bater as para asegurarse de que la c mara funcione seg n la configuración por í á ú favor Travel Pa...

Page 39: ...9 20 21 25 22 23 24 カメラ概略図 Gシリーズ 1 ストラップ穴 2 ロック穴 3 締付ナット 4 DC入力 5 レンズ 6 赤外線 7 PIRインジケータ 8 WIFIインジケータ 9 マイク 10 PIR センサー 11 固定留め金 12 PIR センサー 13 LCD 14 SHOTボタン 15 右ボタン 16 上ボタン 17 MENUボタン 18 左ボタン 19 REPLAYボタン 20 下ボタン 21 OK ボタン 22 TFカードスロット 23 USBインターフェース 24 スイッチ TEST OFF ON 25 バッテリーボックス 37 ...

Page 40: ...23 24 5 9 10 12 11 6 7 8 1 3 4 2 1 ストラップ穴 2 ロック穴 3 締付ナット 4 DC入力 5 赤外線 6 PIRインジケータ 7 WIFIインジケータ 8 マイク 9 レンズ 10 PIR センサー 11 固定留め金 12 PIR センサー 13 LCD 14 SHOTボタン 15 右ボタン 16 上ボタン 17 MENUボタン 18 左ボタン 19 REPLAYボタン 20 下ボタン 21 OK ボタン 22 TFカードスロット 23 USBインターフェース 24 スイッチ TEST OFF ON 25 バッテリーボックス 38 ...

Page 41: ...C12V 2A 電源をサポートする外部電源ポートがあ り 電源プラグのサイズは 3 5X1 35mm です 2 マイクロSDメモリーカードを挿入 Class 10 TF card FAT FAT32 注 SD カードやバッテリーを挿入または取り外す前に カメラ の電源がオフになっていることを確認してください 初めて使用する前にメモリカードをフォーマットしてくださ い 3 スイッチ機能紹介 モード ON TEST OFF 説明 正常な動作状態 1 2 スタンバイ低消費電力 1 カスタム設定 2 手動撮影又はビデオ 3 表示又は再生 1 カメラを閉めます Dcメイトプラグ カメラモ ード 画像の 大きさ 写真 枚数 SD カード 画像の 大きさ カメラ モード 録画 時間 SD カード 日付 時間 録画インターフェース 撮影インターフェース スイッチを TEST モードにスライドします 又は ...

Page 42: ... show ファイルをスライドショーする Write protect ファイルをロックして削除できないようにしま す 保護されたファイルにはアイコン があります ステップ3 REPLAY キーを押して終了します 写真 ビデオを閲覧する MENU OK Settings Delete current file Delete all files Activate slide show Write protect モード PIR感度 PIR間隔 撮影枚数 撮影時間 メニュー 設置 カメラ ビデオ カメラ ビデオ 高 中 低 1 2 3 連続撮影 640x480P 1280x720P コード 1 2 3 4 5 6 12 8 11 録画の音声 動画解像度 言語 7 English Deutsch Francais Italiano 日本語 メニュー 設置 コード 各トリガー射撃の時間間隔 9 時刻設定...

Page 43: ...コンピュータの注意事項 USBケーブルでカメラをパソコンに接続することで パソコン上の画像や動画を閲覧 コ ピー 削除することができます USB接続を使用する場合は スイッチが テスト モー ドになっていることを確認してください 1 メモリーカードをコンピューターに接続した場合 USB経由でフォーマットすることはで きません 2 USBを接続する前に カメラが設定されている場合はパスワードを入力し てください スイッチを TEST モードにスライドしてディスプレイを開く タイムラプス の設定 MENU ボタンを押す タイムラ プス で撮影間隔を設定します 撮 影 し た 写 真 は ビ デ オ 形 式 に 圧 縮 さ れ て い ま す REPLAY と入力して表示します 注 タイムラプス がオンの場合 カメラは写真のみを撮影でき タイムラプス がオ フの場合にのみ録画機能を使用できます ...

Page 44: ...す Bluetoothリストが表示されます Hownic を選択します ステップ3 アンダーソン電話の場合 Wi Fi接続ウィンドウが電話に自動的にポップアッ プ表示されます ただし IOSスマートフォンの場合は 手動でWi Fi接続ウィンドウを開 く必要があります TCJ48K1W という名前のWi Fiホットラインを見つけて選択し パス ワード 12345678 を入力して接続します アプリインターフェイスに戻ってすべての機 能を操作します 接続手順の図 WLAN WLAN View help Network acceleration ON More settings TJ48K1W CONNECT FORGET CONCEL Hunting Cam Pro Connect device Wi Fi No device connected Bluttooth turns on Wi F...

Page 45: ...ップ3 携帯電話でVENARIアプリを開き Connect device Wi Fi をクリックし ます ステップ4 アンダーソン電話の場合 Wi Fi接続ウィンドウが電話に自動的にポッ プアップ表示されます ただし IOSスマートフォンの場合は 手動でWi Fi接続 ウィンドウを開く必要があります TCJ48K1W という名前のWi Fiホットラインを 見つけて選択し パスワード 12345678 を入力して接続します Wi Fiが正常に 接続されると カメラの画面に WIFI接続済み と表示されます MENU SHOT OK REPLAY WIFI wait for connection SSID TJ48K1W Password 12345678 WLAN WLAN View help Network acceleration ON More settings TJ48K1W CON...

Page 46: ...が消灯します 戻る カメラ取付 Video Photo ホーム画面 選択する 写真とビデオのブラウジング 注意 Wi Fiに接続するときは スマートフォンとカメラをできるだけ近づけてくださ い アプリを終了すると Wi Fiが切断されます カメラは接続前の元のモードに 戻ります カメラが設定した EIFIを自動的にオフにする 時間内にカメラと電話の間で 信号が送信されない場合 カメラはWi Fiを切断し 接続前の元のモードに戻り ます すべてのプログラム設定が正しく設定されると カメラは現場で使用できる状態になり ます 下記のリストは あなたのカメラを使って最良の結果を得るための参考になるも のです カメラを約0 5 2mの高さにカメラを少し下向きに向けて取り付けます 太陽の立ち上がりと設定のためにカメラが北または南に面していないと 東また は西ではなく 誤ったトリガーと露出過多の画像が生...

Page 47: ... バッテリーの交換で解決出来る Q カメラが写真とビデオを撮るように設定されている理由 写真のみ ビデ オが存在しない理由 A ビデオを起動すると効率が高くて バッテリーが低下するため 電力を省く ため カメラは写真しか取りません バッテリーの交換をお願いします カメラのレンズやPIRセンサーを塞がないように カメラの正面から離れたすべて の枝やその他の破片を取り除いてください 誤ったトリガを避けることができます 調整する必要があります オブジェクトや野 生動物のサイズ 移動速度 距離に依存します カメラを設置する前に Class 10 TFカードを挿入してください カメラのメニューか らTFカードをフォーマットします 最大サポート32G 時間と日付が正しいことを確認してください カメラを ON モードに切り替えてください エリアを出る前に Travel Path YES 120 130 ...

Page 48: ...elp prevent possible harm to human health and or the environment the product must be disposed of in an approved and environmentally safe recycling process For further information on how to dispose of this product correctly contact the product supplier or the local authority responsible for waste disposal in your area RoHS MADE IN CHINA ...

Reviews: