GENERAL INSTALLATION - SAFETY
When positioning your luminaire, please take note that outdoor electrical installations should be installed by qualified
electricians. Electrical equipment in the garden can be lethal if incorrectly installed or if inadequate provisions have been
made in the event of an equipment fault. Water is the main threat. It can seep in through joints and gaskets; it can be drawn
into electrical enclosures by capillary action; and it can penetrate ageing materials which corrode, crack or are damaged by
wildlife, pets, children, careless gardening or just time. Water conducts electricity and as the ground is usually damp to
some extent, the contact of human feet with the ground is all that is needed to provide a fatal route for electrical current.
Proper circuit protection for all exterior electrical services should include a residual current device (RCD), also known as an
earth leakage circuit breaker (ELCB). This simple device ensures that the power is cut off immediately; it detects a leakage
of current to earth, which indicates an electrical fault which is potentially threatening to life. Observe these few simple rules
and keep your outdoor electrical installation safe.
GENERAL INSTALLATION – LAYING CABLE
Laying electrical cables in the ground may be subject to specific regulations. The aim is to ensure that the cables are buried
deeply enough in the ground to avoid any disturbance which is likely to occur. Where armoured cables can be buried at
adequate depth to avoid being damaged by any reasonable foreseeable disturbance of the ground, they can be laid in a
buffer layer of sand and covered with cable warning tape. Where it is not possible to bury the cables deeply enough because
of the presence of tree roots or unsuitable ground conditions, extra mechanical protection around the cables will be
required. This is usually in the form of plastic ducts or conduits through which the cables are run
.
INSTALLATION
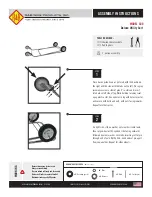
1.
When positioning your luminaire, please take note of:
•
The IP rating (See IP rating table Fig.1.)
•
Beware of existing water pipes and electric cables when preparing the site.
2.
Never install your luminaire in a dip in the ground or in an area of localised flooding. This is to avoid pooling of water
over the top of the glass. (see Fig.2)
3.
When installing the mounting sleeve of the luminaire into the ground, always prepare a minimum of 30cm of gravel
under the sleeve housing to allow for drainage. Check that drainage is adequate by filling the hole with water and
confirming that the water has completely drained in 30 minutes. To avoid any water damage to this luminaire, it may
be necessary to add further drainage (e.g. a drainage tube).
4.
Secure the mounting sleeve into position using concrete or cement. Ensure sleeve is not distorted by the concrete or
cement. It must remain square to allow the luminaire to fit once set.
5.
Always allow sufficient slack in the supply cable in order to remove the luminaire from its mounting sleeve or
position for any future maintenance. It may be possible to use an IP68 connector (available from Aurora AU-CK01).
6.
When dismantling your luminaire, take note of the orientation and position of key components.
7.
The bezel can be removed by un-screwing the nuts on the fixing studs on the underside of the bezel. This will give
you access to the lamp.
8.
This product comes supplied with two cable entry glands. This is to ease wiring and enable ‘loop in, loop out’ wiring.
If using only one entry gland, the other gland must be sealed from the environment with suitable silicon sealant.
9.
To access the supply connections, remove the end cap with the cable entry glands. Remove bracket which is holding
one end of the lamp connector, remove terminal plate for connection. Mark position of bracket prior to removal.
10.
Use 3-core 0.75mm
2
rubber insulated cable for connection. (H05RN-F).
11.
Supply connections are as follows:
•
LIVE – (Red or Brown) to terminal marked ‘L’.
•
NEUTRAL – (Black or Blue) to terminal marked ‘N’.
•
EARTH – (Green & Yellow) to terminal marked ‘ ‘.
12.
Place back into position terminal plate. Refit bracket which is holding one end of the lamp connector.
13.
Install the required lamp. Confirm lamp type and maximum wattage on label of product.
14.
Check all seals and glass are intact and seated correctly. When securing the bezel back on top of the luminaire,
tighten the first screw and then the opposite screw to distribute even pressure.
15.
Wipe clean surfaces, turn on mains supply and test luminaire.