background image

15

EN

POWER SUPPLY

AC Power connections

Before using the unit, check that the local mains supply is compatible with 

the 230V 50Hz Do not plug or unplug the power cable when your hands 

wet. When planning not to use this unit for long periods of time, disconnect 

the plug from the wall outlet. When disconnecting the power cord from 

the wall outlet, grasp the plug; do not pull the cord in order to avoid shock 

risks caused by the damaged cable. Unit power supply (mains 230V 50Hz) 

Connect the power cable plug to the 230V) wall outlet and the AC Socket. 

Battery power operation 

1.  Open the Battery Case on the underside of the unit. Replace the cover 

properly. 

2.  Insert (6) 1.5V-C batteries (not included) following the polarity as 

indicated in the compartment to the right. Alkaline batteries are 

recommended for long using time.

Note: After cutting off the AC Power supply, the Time information will be 

lost when the battery is removed.

CD PLAYER OPERATION

1.  Set the Function Selector  to the "CD" position. 
2.  Press the OPEN Button the CD Door will open. Place an audio CD with its 

label side upward in the CD compartment and close the CD Door. 

3.  After a few seconds, the total number of tracks on the CD will appear in 

the CD Track Display . 

4. 

Press the PLAY Button and the CD will start playing from the first track. 

The CD Track Display will steadily.

5.  Adjust the Volume Control to obtain the desired sound level from the 

Speakers.

6.  To suspend playing, press the PLAY Button. The CD Track Display will 

flash. To resume playing, press the PLAY Button again. 

7.  You can choose to play your favorite track directly by pressing the 

CD FWD Skip Button to skip forward or CD REV Skip Button to skip 

backward. The CD Track Display  will indicate the correct track number 

selected. 

8.  To repeat playing a particular track, press the REPEAT Button once. The 

Repeat Indicator in the CD Track Display will flash.

9.  To repeat playing the entire CD, press the REPEAT Button twice. The 

Summary of Contents for Boomtown 10031945

Page 1: ...w w w a u n a m u l t i m e d i a c o m Boom tow n Tragbarer CD Player m it Radio Portable CD player w ith radio 10031945 10031946 ...

Page 2: ......

Page 3: ... Wiedergabe SICHERHEITSHINWEISE DIE NICHTBEFOLGUNG DIESER HINWEISE KANN ERNSTE PERSONENVERLETZUNGEN ZUR FOLGE HABEN UND DAS GERÄT BESCHÄDIGEN Allgemeine Sicherheitshinweise NICHT ZUR NUTZUNG FÜR KINDER GEEIGNET Das Gerät ist ausschließlich zur privaten Nutzung im Heimbereich bestimmt Lesen Sie die Bedienungsanleitung sorgfältig und bewahren Sie sie sicher auf Beachten Sie alle Warnhinweise Elektri...

Page 4: ...le außerhalb der Reichweite von Kindern auf damit sie nicht von diesen verschluckt werden können Lassen Sie kleine Kinder nicht mit Folie spielen Es besteht Erstickungsgefahr Transport des Gerätes Bitte bewahren Sie die Originalverpackung auf Um ausreichenden Schutz beim Transport des Gerätes zu erreichen verpacken Sie das Gerät in der Originalverpackung Reinigung der äußeren Oberfläche Verwenden ...

Page 5: ...3 Wiederholen Taste 4 PROG 10 Taste 5 Display 6 Frequenzbandanzeige 7 Stopp Taste 8 CD USB Taste 9 Manuelle Frequenzwahl 10 Titel zurück 11 Titel vor 12 Wiedergabe Taste 13 Auswurf Taste 14 Funktionwahlschalter 15 Linker Lautsprecher 16 CD Fach Klappe 17 Rechter Lautsprecher 18 Frequenzbandwahlschalter ...

Page 6: ...6 DE OPEN 19 20 21 22 23 21 22 23 24 19 Antenne 20 Batteriefachdeckel 21 Netzanschluss 22 Kopfhöreranschluss 23 USB Anschluss 24 Griff ...

Page 7: ...Hinweis Nach dem Abschalten der AC Stromversorgung wird die eingestellt Zeit verlorengehen wenn die Batterie entfernt wird CD PLAYER 1 Stellen Sie den Funktionswahlschalter auf die Position CD 2 Drücken Sie die OPEN Taste um das CD Fach zu öffnen Legen Sie eine Audio CD mit der Etikettenseite nach oben in das CD Fach und schließen Sie das CD Fach 3 Nach einigen Sekunden erscheint die Anzahl der Ti...

Page 8: ...PROG Taste um die Auswahl zu speichern Die CD Track Anzeige wechselt auf P02 4 Drücken Sie die Taste CD FWD Skip oder CD REV Skip um den nächsten zu programmierenden Song auszuwählen und drücken Sie die PROG Taste 4 zum Speichern der Auswahl 5 Sie können die Schritte 2 3 wiederholen um bis zu 20 Titel zu programmieren Wenn Sie versuchen mehr als 20 Titel zu programmieren kehrt das CD Track Display...

Page 9: ...Funkfrequenzbereich einzustellen Um einen schwachen rauschenden FM Sender zu empfangen stellen Sie den Band Selektor auf die Position FM Der Empfang kann verbessert werden aber der Ton wird monaural MONO 3 Stellen Sie den Einstellknopf ein um den gewünschten Radiosender zu erhalten 4 Stellen Sie den Lautstärkeregler ein um den gewünschten Klangpegel zu erhalten 5 Wenn Sie das Radio ausschalten möc...

Page 10: ...Sie Altgeräte nicht über den Hausmüll Durch die regelkonforme Entsorgung der Altgeräte werden Umwelt und die Gesundheit Ihrer Mitmenschen vor möglichen negativen Konsequenzen geschützt Materialrecycling hilft den Verbrauch von Rohstoffen zu verringern Das Produkt enthält Batterien die der Europäischen Richtlinie 2006 66 EG unterliegen und nicht mit dem normalen Hausmüll entsorgt werden dürfen Bitt...

Page 11: ...low the instructions carefully Heed all warnings SPECIFICATIONS Item number 10031945 10031946 Power supply 230 V CD player Radio UKW 88 108 MHz MW 530 1600 kHz USB port MP3 playback Dear Customer Congratulations on purchasing this equipment Please read this manual carefully and take care of the following hints on installation and use to avoid technical damages Any failure caused by ignoring the it...

Page 12: ...NOT place objects on top of the product Small objects packaging parts plastic bags cardboard etc Keep small objects for example screws and other assembly materials memory cards and packaging parts out of reach of children so that they cannot be swallowed Do not let small children play with plastic bags Risk of suffocation Transporting the device Please keep the original packaging To ensure adequat...

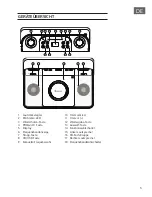
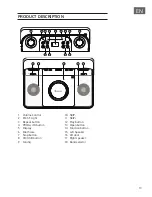
Page 13: ...0 11 12 13 1 Volume Control 2 FM ST Light 3 Repeat button 4 PROG 10 button 5 Display 6 Dial Scale 7 Stop button 8 CD USB button 9 Tuning 10 SKIP 11 SKIP 12 Play button 13 Open button 14 Function button 15 Left Speaker 16 CD door 17 Right speaker 18 Band selector ...

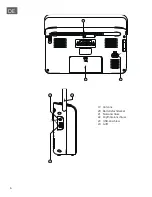
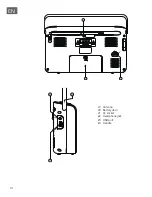
Page 14: ...14 EN OPEN 19 20 21 22 23 21 22 23 24 19 Antenna 20 Battery door 21 AC socket 22 Headphone jack 23 USB port 24 Handle ...

Page 15: ...nformation will be lost when the battery is removed CD PLAYER OPERATION 1 Set the Function Selector to the CD position 2 Press the OPEN Button the CD Door will open Place an audio CD with its label side upward in the CD compartment and close the CD Door 3 After a few seconds the total number of tracks on the CD will appear in the CD Track Display 4 Press the PLAY Button and the CD will start playi...

Page 16: ...o program more than 20 tracks the CD Track Display will revert to 01 and the old entry will be overwritten by the current new entry 6 Press STOP Button to end programming and return to normal play mode 7 To check the programmed tracks press PROG Button continuous to show all the programmed songs The CD Track Display will display the program number first and then followed by the flashing track numb...

Page 17: ...ain the desired radio station 4 Adjust the Volume Control to obtain the desired sound level 5 When you wish to turn off the Radio set the Function Selector to the OFF position TIPS FOR GOOD RADIO RECEPTION 1 To insure maximum FM tuner sensitivity the Telescopic Antenna should be fully extended and rotated to obtain the best possible reception The FM Stereo Indicator 9 will steadily when a stereo p...

Page 18: ...ential negative consequences for the environment and human health which could otherwise be caused by inappropriate waste handling of this product For more detailed information about recycling of this product please contact your local council or your household waste disposal service Your product contains batteries covered by the European Directive 2006 66 EC which cannot be disposed of with normal ...

Page 19: ......

Page 20: ......

Page 21: ...BAN DE91100208900355986675 BIC SWIFT Code HYVEDEMM488 EU Konformitätserklärung Wir die CHAL TEC GmbH Wallstraße 16 10179 Berlin erklären hiermit dass der nachfolgend bezeichnete Funkanlagentyp Auna portables Radio Artikelnr 10031945 und 10031946 allen folgenden einschlägigen Bestimmungen entspricht RED Richtlinie 2014 53 EU LVD Richtlinie 2014 35 EU RoHS Richtlinie 2011 65 EG ErP Richtlinie 2009 1...

Page 22: ......

Page 23: ......

Reviews: