background image

In BT or PH modes, connect your mobile music device to the AUX input jack by 3.5mm-3.5mm audio cable (not included). 
Turn the volume control to adjust the volume. (The volume control of the mobile phone, tablet or PC can also affect the total 
volume).  
 

Connect your own speaker system to the RCA port of the record player with an RCA-3.5mm audio cable (not included). 
NOTE: the RCA cables are color coded. The red plug cable must be plugged into the red connector on both the record player 
and external amplifier or speaker system. The white plug cable must be plugged into the white connector on both the record 
player and external amplifier or speaker system. 


Before you connect the turntable to a computer, unplug it from your mixer or Hi-Fi system.  
The included software is a third party application and therefore Audizio does not handle any questions or problems regarding 
the software.  

1. Turn the computer on  
2. If the computer is booted, connect the turntable. The computer will now install the drivers.  
3. After the drivers are installed, you must now install the Audacity software.  

Windows users: insert the CD or download the newest software via http://audacity.sourceforge.net 
MAC users: download the newest software via http://audacity.sourceforge.net  

To Install Software (PC)  

1. Plug in your turntable to an power supply and connect the USB port on the Turntable to the USB port of your computer.  
2. Turn on the power switch to your turntable.  
3. The Windows system will detect a new device and indicate that it is available to use.  
4. Insert the CD that came with your USB turntable.  
5. Run the file to install the Audacity software. Once installed, run the Audacity program. 

To Install Software (MAC)  

1) Insert the included CD.  
2) Open the CD icon on the desktop. 
3) Drag the installation folder for audacity to your hard drive. We recommend that moving 

the folder to your “Applications” 

folder.  
4) A window will come up which shows the files copying.  
5) EJECT the CD.  

6) Open “Audacity” from where you moved it to on your hard drive. 


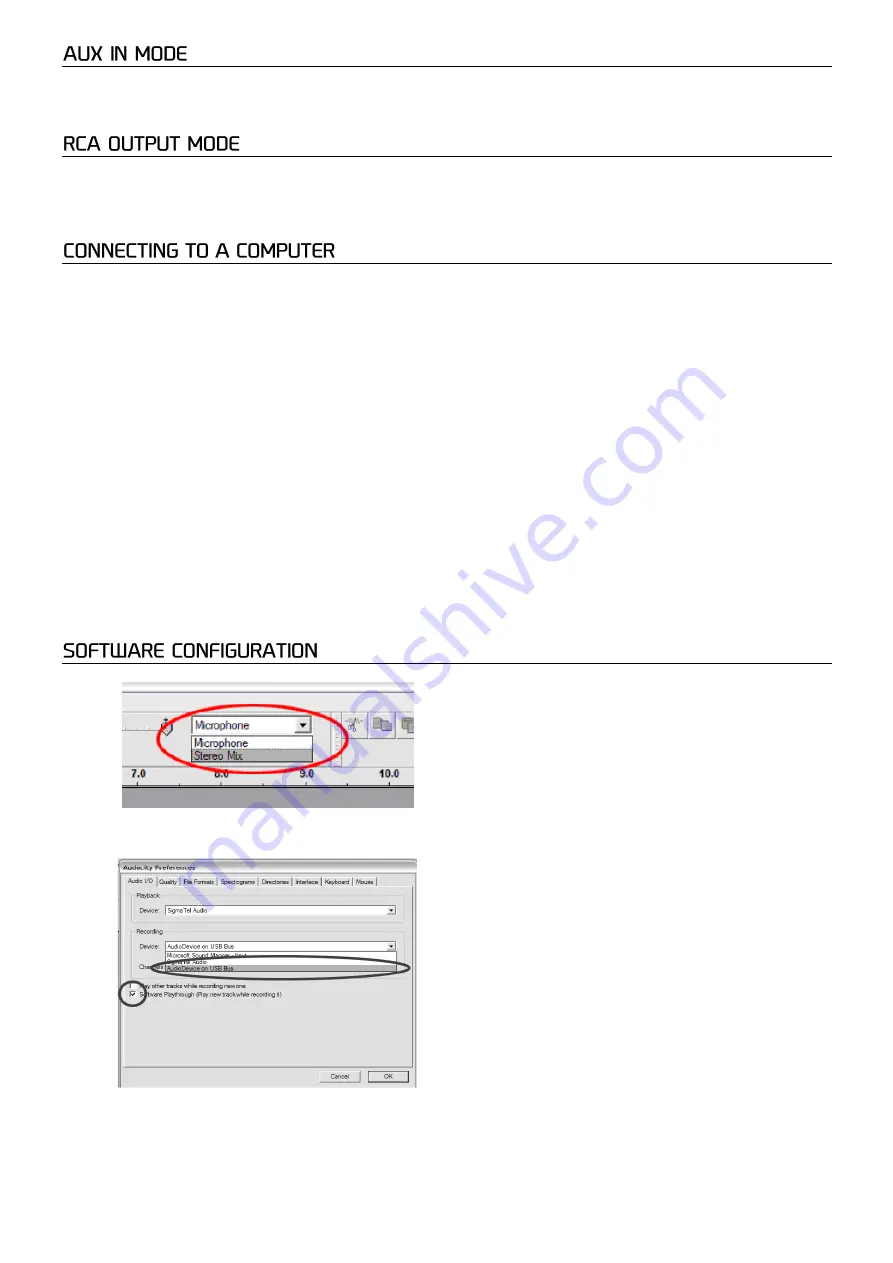
1.


Click on Microphone in the drop down menu and select “Stereo Mix”

.  


2.


Select the “Edit” menu and then “Preferences” 


Select the USB audio device under the “Recording” selection as shown. Select “Software Playthrough” to hear the 

audio while recording.  


3.


After the above settings are completed, you are ready for recording. If you are still having difficulties in finding the 

USB Turntable, try to check your system settings or control panel to adjust the audio input settings from the sound 
control panel.  


Note:

 The attached Audacity software is for reference only. For more information and latest software version, please check the website: 

http://www.audacity.com

Summary of Contents for 102.176

Page 1: ...Ref nr 102 176 INSTRUCTION MANUAL GEBRUIKSAANWIJZING BEDIENUNGSANLEITUNG MANUAL DE INSTRUCCIONES MANUEL D INSTRUCTIONS V1 0 ...

Page 2: ...2 ...

Page 3: ...SS 11 AUX IN MODUS 12 RCA AUSGANG 12 VERBINDEN MIT COMPUTER 12 SOFTWAREKONFIGURATION 12 ESPAÑOL 13 INSTRUCCIONES DE DESEMBALAJE 14 VISIÓN GENERAL 14 OPERACIÓN FONO 14 CONEXIÓN A BT 14 MODO DE ENTRADA AUXILIAR 15 MODO DE SALIDA RCA 15 CONECTANDO CON EL PC 15 CONFIGURACIÓN DEL SOFTWARE 15 FRANÇAIS 16 DEBALLAGE 17 VUE GLOBALE DU PRODUIT 17 FONCTIONNEMENT PHONO 17 CONNEXION BT 17 MODE AUX 18 SORTIE RC...

Page 4: ...rom a specialist Do not force the controls This unit is with speaker inside which can cause magnetic field Keep this unit at least 60cm away from computer or TV If this product have a built in lead acid rechargeable battery Please recharge the battery every 3 months if you are not going to use the product for a long period of time Otherwise the battery may be permanently damaged If the battery is ...

Page 5: ... to place the removable protection cover over the stylus 9 RCA line output Line signal RCA connectors to connect the record player to a mixer or an amplifier 10 AUX input Connector for auxiliary input 11 USB port Use a USB cable to connect your turntable to your computer The USB connection will send audio from the turntable to your computer 12 DC input Connect the power adapter 13 Speakers 1 Conne...

Page 6: ...ity sourceforge net To Install Software PC 1 Plug in your turntable to an power supply and connect the USB port on the Turntable to the USB port of your computer 2 Turn on the power switch to your turntable 3 The Windows system will detect a new device and indicate that it is available to use 4 Insert the CD that came with your USB turntable 5 Run the file to install the Audacity software Once ins...

Page 7: ...rden gevolgd Het apparaat buiten bereik van kinderen houden Bovendien mag het apparaat nooit onbeheerd gelaten worden Gebruik geen schoonmaakspray om de schakelaars te reinigen Restanten van deze spray zorgen ervoor dat smeer en stof ophopen Raadpleeg bij storing te allen tijde een deskundige Gebruik geen overmatige kracht bij het bedienen van het apparaat Dit apparaat kan magnetisch veld veroorza...

Page 8: ...beschermingskapje te plaatsen 9 RCA lijn uitgang RCA connectoren om de platenspeler aan te sluiten op een mixer of een versterker 10 AUX ingang Aansluiting voor aux ingang 11 USB uitgang Gebruik de meegeleverde USB kabel om uw platenspeler aan te sluiten op uw computer De USB verbinding leidt het geluid van de platenspeler naar uw computer 12 DC ingang Sluit hier de voedingsadapter aan 13 Luidspre...

Page 9: ...talleren PC 1 Sluit uw platenspeler aan op een voedingsbron en sluit de USB poort van de platenspeler aan op de USB poort van uw computer 2 Schakel de platenspeler in 3 Het Windows systeem zal een nieuw apparaat detecteren en aangeven dat het beschikbaar is om te gebruiken 4 Voer de CD in die is meegeleverd met uw USB platenspeler 5 Voer het bestand uit om de Audacity software te installeren Na de...

Page 10: ...rät niemals unbeaufsichtigt lassen Die Regler nicht mit Reinigungssprays reinigen Diese hinterlassen Rückstände die zu Staub und Fettansammlungen führen Bei Störungen immer einen Fachmann um Rat fragen Das Gerät nur mit sauberen Händen bedienen Das Gerät nicht mit Gewalt bedienen Dieses Gerät kann dazu führen Magnetfeld Halten Sie das Gerät mindestens 60 cm vom Computer oder Fernseher Wenn dieses ...

Page 11: ...uter zu verbinden Die USB Verbindung überträgt Audiosignale vom Plattenspieler zu Ihrem Computer 12 DC Eingang Schließen Sie hier den Netzadapter an 13 Lautsprecher 1 Schließen Sie den Plattenspieler mit dem mitgelieferten Netzteil an und stecken Sie ihn in eine Steckdose 2 Entfernen Sie die Schutzkappe vorsichtig 3 Drehen Sie den Ein Aus und Lautstärkeregler im Uhrzeigersinn um den Plattenspieler...

Page 12: ...en Installation der Software PC 1 Schließen Sie Ihren Plattenspieler an eine Steckdose an und verbinden Sie den USB Anschluss des Plattenspielers an den USB Anschluss Ihres Computers an 2 Schalten Sie den Plattenspieler ein 3 Das Windows System wird ein neues Gerät erkennen und Sie darauf hinweisen dass es verwendet werden kann 4 Legen Sie die CD ein die mit Ihrem USB Plattenspieler mitgeliefert w...

Page 13: ...iños No deje el aparato sin vigilancia No utilice sprays limpiadores para limpiar los interruptores Los residuos de estos sprays producen depósitos de polvo y grasa En caso de mal funcionamiento siempre consulte a un profesional No fuerce los controles Si el aparato se ha caído siempre haga que lo verifique un técnico cualificado antes de encenderlo otra vez NO utilice productos químicos para limp...

Page 14: ...RCA Conectores RCA de señal de línea para conectar el tocadiscos a un mezclador o a un amplificador 10 Entrada AUX Conector para entrada auxiliar 11 Puerto USB Utilice el cable USB incluido para conectar el tocadiscos al ordenador La conexión USB enviará el audio del tocadiscos a su computadora 12 Entrada de DC Conecta el adaptador de corriente 13 Altavoces 1 Conecte el reproductor de discos con e...

Page 15: ... en la parte posterior del plato giratorio en la posición on 3 Si la computadora se arranca conecte el plato giratorio El equipo ahora instalará los controladores 4 Después de instalar los controladores debe instalar el software Audacity Usuarios de Windows inserte el CD o descargue el software más Nuevo via http audacity sourceforge net Usuarios de MAC descargue el software más Nuevo via http aud...

Page 16: ... contient un haut parleur pouvant engendrer des champs magnétiques Tenez cet appareil à 60 cm au moins d un téléviseur ou ordinateur Si le produit comprend un accumulateur intégré plomb acide rechargez l accumulateur tous les 3 mois en cas de non utilisation prolongée de l appareil Sinon l accumulateur pourrait être endommagé de manière permanente Si l accumulateur est endommagé remplacez le par u...

Page 17: ...nnexion USB enverra le son de la platine à votre ordinateur 12 Entrée DC Brancher l adaptateur électrique ici 13 Haut parleurs 1 Reliez la platine disque au bloc secteur et branchez ce dernier à une prise secteur murale 2 Retirez la protection de l aiguille en le retirant délicatement 3 Tournez le bouton de réglage de l alimentation et du volume dans le sens des aiguilles d une montre pour allumer...

Page 18: ...isque au secteur et reliez le port USB de la platine au port USB de l ordinateur 2 Allumez la platine disque avec l interrupteur Power 3 Le système Windows détecte un nouvel appareil et indique qu il est disponible pour l utilisation 4 Insérez le CD livré avec la platine disque 5 Ouvrez le dossier pour installer le logiciel Audacity Une fois ce dernier installé lancez le programme Audacity Pour in...

Page 19: ...it 3 80 kg The specifications are typical The actual values can slightly change from one unit to the other Specifications can be changed without prior notice The products referred to in this manual conform to the European Community Directives to which they are subject Low Voltage LVD 2014 35 EU Electromagnetic Compatibility EMC 2014 30 EU Restriction of Hazardous Substances RoHS 2011 65 EU ...

Page 20: ...Specifications and design are subject to change without prior notice www tronios com Copyright 2021 by Tronios The Netherlands ...

Reviews: