background image

3

2

CONTENTS 
 

TV Operation


Select Input Source  ............................................................................................3

    Initial Installation  .................................................................................................3

    Main Menu Operation  .........................................................................................4

    Picture Menu  ......................................................................................................6

    Channel Menu 

 ......................................................................................................4

    Sound Menu  .......................................................................................................7

    Time Menu  ..........................................................................................................8  

    Option Menu

  ........................................................................................................9  

    Lock Menu  ..........................................................................................................11

    PVR 


....................................................................................................................12

Media Operation


    Media Operation ..................................................................................................13 

    Photo Menu .........................................................................................................14 

    Music Menu .........................................................................................................15 

    Movie Menu .........................................................................................................16 

    Text Menu ............................................................................................................17 

DVD .........................................................................................................................18


Notes.......................................................................................................................28 


Warranty Card ........................................................................................................31

Android OS


    Install Wizard

 .........................................................................................................20 

    Main Launcher

 .........................................................................................................23 

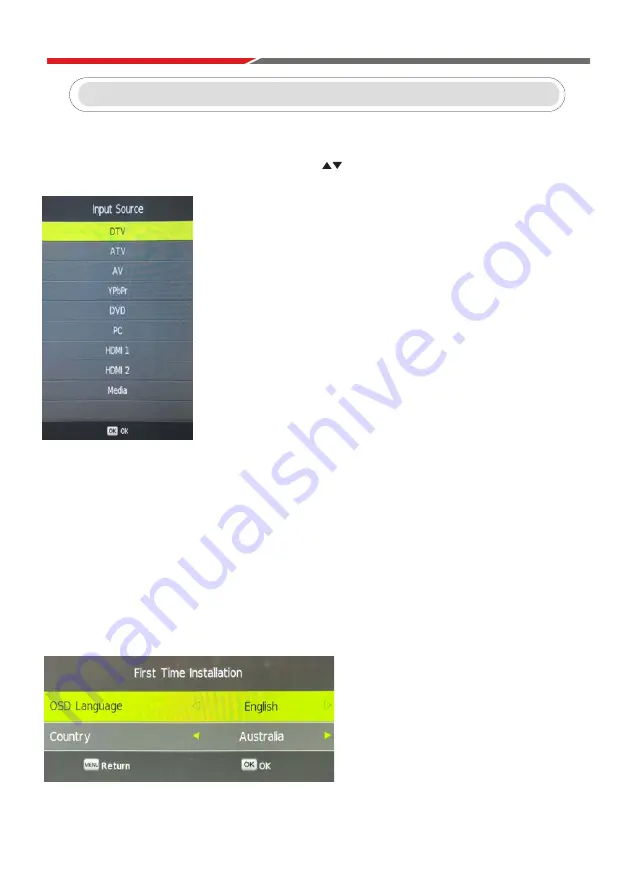
Press Source on the remote, then use the arrow keys         to select your desired source. Press ENTER


on the remote to select the source.

Firstly connect an RF Antenna cable from the TV’s RF output to the TV Antenna socket.

  presented with a number of dialogue 

When you  Reset the TV  from the Setup menu, you will be


boxes that will 

guide

 you through the TV tuning process.

First Time Installation Menu
Selection 1:

 Language - English - select ENTER  on the remote. Note this is the menu language 

setting.

Selection 2:

 Country: Australia. Please select a different country if applicable.

Selection 3:

 Environment: On. There is no need to adjust this setting.

3

TV Operation

Select Input Source

 Initial Installation

Summary of Contents for axis AX1824S Series 2

Page 1: ...DVD Player Supports DVD VCD CD MP3 DIVX JPEG Supports DVD R DVD RW CD R RW TUNER DVB T Digital HD Tuner Analogue Tuner DTV Video System MPEG 1MP ML H 264 MPEG 4 Video Codes DTV Sound System MPEG 1 La...

Page 2: ...peration Media Operation 13 Photo Menu 14 Music Menu 15 Movie Menu 16 Text Menu 17 DVD 18 Notes 28 Warranty Card 31 Android OS Install Wizard 20 Main Launcher 23 Note Regarding Included Apps Apps are...

Page 3: ...ialogue When you Reset the TV from the Setup menu you will be boxes that will guide you through the TV tuning process First Time Installation Menu Selection 1 Language English select ENTER on the remo...

Page 4: ...ing interface will be displayed Press the Menu button on the remote to select the Main Menu From there you can use the buttons to select between the following sub menus Channel Picture Sound Time Opti...

Page 5: ...own on the remote Press the Fav button on the remote to add or remove the channel from your favourite list Signal Information This displays the current signal information of the TV Signal This option...

Page 6: ...to adjust the desired setting Colour Temp Press to select the Colour Temp menu item and then the ENTER button to take you to next menu where you can change Colour Temperature Modes available are stan...

Page 7: ...ss ENTER button to go into the Sub menu With the buttons the balance between left right speakers can be adjusted Auto Volume AVL This function when turned on will help balance out the volume level bet...

Page 8: ...one is also set when first installing the TV and should not need to be adjusted Sleep Timer Select Sleep Timer with the buttons and press the ENTER button Then with buttons the sleep timer can be set...

Page 9: ...elect language with or buttons Press the ENTER button to confirm then the menu button to return to the previous menu Hearing Impaired Select Hearing Impaired where supported with buttons and then pres...

Page 10: ...uttons to turn Audio Receiver communication on or off Press the buttons to allow HDMI CEC connected components to turn each other off Press the buttons to turn HDMI CEC Auto TV power up on off Press t...

Page 11: ...with the buttons Then press the ENTER button to enter the old password default is 0000 and then set a new password by entering it twice Block Program TV only TV must be selected as the source Select B...

Page 12: ...lso press the button twice to stop recording the first press will bring up the Record Menu The TV will then display a confirmation message to stop recording Press on the remote to confirm When the sto...

Page 13: ...button Press button to select Media in the Source menu then press Enter button to enter Press button to select the type of media you wish to view in the Media menu then press Enter button to enter Pr...

Page 14: ...tton to return to the previous menu Exit Photo Menu Press button to select the desired file to watch in the file selecting menu then press Enter to display the picture When highlighting a photo the fi...

Page 15: ...enu then press button to enter Enter Press button to return to the previous menu Exit Music Menu Press button to select drive disk you want to watch then press button to enter Enter Press button to se...

Page 16: ...ss button to return to the previous menu Exit Press button to select desired drive disk then press button to enter Enter Press button to select MOVIE in the main menu then press button to enter Enter...

Page 17: ...ss button to return to the previous menu Exit Text Menu Press button to select drive disk then press button to enter Enter Press button to select return option to change pages Press Display button to...

Page 18: ...rol during DVD playback Press until the audio setup page is shown Downmix LT RT Mono audio during DVD playback Stereo Stereo audio during DVD playback When you stop the disc the player will automatica...

Page 19: ...Initial Installation Connect a RF cable to the TV s input called RF In Select Language Press button to select the language to be used for menus and message Select Country P Select Tune Type Press Pre...

Page 20: ...ard press HOME key If you have finished this wizard once it will not auto open again If you do not want to choose your network you can skip this step by pressing Skip You will also find the network se...

Page 21: ...21 If you choose Wi Fi select a Wi Fi Access Point If you choose Ethernet the screen will show the Ethernet connection status 21 If the network is not connected set up the date and time manually...

Page 22: ...22 Set up data time manually 22 User can set up the Language Network Time Zone Date Time and adjust screen size here...

Page 23: ...o select the sub screen and press to enter the sub screen Main Launcher 2 1 Main Launcher 23 App Menu allows you to view and select more apps If App upgrade message is displayed please press cancel to...

Page 24: ...24 Main Launcher 24...

Page 25: ...25 Restore factory default Main Launcher 2 2 Settings 25...

Page 26: ...26 Local update Net update OTA network upgrade Main Launcher 26...

Page 27: ...ress search key and input your website address 3 Download the APK file which you like if there is a link for download Note if you have problems with downloading please make sure there is enough space...

Page 28: ...AX1824S AX1832S...

Reviews: