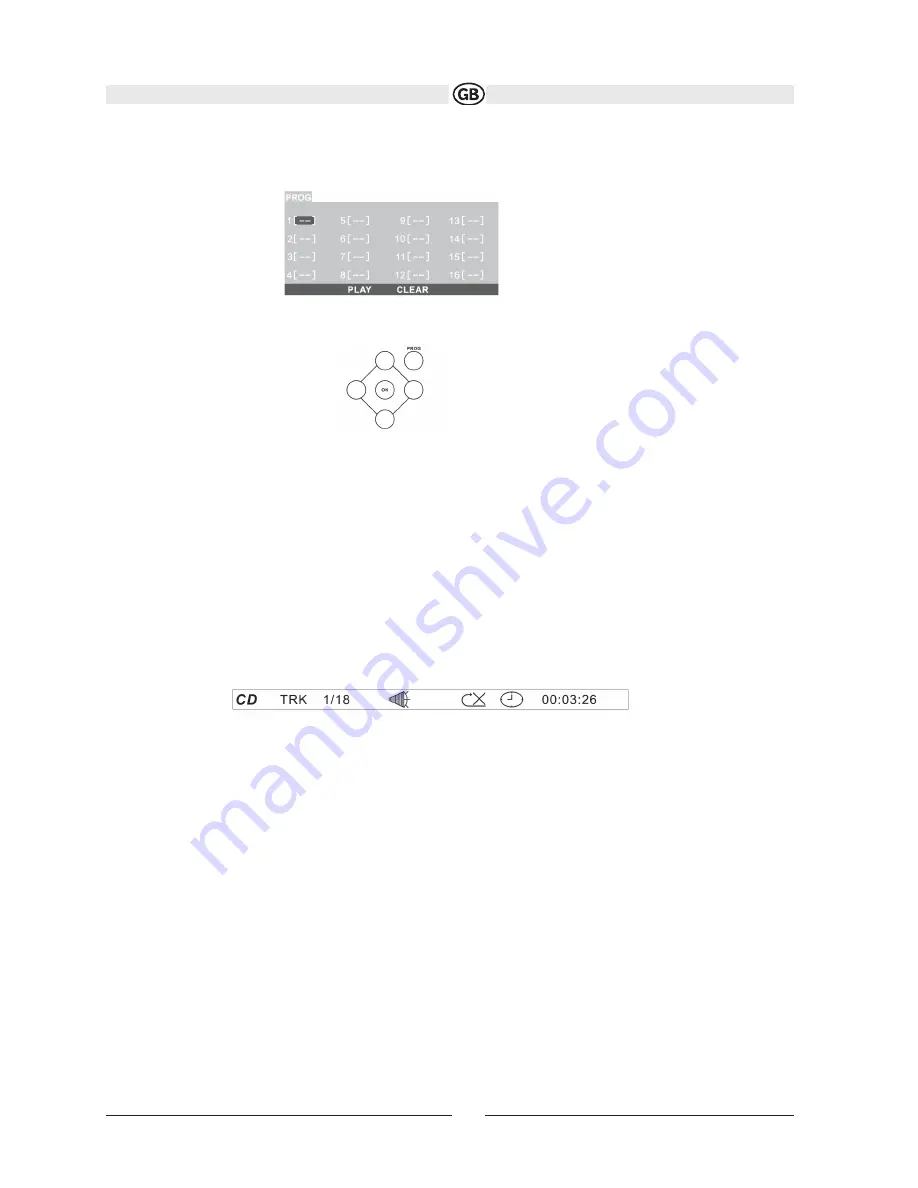
Audiovox VME 9120 TS Manual Download Page 23

Programmed Playback

1. Press the PROG button (34) on the remote control to access the programmed playback screen:

2. Use the 

or cursor buttons to access the fields on the “PROG” screen.

3. Use the number buttons on the remote control to enter a track number in each field.
4. Press the || button (19) on the remote control or highlight “PLAY” on screen and then press OK to begin playback in the numbered order indica-
ted. To delete the list, highlight “CLEAR” and then press OK. Press PROG to exit the programmed playback screen.

Remote Control Direct Track Entry

To select a track directly, use the number pad on the remote control (27). For single digit entries, press the corresponding number. For two digit
entries, press the 10+ button followed by the last digit (i.e., for track 16, press 10+ and then 6).

GOTO Direct Track/Chapter Access

Use the GOTO function to access a track (chapter) directly.
1. Press the GOTO button (20) on the remote control. The On Screen Display information will appear with the track number highlighted.
2. Use the number keys on the remote control to enter the 3-digit track number directly (i.e. for track 10, enter “010”) .

3. Press the OK button (26) to confirm and begin playback.

CD Playback Information

The following information is displayed at the top of the screen during CD playback:

• TRK ##/## – “1/18” indicates the first of 18 tracks on the CD is currently playing.
• – “X” indicates repeat play is OFF, “1” indicates repeat track, and “A” indicates repeat disc.
• Press OSD repeatedly to view the following information: for elapsed/remaining playing time:
• 00:02:18 – total elapsed playing time for disc
• C –00 :34 :37 – remaining playing time
• T 00:02:18 – total elapsed playing time for current track
• C –00 :34 :37 – remaining playing time for current track

23

Subject to technical changes

Summary of Contents for VME 9120 TS

Page 1: ...VME 9120 TS Multimedia Receiver 1...

Page 2: ...use all the features of your new Audiovox VME 9120TS Mobile Multimedia Receiver for maximum enjoyment Preparation 3 Installation 5 Controls and Indicators 9 Remote Control 10 Using the TFT Monitor 12...

Page 3: ...336 960 Sub Pixels 1440W X 234H Pixel Pitch 0 107 X 0 370 Screen Tilt Angle Adjustment Beep Tone Confirmation On OFF Option General 44 Key Infrared Remote Control Two Composite Video Outputs for Addi...

Page 4: ...the mechanism inside this unit avoid impact to the TFT monitor WARNING Using an improper fuse may cause damage to the unit and result in a fire WARNING The monitor employs an automatic motorized mecha...

Page 5: ...N Do not exceed M5 X 6MM screw size Longer screws may touch and damage components inside the chassis 4 Place the radio in front of the dashboard opening so the wiring can be brought through the dash F...

Page 6: ...bs outward as necessary so that the sleeve is firmly secured to the dashboard Use the M5 x 6 screws provided to install the mounting brackets to each side of the radio using the holes indicated below...

Page 7: ...s are packaged with the VME 9120TS for installation flexibility The VME 9120Ts will fit into most import dashes with little or no modification to the dash board cavity Some US domestic vehicle dashes...

Page 8: ...Wiring Diagram 8 Subject to technical changes...

Page 9: ...N EJECT Press to activate the automatic mechanical system and move the TFT monitor down to reveal the CD and SD Card slots Press again to close the TFT Press and hold to view the on screen tilt contro...

Page 10: ...Remote Control 10 Subject to technical changes...

Page 11: ...11 Subject to technical changes...

Page 12: ...he tilt angle in a continuous motion On Screen Panel Controls Press and hold the EJECT button 5 on the control panel to display the on screen tilt control menu TILT TILT EXIT TILT Touch repeatedly to...

Page 13: ...nal devices connected to the AUX IN inputs NOTE External sources will be displayed incorrectly if the MIRROR function is activated To correct this problem access the setup menu and set the MIRROR func...

Page 14: ...ON to reverse the screen image for rear view camera use LCD CALIBRATE Touch and hold to initiate screen calibration Touch the marks when prompted VOL LAST ADJUST VOL LAST When turned on the unit will...

Page 15: ...format The color signals are output in the standard PAL format The color signal output is switched automatically based on the current video input signal NTSC or PAL Smart Picture Standard Bright Soft...

Page 16: ...to the AM FM or RADIO source Selecting FM AM Band Touch the BAND button 22 on the screen or remote control 18 to change between the following bands FM1 FM2 FM3 AM1 and AM2 Seek Tuning To seek the nex...

Page 17: ...up possibilities OVERVIEW OF THE RDS FUNCTION Notes RDS is only available for FM receiption The PS function allows station names to be displayed in clear letters Network Tracking receiption uses the P...

Page 18: ...Disc To eject a disc you must first press the EJECT button 5 on the control panel or remote control 23 to reveal the disc slot 11 Press the EJECT button 13 behind the TFT panel to eject the disc The...

Page 19: ...ect the starting point The display will show REPEAT A Press A B when you reach the desired ending point The display shows REPEAT A B and the selected section will play repeatedly To cancel section rep...

Page 20: ...TT 5 8 5 8 indicates the fifth of 8 titles on the DVD is currently playing CH 2 16 2 16 indicates that the second of 16 titles on the DVD is currently playing Press OSD repeatedly to view the followi...

Page 21: ...Table 5 Disc Properties 21 Subject to technical changes...

Page 22: ...disc play To resume playback touch the button on screen or on the remote control 19 Pausing Playback Touch the button on screen or on the remote control 19 to suspend or resume disc play Moving Throu...

Page 23: ...then 6 GOTO Direct Track Chapter Access Use the GOTO function to access a track chapter directly 1 Press the GOTO button 20 on the remote control The On Screen Display information will appear with the...

Page 24: ...ting MP3 Playing Order When selected for play files and folders Folder Search File Search or Folder Select are accessed in the order they were written by the CD writer As a result the order in which t...

Page 25: ...to move to the previous file Repeat Playback Press the REPT button 7 on the remote control to alter repeat mode according to the following REP ONE Single REP DIR Directory REP OFF NOTE CD R and CD RW...

Page 26: ...eys on the remote control to enter the 4 digit track number directly i e for track 10 enter 0010 Continue pressing the 10 for multiples of ten into the 1000 s 3 Press the OK button to confirm and begi...

Page 27: ...iginal copy Speaker power rating not compatible with unit Connect proper speakers Speaker is shorted Check speaker contact Tel Mute malfunction MUTE wire is grounded Check that the MUTE connection is...

Page 28: ...atically stops play of the disc If this occurs allow the unit to cool before operating the player again 4 Never insert anything other than a 5 12 cm disc intothe player as the mechanism can be damaged...

Page 29: ...ng Range USA 530 kHz 1720 kHz Tuning range Europe 522kHz 1620kHz Sensitivity 20dB 15uV Signal to Noise Ratio 1 kHz 50dB Image Rejection 60dB Frequency Response 50Hz 2 kHz 3dB Monitor Screen Size 7 0 M...

Page 30: ...e excluded The guarantee period is not altered by the fact that we have carried out gua rantee work 3 Unauthorized tampering with the equipment will invalidate this guarantee 4 Consult your authorized...

Page 31: ...rial No Name und Anschrift des H ndlers Stempel Name and address of the dealer stamp K ufer Customer Name Name Stra e Street PLZ Ort City Land Country Nur g ltig in Verbindung mit Ihrer Kaufquittung N...

Page 32: ...Audiovox Audio Produkte GmbH Lise Meitner Str 9 D 50259 Pulheim Germany Tel 49 0 2234 807 0 Fax 49 0 2234 807 399 www audiovox germany de...

Reviews: