background image

[61]

[60]

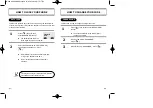
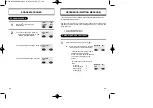
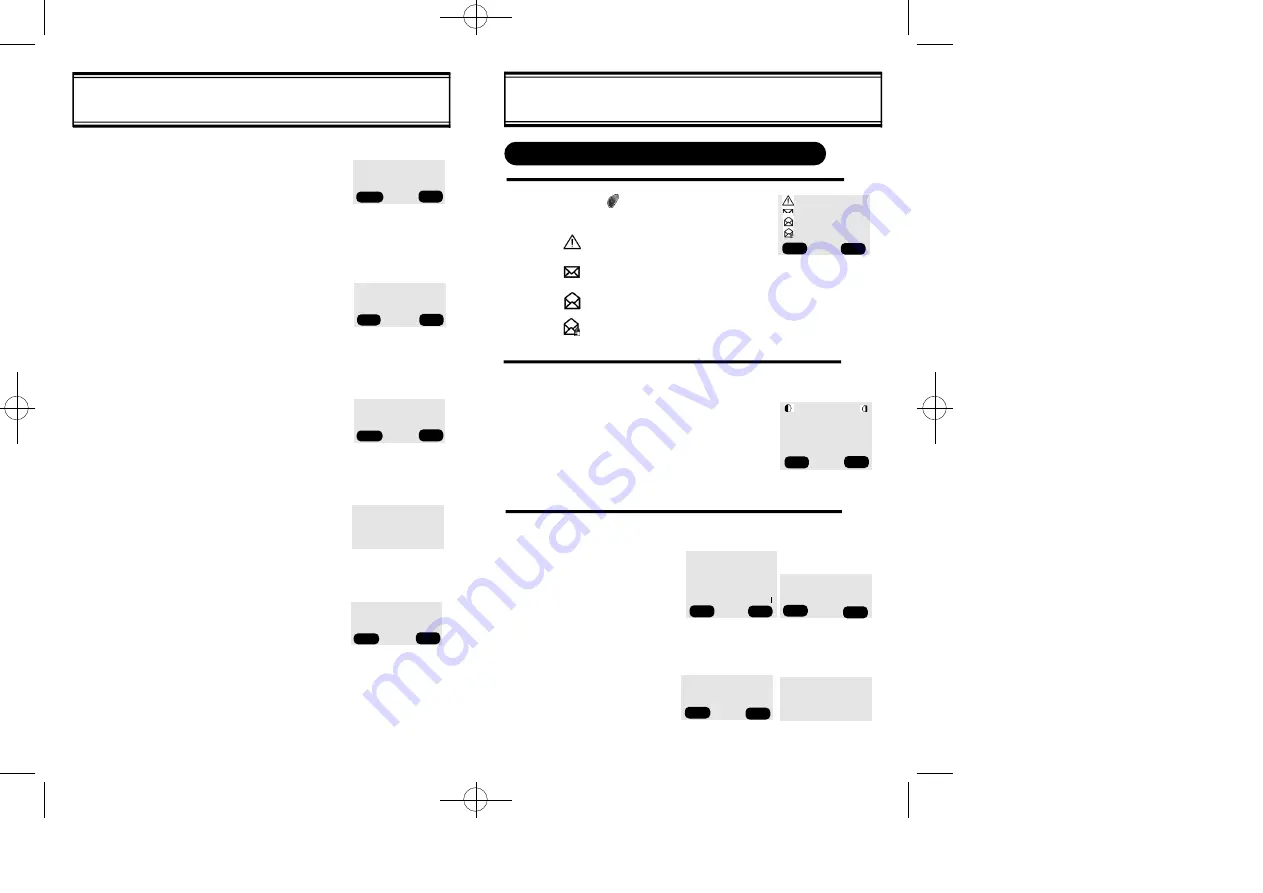
Select the desired message and press [SEL].
The message is displayed.

Then press [OPTS].

3.1 To reply to the text message,
press [1]


“Reply”,

then press [SEND].
Write your reply 
message, then press 
[NEXT]

.

INBOX

3

MESSAGE? T9 ABC

MODE

ERASE

THIS MESSAGE?

Press [       ], then press [3] “Inbox”.

: Urgent New Msg

: New Msg (unread)

: Old Msg (read)

: Lock (read) 

1

PREV

CHECKING RECEIVED TEXT MESSAGE

2

1 : REPLY
2 : ERASE
3 : FORWARD
4 : SAVE
5 : SAVE ADDRESS    

PREV

SEL

3.2 To erase the text message,
press[2], then press [YES].

THE MESSAGE
IS ERASED     

SEL

NEXT

YES

NO

0 / 1 6 0

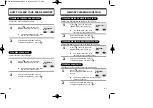
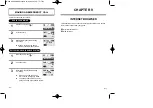
4.3 To change the text message,
press [3]“Edit Message”.

Input text message,

then press [NEXT].

MESSAGE?   T9 Abc
Test

MOOE

NEXT

4.4 To send urgent message, press
[4] “Priority”.
Then select the parameter
(Normal/ Urgent) by using the navi-
gation key. Press [SEL].

Priority?

u

Normal

PREV

SEL

4 / 1 6 0

4.5 To change call back 

number, press [5],“Call back”.

Input call back number,
then press [NEXT].

Call back NO.?       

XXXXXXXXXX

PREV

NEXT

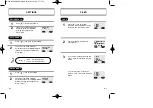
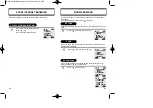
4.6 To save the text message,

press [6] “Save”.

Message saved
in ‘outbox’
folder

Phone book

4.7 To confirm the sending                  

message, press [7]

“Delivery Ack”.

Then select the parameter

(YES/NO) by using the navigation  

key. Press [SEL].

Delivery Ack

Z

NO

PREV

SEL

SEND NEW

: Test1
: Test2
: Test3
: Test4

TEXT MESSAGE

Test1
Fr : XXX-XXX-XXXX
CB : XXX-XXX-XXXX
02/20 09:36 AM

OPTS

PREV

TX-20B USER MANUAL06/28   01.6.28 12:21 PM  페이지68

Summary of Contents for CDM-8100

Page 1: ...ompletion 8 Status of Charger LED 9 Battery Life 9 Important Battery Information 10 CHAPTER 2 BASIC OPERATION 11 Turning the Phone On and Off 12 Turning the Phone On 12 Turning the Phone Off 12 How to Use the Menu 13 Menu Summary 14 Basic Functions 16 Making a Call 16 Pause Feature 17 How to Answer Calls 18 Caller ID Function 18 Call Waiting Function 18 Missed Call Display 19 How to Adjust Volume ...

Page 2: ...ing Roam Calls 51 CHAPTER 6 SUPPLEMENTARY FUNCTIONS 53 Schedule 54 View Schedule List 54 Input Schedule 54 Pause All Schedules 54 Stopwatch 55 Calculator 55 Bio Rhythm 56 TABLE OF CONTENTS CONT D iii CHAPTER 3 MEMORY FUNCTION 21 How to Store a Phone Number 22 How to Enter Letters and Characters Using the Keypad 23 How to Make a Call Using a Stored Phone Number 24 One Touch Two Touch Dialing 24 How...

Page 3: ...ng an Emergency Call 76 E911 in Lock Mode 76 E911 Using Any Available System 76 CHAPTER 9 INTERNET BROWSER 77 Start Internet Browser 78 Access Wireless Internet 78 Browser Menu 79 Reload 79 Home 79 Bookmarks 79 Mark Site 80 About Phone com 80 Advanced 80 TABLE OF CONTENTS CONT D iv Show URL 81 Homepage 81 SetUP link 81 Offline Service 82 Outbox 82 Restart Up Browser 83 Encryption 83 CHAPTER 10 SAF...

Page 4: ... product u Package Includes v Handset Description w Basic Functions x Display Indicators y Using the Battery z Charging the Battery Important Battery Information CHAPTER 1 BEFORE USING YOUR PHONE 1 TX 20B USER MANUAL06 28 01 6 28 12 20 PM 페이지8 ...

Page 5: ...t defects please report them to the place of purchase immediately Handstrap Standard Battery User Manual Desktop Charger Handset Volume Button Used to adjust the volume of the earpiece and ringer volume Antenna For best call quality extend the antenna during the call Earpiece LCD Screen Function Keys Keypad Send key END POWER KEY Microphone TX 20B USER MANUAL06 28 01 6 28 12 20 PM 페이지10 ...

Page 6: ...NCTION KEYS Signal Strength Indicates current signal strength More lines mean better signal strength Roaming Indicates the phone is outside of its home area Service Indicator When a call is in progress is displayed When is displayed the phone is in idle mode When is displayed the phone is not receving a signal from the system Message Indicates a text message or voice mail message is waiting Digita...

Page 7: ...erted the handset will not turn on or the battery may slip out during use Connect the charger to a standard 120V AC outlet The LED will light green when the power is connected POWER CONNECTION CHARGING THE BATTERY ONLY Battery is not charged when you purchase the product Fully charge the battery before use To charge the battery only insert the battery pack into the charging slot on the charger The...

Page 8: ...is less efficient than charging it with the handset off 1 1 STATUS OF CHARGER LED If the red LED does not come on after the handset or battery has been inserted into the charging slots re insert or check power Charging in Progress Red Color On Charging Completion Green Color On Charging Slot Front Charging slot charging slot for handset only BATTERY LIFE FOR NEW BATTERY Status Type Standard Batter...

Page 9: ...nals may damage the battery or the connecting object Leaving the battery in hot or cold places such as in a closed car in summer or winter conditions reduces the capacity and lifetime of the battery Always try to keep the battery between 41ºF and 95ºF 5ºC and 35ºC A phone with a hot or cold battery may temporarily not work or charge even if the battery is fully charged Temperature extremes affect ...

Page 10: ...NING THE PHONE ON AND OFF l Press l The phone is locked if LOCK is displayed on the screen When LOCK is displayed enter the 4 digit lock to unlock the phone l The default lock is the last 4 digits of your phone number 1 TURNING THE PHONE ON TURNING THE PHONE OFF 1 If the LOW BATTERY WARNING POWER OFF is displayed and the power goes off there is a possibility of damaging the memory Change or charge...

Page 11: ...ALL 3 DIALED CALL 1 CALL LOGS 2 BY LOCATION 3 BY NAME 1 AUTO RETRY 2 AUTO ANSWER 3 ONE TOUCH 4 BACKLIGHT 5 LCD CONTRAST 6 LANGUAGE 7 CHANGE BANNER 8 KEY GUARD 1 RING MODE 2 RING TYPE 3 KEY BEEP 4 DTMF TYPE 1 LAST CALL 2 ALL CALLS 3 HOME CALLS 4 ROAM CALLS 15 14 2 SETTING 3 TONE 4 TIMER 8 SYSTEM INFO 1 INCOMING 2 OUTGOING 3 MEMORY 4 LONG DISTANCE 5 900 S 1 CLR PHONEBOOK 2 CLR SCHEDULE 3 CLR CALL LO...

Page 12: ... will be retried automatically for the time you have selected l Press to end the call and hold for more than half a second 1 MAKING A CALL 2 Enter phone number then press Select desired pause Pause Definitions l HARD PAUSE If you enter the pause character P the number entered after the pause character will be sent by pressing key When Receiving Call status 1 SEND PHONE 2 SCRATCH PAD 3 MUTE 4 VIEW ...

Page 13: ... Hands free volume adjustment Press when the phone rings and it will mute the ringer 1 HOW TO ADJUST VOLUME You can adjust the volume in two ways by using the volume control keys on the side of the handset or by using the menu BASIC FUNCTIONS When the phone rings or LED blinks press any key except Volume up or down or 1 HOW TO ANSWER CALLS 2 If you set up the AUTO ANSWER function in advance the ca...

Page 14: ...he phone number then press 1 SENDING YOUR NUMBER TO A PAGER This function enables the phone number of the handset to be transmitted automatically to a pager depending on pager ser vice SCRATCH PAD 2 1 00 00 38 OFF MENU CHAPTER 3 MEMORY FUNCTION u How to Store a Phone Number v How to Make a Call Using a Stored Phone Number w How to Find Your Call Logs x How to Find Your Phone Book TX 20B USER MANUA...

Page 15: ...cial mode where special characters are displayed on the top of the screen 3 Press the navigation key up or down to display different special characters 4 Press to make a blank space The cursor moves to the next column automatically in two seconds 3 Repeat until all the characters you want are entered You can store up to 16 characters 4 Erasing Entry To erase one letter press To erase the entire en...

Page 16: ...le number MISSED CALLS 4 2 3 ONE TOUCH TWO TOUCH DIALING This feature allows the phone book entries to be dialed via the key pad ONE TOUCH DIALING 1 9 Press the corresponding memory number and hold for more than 1 second TWO TOUCH DIALING 00 10 99 press the first digit and second digits of the memory num ber short and long respectively l If no phone number is stored in the location keyed Empty Loc...

Page 17: ...1 RECALLING BY MEMORY LOCATION NUMBER 2 4 3 HOW TO FIND YOUR CALL LOGS ANSWERED CALLS DIALED CALLS Press then 1 then 1 then 3 Refer to previous page for instructions on how to view call information Press to dial desired dialed call number l The last outgoing call its phone number time and date are displayed SEARCH LOCATION _ STO PREV Press then 1 then 1 then 2 Refer to previous page for instructio...

Page 18: ... l edits the phone l returns to the previous menu l erases the contents 1 RECALLING BY NAME ALPHA 2 4 3 SEARCH RECALL NAME Abc STO MODE Please read this chapter before using this product Settings BackLight Display Change Banner Key Guard Tone Call Timers Alerts Data Service System Info Phone Info CHAPTER 4 MENU Press to dial 29 TX 20B USER MANUAL06 28 01 6 28 12 20 PM 페이지36 ...

Page 19: ...at a set interval or amount of retries INTERVAL AUTO RETRY Press then 2 then 1 then 2 Select the parameter 1 3 RINGS by using the navigation key 1 2 REPEAT Select the parameter OFF 1 3 RINGS by using the navigation keys Press to set l Auto answer function does not work if you select lamp AUTO ANSWER u OFF SEL PREV This function allows the phone book entries to be dialed via the keypad 1 2 ONE TOUC...

Page 20: ... use the phone even in dark places This function adjusts the LCD screen contrast DISPLAY 1 2 LCD CONTRAST Press then 2 then 5 Select the contrast level by using the navigation key Press Press then 2 then 6 Select the parameter ENGLISH FRANÇAIS by using the navigation key Press 1 2 LANGUAGE LCD CONTRAST u PREV SEL LANGUAGE u ENGLISH SEL PREV This function changes the language of the phone TX 20B US...

Page 21: ...layed on the LCD You can enter a banner up to 16 characters long Press 3 This function protects the phone from unintentional key presses KEY GUARD 1 2 KEY GUARD Press then 2 then 8 Select the parameter ON OFF POWER ON by using the navigation key Press 3 KEY GUARD u ON PREV SEL BANNER abc XXXXXXX SEL MODE 34 35 TX 20B USER MANUAL06 28 01 6 28 12 20 PM 페이지42 ...

Page 22: ...ect the parameter CONTINUOUS BURST by using the navigation key 1 2 DTMF TYPE 3 Press Press then 3 then 3 for keypad volume l If the warning alarm sounds because of low battery the sound will not be heard even if the user press es the button Select the volume level by using the scroll keys Press it up to raise the volume and down to lower it Press 1 KEY BEEP 2 3 CALL TIMERS Press then 4 then 1 Pres...

Page 23: ...ll lapse time Select the parameter ON OFF by using the navigation key Press 1 MIN ALERT MIN ALERT u ON SEL PREV Press then 6 then 2 Select the parameter ON OFF by using the navigation key Press 1 2 ROAM ALERT This function sounds an alert when then handset enters a new ser vice area when it enters another service area or when it leaves the user s service area ROAM ALERT u ON SEL PREV FADE ALERT u ...

Page 24: ... flow control SOFTWARE Software flow control Recommendation HARDWARE flow control 1 2 FLOW CONTROL 1 RECEIVE MODE 2 FLOW CONTROL PREV 1 RECEIVE MODE 2 FLOW CONTROL PREV RECEIVE MODE uINACTIVE SEL SEL SEL PREV FLOW CONTROL u HARDWARE SEL PREV Press then 8 then 2 SYSTEM INFO Press then 8 then 1 1 SYSTEM INFO FORCE MODE u AUTOMATIC Select the system AUTOMATIC TELUS DIGI TAL by using the navigation ke...

Page 25: ...ecks the telephone number of the handset currently in use u How to Lock Your Phone v How to Change Your Code w How to Restrict Your Phone x How to Reset Your Phone y How to Clear Your Phone Memory z Memory Clearing Function CHAPTER 5 SECURITY FEATURES TX 20B USER MANUAL06 28 01 6 28 12 21 PM 페이지50 ...

Page 26: ...the last 4 digits of your phone number Select the parameter OFF POWER ON ON by using the navigation key Press l POWER ON locks the handset upon pow ering on the handset each time l OFF unlocks the handset and leaves it unlocked 1 AUTO LOCK This function prevents any other person from using the handset with out permission When it is locked the handset can not be used to dial or use any other functi...

Page 27: ...g calls can still be made 2 3 RESTRICT u YES INCOMING uALLOW SEL PREV SEL PREV RESTRICTING OUTGOING CALLS Press 2 OUTGOING Select the parameter by using the navigation key RESTRICT Restricts outgoing calls ALLOW Allows outgoing calls Press 1 When this function is enabled incoming calls can be answered but outgoing calls cannot be made It is still possible to make emergency calls 2 3 OUTGOING uALLO...

Page 28: ...LLOW Allows 900 service Press 1 2 3 LONG DISTANCE uALLOW SEL PREV RESTRICTING LONG DISTANCE CALLS The message THIS PHONE IS RESTRICTED is dis played on the screen when a restricted call is placed 900 S uALLOW PREV SEL Press then 0 then PASSWORD then 4 Select the parameter by using the navi gation key Press l If you select YES RESET is dis played and then the screen will return to idle mode 1 This ...

Page 29: ...s of your phone number Select the parameter NO YES by using the navigation key Press 1 2 CLEARING AIR TIME IN HOME SERVICE AREA This function clears air time used in the home service areas CLEAR HOME u NO SEL PREV MEMORY CLEARING FUNCTION Press then 0 then enter PASSWORD then 5 then 3 l The default lock code is the last 4 digits of your phone number Select the parameter NO YES by using the navigat...

Page 30: ... 52 53 u Schedule v Stopwatch w Calculator x Bio Rhythm CHAPTER 6 SUPPLEMENTARY FUNCTIONS TX 20B USER MANUAL06 28 01 6 28 12 21 PM 페이지60 ...

Page 31: ...L SCHEDULE Select the parameter NO YES by using the navigation key then press STOPWATCH Press then 5 then 2 Press to control the stopwatch control Start Stop Split Split Release Initiate Previous The time unit displayed on the LCD in 1 100 of a second Press to exit and return to the initial display 1 2 STA PREV 3 CALCULATOR Using the calculator l Definitions t u l Up to 8 integer digits can be dis...

Page 32: ...n today s date 2 1 3 This function identifies the bio rhythms of today or a specific day using solar calendar l Physical Emotional and Intelligent quotients appear with a number showing how many days have passed since your birthdate for the date you want to find out Bio rhythm is displayed on the top portion of the screen l What is Bio rhythm Bio rhythm is a life rhythm which is governed by three ...

Page 33: ...ge if necessary then press NEXT Then press 1 SEND Send To 123 123456789 MODE phone book STO MESSAGE T9 Abc Test NO RECEIVING A MESSAGE When a message is received the follow ing message is displayed Press READ to display the received message 1 2 Test1 Test2 XX NEW TEXT XX VOICE FR XXX XXXX XXXX CNCL VOICE MAIL Press then press 1 Voice Mail The number of voice mail messages currently received in you...

Page 34: ... 3 Edit Message Input text message then press NEXT MESSAGE T9 Abc Test MOOE NEXT 4 4 To send urgent message press 4 Priority Then select the parameter Normal Urgent by using the navi gation key Press SEL Priority uNormal PREV SEL 4 160 4 5 To change call back number press 5 Call back Input call back number then press NEXT Call back NO XXXXXXXXXX PREV NEXT 4 6 To save the text message press 6 Save ...

Page 35: ... 6 To lock or unlock the text message press 6 Then select the parameter Lock Unlock by using the navigation key then press SEL INBOX 3 3 To forward the text message press 3 then input the phone number and text mes sage Send To 123 MODE MESSAGE T9 Abc SMS Test1 MODE Message saved in filed folder 3 4 To save the text message press 4 3 5 To save the text message s Call Back NO into a memory location ...

Page 36: ...the phone number and text message MESSAGE T9 Abc OutboxTest5 MODE 3 4 To save the text message press 4 Cause_code XX Error_class XX 3 5 To display sent message state press 5 Message saved in filed folder YES STO NEXT CNCL phone book 11 160 OUTBOXTest1 OUTBOXTest2 OUTBOXTest3 OUTBOXTest4 OUTBOXTest5 PREV SEL OUTBOXTest1 OUTBOXTest2 OUTBOXTest3 OUTBOXTest4 OUTBOXTest5 PREV SEL Press then 5 SETTINGS ...

Page 37: ... 4 DELIVERY ACK Select the parameter YES NO by using the navigation key Press SEL 1 2 DELIVERY ACK FILED Delivery Ack Z YES PREV PREV SEL Press then press 5 SETTINGS Then press 5 AUTO ERASE Select the parameter DISABLED OLD INBOX by using the navigation key Press SEL Press then 5 SETTINGS Then press 6 ENTRY MODE Select the parameter T9 MODE ALPHA MODE by using the navigation key Press SEL 1 1 2 2 ...

Page 38: ...o enter Press it as many times as needed for the letter to appear on the screen For example to enter the name John Press 5 J Press 6 6 6 o Press 4 4 h Press 6 6 n Press then press 7 Erase Msgs 1 ERASE MESSAGES 2 1 Inbox XX 2 Outbox XX 3 Filed PREV PREV 2 1 To erase inbox mail press 1 Select the parameters NO OLD INBOX ENTIRE INBOX Erase inbox ZNO PREV PREV PREV SEL SEL Erase outbox ZNO PREV PREV P...

Page 39: ... for h 6 for n REFERENCE WRITING MESSAGE The display shows the above words for each key pressed USING T9 MODE TEXT INPUT REFERENCE WRITING MESSAGE Mode 0 Next Space Shift Clear Left Right Press to change mode T9Abc Abc 123 Special characters mode Press to view the next matching word if the underlined word is not the word you intended Press once to accept a word and add a space Press to select stan...

Page 40: ...SAGE T9Abc Logo MODE NEXT MESSAGE T9Abc John MODE NEXT 1 2 Press each key once for each letter For example to write John press 5 6 4 6 Press 0 to view the next matching word if the underlined word is not the word you intended REFERENCE WRITING MESSAGE Select the T9 Abc mode by using the keys If the word is correct then press If the word is not correct then press 0 press 0 until you reach the corre...

Page 41: ... 75 74 u Making an Emergency call CHAPTER 8 MAKING AN EMERGENCY CALL TX 20B USER MANUAL06 28 01 6 28 12 21 PM 페이지82 ...

Page 42: ...e during 5 minutes l When a call ends the phone returns to the Emergency Mode 1 3 2 E911 IN LOCK MODE This is the enhanced 911 feature Telus APR3 9 20 pm TUE 00 11 01 911 MAKING AN EMERGENCY CALL MENU LOCK 911 EMERGENCY CALL Telus APR3 9 20 pm TUE 00 11 01 911 MENU LOCK 911 EMERGENCY CALL INTERNET BROWSER CHAPTER 9 This chapter describes convenient functions that allow you to access the Wireless I...

Page 43: ...hen internet browser will start 1 ACCESS WIRELESS INTERNET START INTERNET BROWSER 1 EMAIL 2 CONTACTS 3 CALENDAR 4 TO DO S 5 BOOKMARKS INBOX OK BROWSER MENU 1 RELOAD 2 HOME 3 BOOKMARKS 4 MARK SITE BACK OK BROWSER MENU 1 RELOAD 2 HOME 3 BOOKMARKS 4 MARK SITE BACK OK When the bookmarks item is selected from the browser menu the browser displays the user s bookmarks Press then press 3 1 BOOKMARKS BOOK...

Page 44: ...E 5 ABOUT PHONE COME BACK OK 1 RELOAD 2 HOME 3 BOOKMARKS 4 MARK SITE 5 ABOUT PHONE COME BACK OK 2 HOME 3 BOOKMARKS 4 MARK SITE 5 ABOUT PHONE COME 6 ADVANCED BACK OK Selecting the Show URLitem displays the URL of the current deck Press and hold then press 6 then press 1 Press and hold then press 6 then press 2 1 1 SHOW URL HOMEPAGE Selecting the homepage item from the browser menu enables the user ...

Page 45: ...e oldest item Press and hold then press 6 then press 5 1 OUTBOX 2 HOMEPAGE 3 SET UP LINK 4 OFFLINE SERVICE 5 OUT BOX BACK OK OUTBOX EMPTY BACK OK Press and hold then press 6 then press 6 1 RESTARTUP BROWER Selecting restart from the browser menu causes the deck history and deck cache to be cleared and a new session with the UP Link to be started 4 HOMEPAGE 5 SET UP LINK 6 RESTART UP BROWSER BACK O...

Page 46: ... 85 84 SAFETY u Safety Information for Wireless Handheld Phones v Safety Information for RF Exposure CHAPTER 10 TX 20B USER MANUAL06 28 01 6 28 12 21 PM 페이지92 ...

Page 47: ...hone is a low power radio trans mitter and receiver When it is ON it receives and also sends out radio frequency RF signals In August 1996 the Federal Communications Commissions FCC adopted RF exposure guidelines with safety levels for handheld wire less phones Those guidelines are consistent with the safety standards previously set by both U S and international standards bodies ANSI C95 1 1992 NC...

Page 48: ...uipment may not be shielded against the RF signals from your wireless phone Pacemakers The Health Industry Manufacturers Association recommends that a minimum separation of six 6 inches be maintained between a hand held wireless phone and a pacemaker to avoid potential interference with the pacemaker These recommendations are consistent with the independent research by and recommendations of Wirel...

Page 49: ... and Transport Canada Regulations prohibit using your phone while in the air Switch OFF your phone before boarding an aircraft Blasting Areas To avoid interfering with blasting operations turn your phone OFF when in a blasting area or in areas posted Turn off two way radio Obey all signs and instructions Potentially Explosive Atmospheres Turn your phone OFF when in any area with a potentially expl...

Page 50: ...ase visit the Canadian Wireless Telecommunication Association website at www cwta ca SAFETY INFORMATION FOR RF EXPOSURE CHAPTER 11 WARRANTY u Protect Your Warranty v 12 Month Limited Warranty TX 20B USER MANUAL06 28 01 6 28 12 21 PM 페이지100 ...

Page 51: ... be delivered with proof of warran ty coverage specification of defect s transportation prepaid to the Company at the address shown below For TRAVELERS WARRANTY SERVICE PROTECT YOUR WARRANTY Read your Warranty carefully with the special consideration to paragraph seven of the Limited Warranty for your unit Warranty does not apply to or to any product or part thereof which has suffered through alte...

Page 52: ...72 for reference to an Authorized Warranty Station in your area THE EXTENT OF THE COMPANY S LIABILITY UNDER THIS WARRANTY IS LIMITED TO THE REPAIR OR REPLACE MENT PROVIDED ABOVE AND IN NO EVENT SHALL THE COMPANY S LIABILITY EXCEED THE PURCHASE PRICE PAID BY PURCHASER FOR THE PRODUCT The Company disclaims liablity for geographic coverage inad equates signal to antenna communications range or operat...

Reviews: