background image

5

Main Features

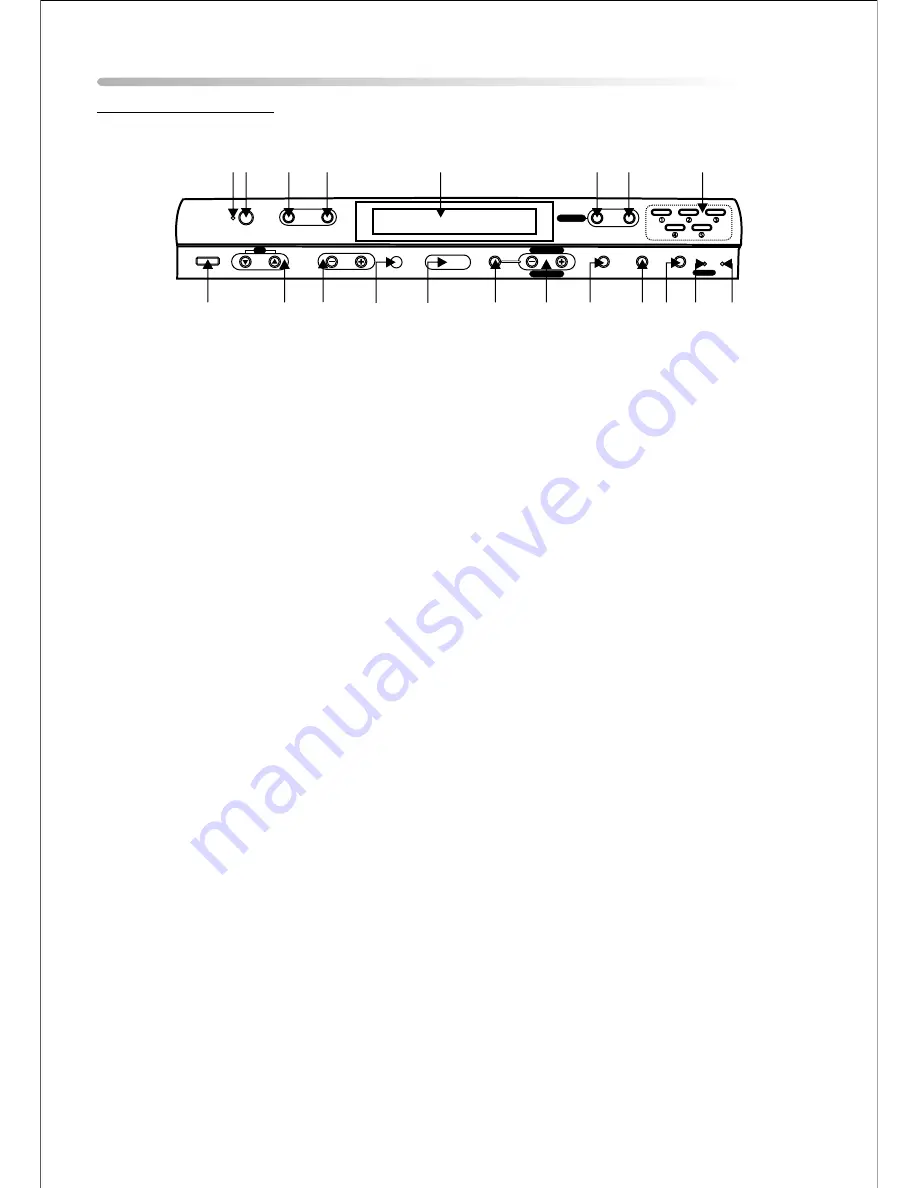
Front Panel Controls

1. Power Indicator–

 Bright red when power is on.

2. Power Button –

 To turn the DKP102


on or off.

3. Source Button –

 Press this button to select from the four available sources DVD, TV , AV, Radio

.


4. Auto Pro. Button – 

When this


button is pressed, all TV


channels are searched and channels that are 

detected with signals of sufficient levels are automatically stored in memory.

5. LCD Display Window –

 The LCD display shows the current time, source selected and radio

station.

6. Record Button – 

Press this button to record up to a 2 minute message.

7. Play Button – 

Press this button to playback the recorded message.

8. Numeric Buttons (1-5) – 

Used to recall the radio presets.

9. Mic –

 Microphone used for message


recording .

10. Message Indicator – 

Flashes to indicate a message is waiting.

11. Timer Button –

 Used to set the timer function and turn off the timer buzzer when activated.

12. Clock Mode Button –

 Used to select the clock or alarm item to be set.

13. Store Button –

 Used to set the AM/FM presets into memory.

14. Radio Tune/Clock Set 

 –

 In Standby mode these buttons are used for setting hours, minutes,


and to select

from 12 and 24 hour mode.


      –

 In operation mode


these buttons are used for radio tuning Up and Down.

15. Radio Band / Alarm Off Button –

 Radio Band selector. (Between FM1, FM2 and AM

Press this

button to turn off the alarm when activated.

16. Open Button –

 Used to unlock the shuttle housing.

17. Bass Boost Button – 

Used to increase the low frequency (Bass) response.

18. Volume Up/Down Button –

  Used to increase and decrease the volume level.

19. Channel Up/Down Button –

 Used to go to the next channel Up or Down.

20. Sensor Cover –

 Allows the remote control to operate the DKP102 and the installed shuttle 

(DT102, DT85, DT7).

1 2

3

4

5

6

7

8

9

10

11

12

13

14

15

16

17

18

19

20

POWER

SOURCE

AUTO PRO.

PLAY

REC

MESSAGE

MESSAGE

RADIO TUNE

CLOCK SET

CHANNEL

VOLUME

OPEN

STORE

TIMER

MIC

RADIO BAND/AlARM OFF

CLOCK MODE

BASS BOOST

TV

Summary of Contents for 1287350

Page 1: ...KING STATION for DT102 DT85 DT7 128 7350 Operation and Installation Manual POWER SOURCE AUTO PRO PLAY REC MESSAGE MESSAGE RADIO TUNE CLOCK SET CHANNEL VOLUME OPEN STORE TIMER MIC RADIO BAND ALARM OFF...

Page 2: ...e the battery incorrectly Replace the battery only with the same or equivalent type in order to protect the environment please dispose the dispose the battery properly 3 Warning To reduce the risk of...

Page 3: ...N 112 3542 1pc 5 AM FM BP Antenna P N AMFM BP 1pc 6 Paper Template P N 128 7424 1pc 7 Antenna Adaptor L P N 154 1130 2pcs 1 TOOLS REQUIRED Drill and Drill Bit Nail or Awl Philips Screwdriver Masking T...

Page 4: ...Main Features Under Counter Docking Station for DT102 DT85 DT7 125 Channel Cable Ready TV Tuner AM FM Radio Alarm Clock AV Input Personal Message Recorder Bass Boost Countdown Timer 2...

Page 5: ...a combination of spacers which will allow the DKP102 to be secured to the bottom of the cabinet 3 Measure the thickness of the bottom of the cabinet or shelf and the spacers chosen Select the shortest...

Page 6: ...Mounting Screw Template 3a 2 3 1 128 7424 4 To prevent heat damage do not place heating or cooking appliances beneath this unit Install the unit as far as possible from a source of noise For example...

Page 7: ...imer buzzer when activated 12 Clock Mode Button Used to select the clock or alarm item to be set 13 Store Button Used to set the AM FM presets into memory 14 Radio Tune Clock Set In Standby mode these...

Page 8: ...round 12V DC operation 3 AV IN The DKP102 will accept an AV input through the AV jacks located on the rear of the unit The video device could be a video game system video camera or other input device...

Page 9: ...20 21 23 22 24 25 26 27 28 29 30 31 32 34 33 35 36 37 38 0 39 40 41 42 VOLUME Battery Installation Before attempting to operate your Remote Control install the batteries as described below 1 Turn the...

Page 10: ...and the stored channel numbers are displayed in GREEN The word ERASE and the erased channel numbers are displayed in RED 6 SEEK CHANNEL UP 5 Button Use this button to increase the TV channel number o...

Page 11: ...r to search in a forward direction at 2 4 8 and 20 times the normal speed 24 PLAY 4 Button Press this button to activate the play mode when a disc is loaded into the disc compartment 25 ANGLE Button P...

Page 12: ...ns are searched in ascending order and the tuner will stop on the next active channel 36 PIX Button PICTURE SELECT Each time this button is pressed the OSD will display the adjustment bars for BRIGHTN...

Page 13: ...tes will flash b Press the radio tune clock set button to set the hour This will also set AM PM c Press the radio tune clock set button to set the minutes d Press the clock set button to turn off the...

Page 14: ...into memory Memo will be displayed on the LCD display to indicate the channel has been stored in memory To store the next radio station in memory follow steps 1 3 above A maximum of 5 presets are ava...

Page 15: ...he DVD shuttles is installed it will power ON a moment after the DPK102 is turned ON 2 TV mode Press the Source button once The DKP102 will be in TV tuner mode 3 AV mode Press the Source button twice...

Page 16: ...nal Shuttle Housing AV1 Input 1 Lift the shuttle clamp 1 up to the top 2 Install the lower 2 portion of the shuttle into the bottom of the shuttle housing 3 3 Gently push the upper portion 4 of the sh...

Page 17: ...k The words Invalid Key appear on screen Make sure there aren t any obstructions between the remote control and the DVD Player Make sure the you are pointing the remote control at the DVD Player Make...

Page 18: ...l or defacement of the factory serial number bar code label s THE EXTENT OF THE COMPANY S LIABILITY UNDER THIS WARRANTY IS LIMITED TO THE REPAIR OR REPLACEMENT PROVIDED ABOVE AND IN NO EVENT SHALL THE...

Page 19: ...2005 Audiovox Electronics Corp Hauppauge NY 11788 128 7350 WWW audiovox com For Customer Service Visit Our Website At Product Information Photos FAQ s Owner s Manuals...

Reviews: