128-6994
1 of 8
Model AX-200
Installation Manual
Note:
When both Passive Arming and Voltage Sensing are selected, you must hardwire the driver’s door pin
switch in order to begin the passive arming sequence.
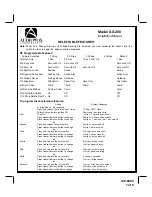
RF Programmable Features:
Feature Selection
1 Chirp
2 Chirps
3 Chirps
4 Chirps
Default
1st Door L/UL
1 Sec.
3.5 Sec.
1 Sec L, Dbl. U/L
1 Sec.
2nd Accy Lock
Auto Lock On
Auto Lock Off
Auto Lock Off
3rd Accy. UL
Auto UL Dr.
Auto UL All
Auto UL Off
Auto UL Off
4th Passive Locks
Passive
Active
Active
5th Passive/Active Arm
Passive Arm
Active Arm
Active Arm
6th Voltage Sense
Voltage Sense
Hardwire
Hardwire
7th Siren/Horn
Siren/Horn
Siren Only
Horn Only
Siren/Horn
8th Horn Chirp
10mS
16mS
30mS
16mS
9th Override Method
Custom Code
Valet
Valet
10th Two Step Unlock
On
Off
Off
11th Chirp Delete From Tx On
Off
Off
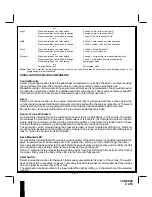
To program these selectable features;
Action
System Response
Turn ignition on No response
Press and release the valet switch 3 times
1 Chirp - LED 1 flash
Within 3 seconds, turn ignition Off
Short chirp, then long chirp
First
Then On
1 chirp = 1 second door locks
Press transmitter Lock button to change
2 chirps = 3.5 second door locks
Press transmitter Lock button to change
3 chirps = 1 sec. lock, dbl 1 sec. unlock
or
Second
Press and release the valet switch
2 chirps = auto locks off
Press transmitter Lock button to change
1 chirp = auto locks on
or
Third
Press and release the valet switch
3 chirps = auto unlock off
Press transmitter Lock button to change
1 chirp = auto unlock dr.
Press transmitter Lock button to change
2 chirps = auto unlock all
o r
Fourth
Press and release the valet switch
2 chirps = active locks
Press transmitter Lock button to change
1 chirp = passive locks
o r
Fifth
Press and release the valet switch
2 chirps = active arming
Press transmitter Lock button to change
1 chirp = passive arming
o r
Sixth
Press and release the valet switch
2 chirps = hardwire
Press transmitter Lock button to change
1 chirp = voltage sense
o r
Seventh
Press and release the valet switch
1 chirp = siren and horn output
Press transmitter Lock button to change
2 chirps = siren output only
Press transmitter lock button to change
3 chirps = horn output only
SELECTABLE FEATURES

