background image

2

3

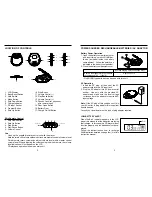
LOCATION OF CONTROLS

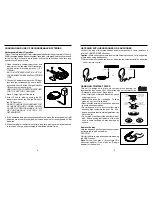
POWER SOURCES RECHARGEABLE BATTERIES / AC ADAPTOR

Battery Power Operation
1. Open the battery compartment cover

and insert two gum stick Ni-MH bat-
teries  (included) inside the battery
compartment.  Follow the polarity as
indicated in the battery compartment.

2. Close the battery compartment cover.

          Average Playing Time (Continuous Play)

Ni-MH Rechargeable (min specification

           Approx 5 hours.

recommended 1.2V - 1100mA)

• Only Ni-MH type batteries can be used with this unit.

AC Operation
1. Insert the DC plug, at the end of the AC

adaptor cord into the DC input jack.

2. Plug the AC adaptor into AC power outlet

socket.  Use only with the provided AC
adaptor and make sure the local voltage
corresponds to the adaptor's required AC
input voltage.

Note: If the AC plug of this unit does not fit in
your AC outlet, a plug adaptor (Not supplied)
should be used.
Consult your local dealer on the type of plug adaptor required.

LOW BATTERY ALERT
When the Batt. indicator appears in the LCD
panel, this means that the batteries are losing
their charge.  In this case the CD player will not
function properly and the batteries must be re-
placed.
Follow the instructions on how to recharge
Ni-MH batteries detailed on page four (4) of this
instruction manual.

1. LCD Display
2. Bass Boost Switch
3. Hold Switch
4. Mode Button
5. Skip Down Button
6. Charge Indicator
7. DC Input Socket
8. Program Button
9. Skip Up Button

10. Stop Button
11. Volume Control (–)
12. Play/Pause Button
13. Volume Control (+)
14. Phones Jack (for phones or

wire remote input)

15. Door Open Button
16. Battery Door
17. Charge On/Off Button

Wire Remote Control
1. Skip Down Button
2. Skip Up Button
3. Stop Button
4. Play/Pause Button
5. Volume Control

Note:
-

Use only the supplied remote control unit with the player.

-

Note that main unit volume up/down buttons are master control of volume level.
Wired remote rotary volume can adjust volume level within master control
volume level. When adjusting the volume using the wired remote, the volume
level indication will not appear on the LCD.

-

CD playback operation is same as main unit.

ON

TO MAIN UNIT

TO HEADPHONE

1

2

3

4

5

13

12

7

8

10

5

4

14

6

17

9

11

1

16

15

2

3

Summary of Contents for CD-330R

Page 1: ...he wall outlet when the set is not to be used for an extended period of time 4 When cleaning your unit use a soft dry cloth do not use solvents or commer cially available cleaners as they may damage or discolour the finish 5 Do not wear eardphones while operating a motor vehicle this could create a traffic hazard and is illegal in many areas 6 The eardphones supplies with your unit provide super s...

Page 2: ...s in the LCD panel this means that the batteries are losing their charge In this case the CD player will not function properly and the batteries must be re placed Follow the instructions on how to recharge Ni MH batteries detailed on page four 4 of this instruction manual 1 LCD Display 2 Bass Boost Switch 3 Hold Switch 4 Mode Button 5 Skip Down Button 6 Charge Indicator 7 DC Input Socket 8 Program...

Page 3: ...A R G E A B L E B AT T E RY TO DETERIORATE 4 If the operating time decreases drastically even when the rechargeable Ni MH batteries are properly recharged purchase a new set of rechargeable Ni MH batteries 5 When charging for the first time or after a long time playing time may be reduced In this case charge and discharge the batteries several times HANDLING COMPACT DISCS This unit is designed to ...

Page 4: ...xcept OPEN Moving the switch to the OFF position will allow the unit to return to normal operation Turning Power on and off This unit has no ON OFF switch To turn on and off press the following buttons To turn on Press II PLAY PAUSE playback starts To turn off Press the STOP button once to standby mode Press the STOP button twice to turn off the power Auto power off function When the unit is stopp...

Page 5: ...ts When TOC data has been read display shows TOC 1 second Starts play from track No 1 automatically ANTI SHOCK starts flashing TO PLAY FROM STOP CONDITION Press the PLAY PAUSE button the display changes to 01 00 00 and starts play When the memory is full ANTI SHOCK stops flashing TO STOP Press the STOP key This will stop play and the TOC will be displayed TO PAUSE Press the PLAY PAUSE and the paus...

Page 6: ...arts RANDOM play INTRO PLAY 1 Press the MODE button three times then INT is displayed 2 Press the PLAY PAUSE button Starts INTRO play from track no 01 3 Select INTRO mode during play INT starts flashing Press the PLAY PAUSE button Flashing stops and starts INTRO play from track no 01 Press I to play the current track Flashing stops and starts INTRO play from next track Press I flashing stops and s...

Page 7: ...r empty NOTES Remember that conditions such as dirty scratched or warped discs may cause skipping or noise thereby affecting performance of ANTI SKIP system Sound may skip if the CD player receives stronger continuous shock than expected Sound may skip if using poor quality CD R RWs or if there is a problem with the recording device or application software PRODUCT SPECIFICATIONS PICK UP System Com...

Reviews: