background image

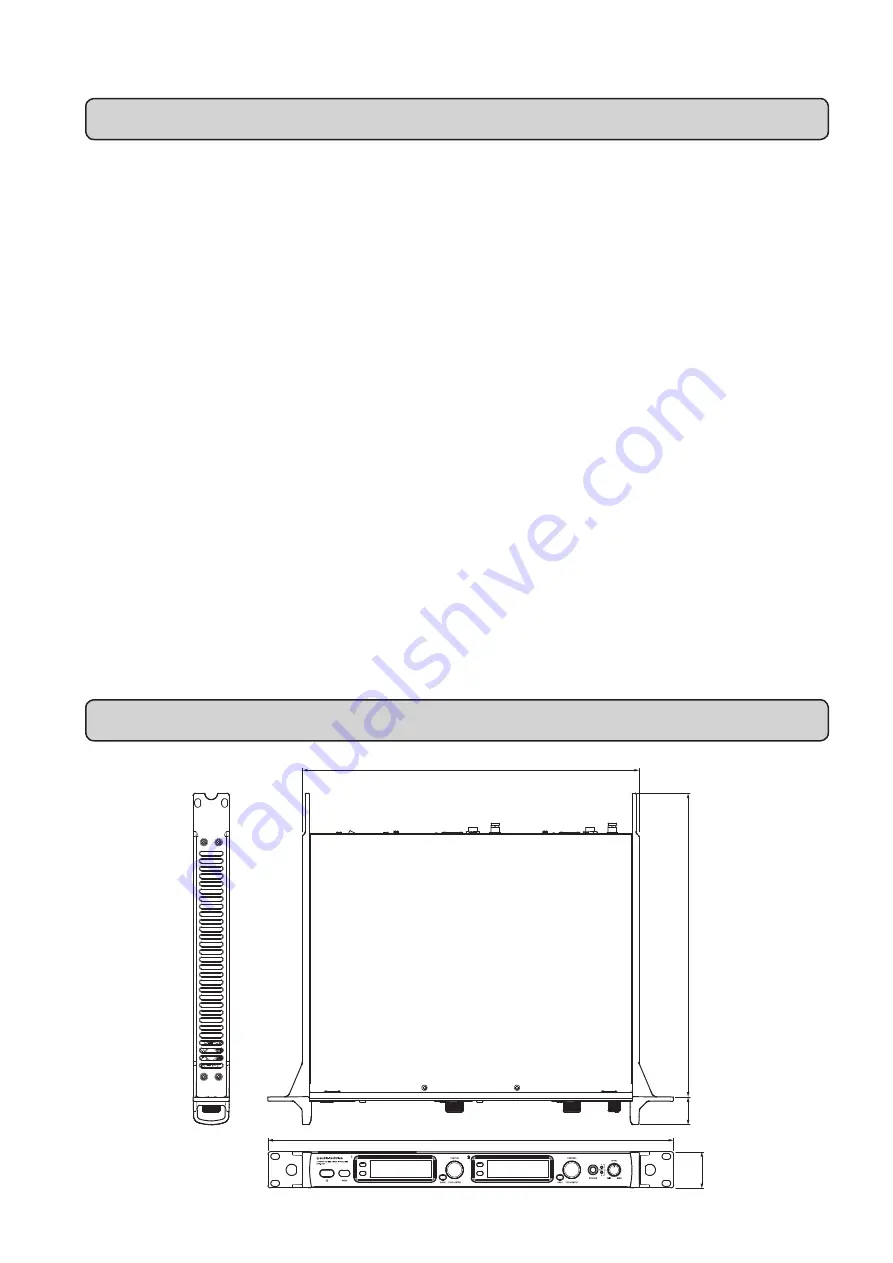
(Unit:  mm)

23

Specifications

482

400

43

32 .8

361

Dimensions

Receiving system

True diversity

Operating frequency

946.125 to 949.875 MHz

Simultaneous channels

Total of 31 channels (125kHz intervals)

RF sensitivity

20 dB μV (at 60dB S/N ratio)

Total harmonic distortion

<1% (63 dB μ V input, 1 kHz, frequency deviation  ±10 kHz)

SN ratio

110 dB or more

Audio output level

XLR balanced ≥+18 dBV (LINE), ≥+4 dBV (MIC) (frequency deviation ±15 kHz)

: Φ

6.3 balanced ≥+18 dBV (LINE), ≥+4 dBV (MIC) (frequency deviation ±15 kHz)

Antenna input jack

BNC type (50 ohm) 12 V DC OUT (max 60 mA x 2)

Audio output terminal

XLR 3-pin male (balanced) 
6.3 mm (1/4") standard stereo jack (balanced)

Headphone OUTPUT jack

6.3 mm (1/4") standard stereo jack; max power output: 100 mW + 100 mW into 32 ohms

Power

120 V AC 60 Hz

Operating temperature 
range

5

 to 45 

℃ (

41°F to 113 °F

)

Power consumption

25 W

External dimensions 
(excluding protrusions)

482 mm (18.97") × 43 mm (1.69") × 361 mm (14.21") (W × H × D)

Weight

4.7 kg (10.4 lbs)

Accessories     1/2

λ

 whip antenna x 2, Power cable, Legs x 4 (4 mounting screws), Front mount antenna cables 

and connectors

 This product is for use in the USA only.

Specifications are subject to change without prior notice.

Summary of Contents for ATW-R6200 S

Page 1: ...1 simultaneous channels within a 4 MHz tuning bandwidth High performance filtering removes external noise from outside of the tuning bandwidth Clear easy to read display Easy transmitter setup via IR sync Headphone output jack for monitoring receiver output Ethernet connection allows monitoring and controlling via a PC Ethernet interface for monitoring and controlling system parameters via a PC Me...

Page 2: ...tions 12 Setting the key lock 12 Setting the lock code 13 Setting the antenna power 13 Setting transmitters via IR sync 14 Screen saver settings 14 Resetting factory defaults 15 Checking the product information 15 Setting up the network 16 Obtaining an IP address 16 Setting the IP address 16 Setting the subnet mask 17 Displaying the MAC address 17 Changing the DHCP server setting 17 Setting up tra...

Page 3: ...apparatus When a cart is used use caution when moving the cart apparatus combination to avoid injury from tip over 13 Unplug this apparatus during lightning storms or when unused for long periods of time 14 Refer all servicing to qualified service personnel Servicing is required when the apparatus has been damaged in any way such as power supply cord or plug is damaged liquid has been spilled or o...

Page 4: ...ere are no obstructions between the transmitter and receiver Do not use outside the USA Use abroad may be punished according to the laws of the relevant country Unplug the product when unused for long periods of time Use 120 V AC power source Refer to Specifications for product ratings When using multiple units simultaneously maintain approximately 1 meter or more between individual transmitters a...

Page 5: ...receivers 1 and 2 4 Display Displays the product state and setting menus 5 BACK button Takes the display back one screen when pressed 6 Control dial Turn to scroll through settings and press to set them 7 Headphone monitor 6 3 mm output jack This is the headphone output jack used for monitoring It allows you to monitor receivers 1 and 2 8 Headphone channel indicator Displays which receiver is bein...

Page 6: ...or use in the USA It may not be used abroad 7 Main power switch Press the main power switch to turn the power on Turn the main power switch on before turning the front panel power switch on 2 Balanced output jack 6 3 mm 1 4 standard stereo jack COLD GND HOT 3 Balanced output jack XLR 3 pin male 3 COLD 2 HOT 1 GND 5 Network interface Connecting to a PC via Ethernet cable allows you to monitor and c...

Page 7: ...uch battery power has been consumed If there is no remaining battery power replace the transmitter s batteries If rechargeable batteries are being used recharge them 5 Key lock and network remote Key lock is ON Network remote state 6 DHCP server operation indicator Displayed when the DHCP server operation setting is ON 7 Frequency Displays the set frequency 8 Mute indicator An exclamation point ic...

Page 8: ...ower switch 2 Power switch Rear Panel Front Panel RF A RF B Audio PEAK 40 30 20 10 0 10 1 When on the main screen pressing the function button FN1 switches the display to main screen 2 RF A RF B Audio PEAK 40 30 20 10 0 10 2 If you press and hold the function button FN2 the minimum hold function turns on and its marker is displayed The marker indicates the lowest level RF signal received from the ...

Page 9: ...the selected item Press the BACK button to go back one screen To cancel part way through making a setting press the BACK button While in the setting mode the display will return to the main screen if 30 seconds pass without a button or the control dial being used Frequency Management Sets the operating frequency and corresponding name Squelch Sets the squelch level Audio Settings Sets the audio ou...

Page 10: ... be entered Alphabetical characters upper and lower case Numbers Symbols period Spaces 946 a b RF AF PEAK 10 0 10 20 30 40 Squelch Audio Settings Frequency 1 From the main menu turn the control dial select Frequency and then press the control dial FREQ Frequency Management NAME 2 Select NAME and press the control dial FREQ Frequency Management NAME V 3 Turn the control dial to display the characte...

Page 11: ...t Audio Settings and then press the control dial 0 20 GAIN Audio Settings LINE MIC 0 dB 2 Select GAIN and press the control dial 0 20 GAIN Audio Settings LINE MIC 20 dB 3 Turn the control dial and set the audio output level The level changes 2dB each time you turn the control dial It can be set from 20 to 0dB 4 Press the control dial The setting is complete Correcting characters There are two ways...

Page 12: ...trol dial The setting is complete Setting the system related functions Setting the key lock Set this function to prevent the product settings from being changed The default setting is OFF 946 a b RF AF PEAK 10 0 10 20 30 40 Audio Settings Squelch System Settings 1 From the main menu turn the control dial select System Settings and then press the control dial OFF ON Key Lock Lock Code ANT PWR Syste...

Page 13: ...n press the control dial 9 Key Lock Lock Code ANT PWR System Settings 4 Repeat the operation until all 4 numbers are entered and then press the control dial The setting is complete Setting the antenna power This turns power on off to the antenna input terminals The default setting is OFF This can only be set from receiver 1 If set to ON power is supplied to both antennas A and B 946 a b RF AF PEAK...

Page 14: ... the control dial select ON or OFF and then press the control dial Lock Code RF PWR HIGH MIC GAIN 10 KEY LOCK OFF BATT Alkaline ANT PWR TX SET System Settings 6 To set the BATT type of battery used in the transmitter turn the control dial select Alkaline or Ni MH and then press the control dial Alkaline Select when using alkaline batteries Ni MH Select when using nickel metal hydride batteries The...

Page 15: ...ff and on Checking the product information This function displays product information 946 a b RF AF PEAK 10 0 10 20 30 40 Audio Settings Squelch System Settings 1 From the main menu turn the control dial select System Settings and then press the control dial Screen Saver VERSION RESET Audio Technica Co Ltd ATW R6200 SN00000000 1 0 000 BAND 09 47 32 Aug 12 2015 System Settings 2 Select VERSION Prod...

Page 16: ...matically assign an IP address STATIC This sets the system to use a fixed IP address The setting is complete Restart the product after completing all the network settings Setting the IP address This configures the IP address This can only be configured when IP Select is set to STATIC 946 a b RF AF PEAK 10 0 10 20 30 40 TX SYNC System Settings Network 1 From the main menu turn the control dial sele...

Page 17: ... Displaying the MAC address This allows you to check the MAC address 946 a b RF AF PEAK 10 0 10 20 30 40 TX SYNC System Settings Network 1 From the main menu turn the control dial select Network and then press the control dial 00 00 00 00 00 00 IP Address Subnet Mask MAC Address Network 2 Select MAC Address The MAC address is displayed Changing the DHCP server setting This sets whether or not to u...

Page 18: ...standby mode position the IR sync windows of the product and transmitter so they face each other 4 Press the SYNC button on the transmitter Wait several seconds until communication is established Ir bus arbitration OK Connect OK Send and Wait OK Close and End Audio Settings System Settings TX SYNC TX Sync 5 When the sync is complete the completed screen is displayed The settings made on the produc...

Page 19: ...25 a b RF AF PEAK 0 10 20 30 40 50 NAMEAREA12 MHz PIN INPUT 1 When the key lock is enabled the PIN INPUT screen is displayed when you press or turn the control dial on the main screen 710 125 a b RF AF PEAK 0 10 20 30 40 50 NAMEAREA12 MHz 0 PIN INPUT 2 To release the lock enter the 4 digit lock code Turn the control dial to select a number and then press the control dial Once you enter a number th...

Page 20: ...tor sold separately refer to the distributor s user manual NOTE The example connection shown above uses the supplied antennas When using the product in a large space or on a stage connect it to UHF wideband LPDA antennas ATW A49 sold separately as shown by the dotted lines ATW A49 ATW A49 ATW R6200 S Antenna Antenna Mixer IN PC PC Mixer IN Connection example ...

Page 21: ...tennas A and B should be at least 30 cm and less than 30 m Otherwise diversity reception can be lost When using 1 set ATW A49 Achieving stable reception Low RF signal may result if there are obstructions between receiver antennas and transmitter s In such a case reposition the antennas to get better reception ...

Page 22: ...ns Screws for rack mounting the product are not included Consider ventilation when rack mounting to avoid heat building up in the rack Shake proof washer Rubber washer To connect the antennas to the front of the product attach all parts as shown below ...

Page 23: ...n 15 kHz Antenna input jack BNC type 50 ohm 12 V DC OUT max 60 mA x 2 Audio output terminal XLR 3 pin male balanced 6 3 mm 1 4 standard stereo jack balanced Headphone OUTPUT jack 6 3 mm 1 4 standard stereo jack max power output 100 mW 100 mW into 32 ohms Power 120 V AC 60 Hz Operating temperature range 5 to 45 41 F to 113 F Power consumption 25 W External dimensions excluding protrusions 482 mm 18...

Page 24: ...Audio Technica Corporation 2017 Audio Technica Corporation ver 1 2016 03 31 ver 2 2017 02 01 232305390 01 02 ...

Reviews: