background image

3

O

FF

ON

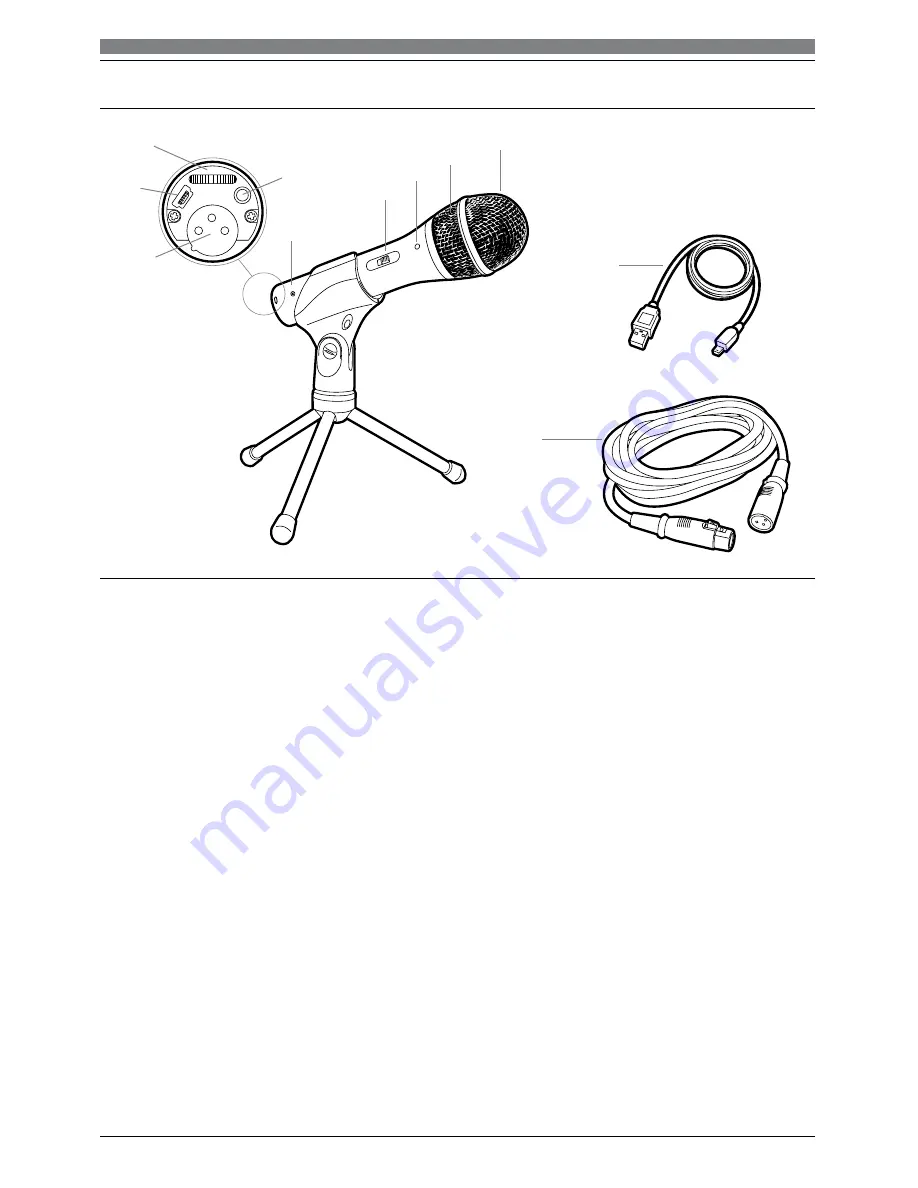
1.  Windscreen

–Multi-stage grille design offers excellent protection against plosives and sibilance 


without compromising high-frequency clarity

2.  Capsule

–Dynamic microphone element with cardioid polar pattern 

3.  Blue LED

–Blue light shows mic is receiving USB power (

Note:

 The blue LED is not affected 


by the on/off switch position)

4.  ON/OFF switch

–Functions for both USB and analog operation  

5.  Metal construction

–Tough, durable, resilient design

6.  Headphone level control

–Up/Down dial controls headphone volume

7.  XLR connector

–XLR connector with analog output for connection to PA system’s conventional 


microphone input 

8.  USB

–USB connector for connection to your Mac or PC

9.  Headphone Jack

1

/

8

-inch (3.5mm) stereo jack for connecting your headphones

 10.  USB cable
 11.  XLRM to XLRF cable

Setting up your microphone with included pivot mount and tripod desk stand
A.

  Screw the pivot mount microphone mount onto the threaded portion of the desk stand.

B.

  Extend the tripod legs to provide a wide, secure base, and place the tripod desk stand on 


a flat surface. 

B.

  Install the ATR2100-USB microphone into the microphone mount, with ON/OFF switch up

C.

  The top of the microphone should be facing the sound source.  

D.

  Use a screwdriver or coin to loosen and tighten the pivot screw for angle adjustment.

E.

  Plug the provided USB cable into the USB output at the base of the microphone, or plug the 


provided XLR cable into the microphone input of your sound system.

Note:

 Many recording software programs are available online. Audacity is widely used free software 

for recording and editing sounds. It is available online at http://audacity.sourceforge.net/

ATR2100-USB 

1

2

3

4

5

6

7

8

9

10

11

Summary of Contents for ATR2100-USB

Page 1: ...ne with pivot mount desk stand 3 Preliminary setup with Mac OS X 4 Preliminary setup with Windows XP 6 Preliminary setup with Windows Vista 9 Preliminary setup with Windows 7 10 Using headphones 13 Se...

Page 2: ...mance Smooth extended frequency response ideally suited for podcasting home studio recording field recording voiceover and on stage use Built in headphone jack allows you to directly monitor your micr...

Page 3: ...g your headphones 10 USB cable 11 XLRM to XLRF cable Setting up your microphone with included pivot mount and tripod desk stand A Screw the pivot mount microphone mount onto the threaded portion of th...

Page 4: ...The microphone s blue LED will illuminate indicating the microphone is receiving power Your computer will automatically recognize the USB device and install a driver 2 To select the ATR2100 USB as yo...

Page 5: ...o display the Sound preference pane 4 Click the Input tab and select the ATR2100 USB as the device for sound input Your preferences are now set to use the ATR2100 USB on your Mac with GarageBand or an...

Page 6: ...ic is receiving power Your computer will automatically recognize the USB device and install a driver 2 In the lower right portion of your screen you may see a message that new hardware was found or yo...

Page 7: ...7 4 Select Sounds and Audio Devices...

Page 8: ...Volume button beneath Sound recording Default device Preliminary setup with Windows XP continued ATR2100 USB 7 Through the Wave In window you can set the computer volume or mute the microphone Your pr...

Page 9: ...er right portion of your screen you may see a message that new hardware was found or you may see a driver software installation notice 3 To select the ATR2100 USB as your default recording device begi...

Page 10: ...automatically recognize the USB device and install a driver 2 In the lower right portion of your screen you may get a message that new hardware was found or you may see a driver software installation...

Page 11: ...11 4 Select Sound 5 The following screen will pop up...

Page 12: ...s window Select the levels tab to adjust microphone level loudness You may need to come back to this window to readjust the level after you begin recording Preliminary setup with Windows 7 continued Y...

Page 13: ...or through your recording software If your recording program shows insufficient level you can increase the microphone gain either from the control panel or system preferences settings or through your...

Page 14: ...MAC OS X USB 1 0 or 2 0 64 MB RAM minimum Windows XP Vista Windows 7 USB 1 0 or 2 0 64 MB RAM minimum In the interest of standards development A T U S offers full details on its test methods to other...

Page 15: ...lace any product with one of equal value Except to the extent precluded by applicable state law A T U S will have no liability for any consequential incidental or special damages any warranty of merch...

Page 16: ...om in a selection of languages Afin de r duire l impact sur l environnement de l impression de plusieurs les informations concernant les produits sont disponibles sur le site www audio technica com da...

Reviews: