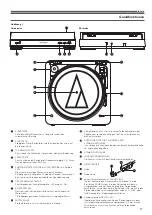
background image

6

Operation 

(continued)

Replacing the Stylus

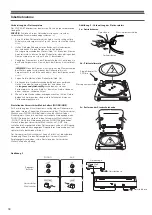
While holding the head of the tone arm, rotate the front of the stylus 

assembly in a forward and down motion to remove it (Fig. 9). (As 

you remove the old assembly, note its position and “feel,” to aid in 

properly installing the new one.)

Install the new stylus assembly as shown in Figures 10a/10b, being 

careful not to touch the actual stylus. Make certain that the projection 

at the back of the assembly is fully seated in the cartridge body 

first 

(Fig. 10a), and that the assembly “clicks” up into place, with no gap 

between its top edge and the front of the black plastic tone arm head 

(Fig. 10b). Replace the stylus after 400 hours of use.

To maintain original performance, insist upon a genuine Audio-Technica 

brand replacement stylus. Look for the Audio-Technica trademark (    ) 

on the front of the stylus assembly and on the packaging.

(Out)

Figure 6

Figure 7

(In)

Figure 8

8a  

8b 

8c

Figure 10 – Installing a new stylus
10a

10b

Caution: 

When the tone arm reaches the end of the record, it 

will lift and return to the tone arm rest automatically. When this 

happens, 

do not interfere with the tone arm’s motion, or 

damage to the mechanism may occur.

If the tone arm does not return automatically to the tone arm 

rest after the record has finished playing, simply press the STOP 

button to complete operation.

Manual Operation

1.   Remove the stylus guard from the stylus assembly (Fig. 4).
2.   Put a record on the turntable. If needed, use the 45 RPM 

adapter (Fig. 5).

3.   Select the size of record: 12" or 7" (Fig. 6).
4.   Select the speed: 33

1

/

3

 RPM or 45 RPM (Fig. 7).

5.   Press the Lift button in to raise the tone arm (Fig. 8c).
6.   Gently move the tone arm so the stylus is over the point on 

the record where play is desired to begin.

7.   Press the Lift button again to gently lower the tone arm and 

play record.

Figure 9 – Removing the stylus

Engage in  

body first

No gap here

  Out In
 Lower  Raise

Button Position:


Tone Arm Action:

Summary of Contents for AT-LP60BK-BT

Page 1: ...spieler Installation und Betrieb Seiten 16 22 AT LP60 BT Giradischi wireless Installazione e funzionamento Pagine 23 29 AT LP60 BT Tocadiscos inalambrico Instalación y funcionamiento Páginas 30 36 AT LP60 BT Vitrola Sem Fio Instalação e Operação Páginas 37 43 AT LP60 BT Беспроводной проигрыватель грампластинок Установка и эксплуатация Стр 44 50 ATロゴとレジストレーションマーク 使用基準 ...

Page 2: ...e frequency band 2 4GHz as the turntable including devices with Bluetooth wireless technology devices using wireless LAN digital cordless phones and microwaves Similarly because radio waves of the turntable may affect these devices take the following precautions Install the devices using the same frequency band 2 4GHz away from the turntable Instructions for Use Any device which is connected to th...

Page 3: ... turntable mat placed on top of it 8 CENTER SPINDLE Centering pin for record positioning 12 10 9 45 RPM ADAPTER shown in receptacle Adapts 7 records with large center holes to fit center spindle 10 DUST COVER HINGE HOLDERS Attachment points for removable hinged dust cover 11 DUST COVER 12 TONE ARM HEADSHELL ASSEMBLY Tone arm is permanently attached to the headshell assembly 13 STYLUS ASSEMBLY 14 S...

Page 4: ...m the turntable Fig 2c Keep the cover in a safe clean place 6 To re install the dust cover guide the dust cover hinges into the two hinge receptacles located at the back of the turntable housing Setting the Pre amplifier Selector Switch PHONO LINE For increased flexibility of use this turntable has an internal stereo phono pre amplifier The pre amplifier selector switch PHONO LINE switch is locate...

Page 5: ...ter of the turntable to perform pairing correctly 1 Set the Bluetooth receiver device into pairing mode 2 After connecting the turntable s power cable plug to an AC outlet press and hold the wireless function button for about 4 seconds The button s Indicator LED will begin flashing red blue 3 When the pairing is successfully performed the Indicator will turn blue Listening to Music 1 Once pairing ...

Page 6: ...packaging Out Figure 6 Figure 7 In Figure 8 8a 8b 8c Figure 10 Installing a new stylus 10a 10b Caution When the tone arm reaches the end of the record it will lift and return to the tone arm rest automatically When this happens do not interfere with the tone arm s motion or damage to the mechanism may occur If the tone arm does not return automatically to the tone arm rest after the record has fin...

Page 7: ...een the pulley and the platter s drive rim F Put the record mat back on the platter G While holding the tone arm in its rest position slowly turn the platter by hand clockwise at least 10 rotations to clear the mechanism s automatic cycle Turntable operates but no sound at all 1 The stylus guard is still in place 2 The tone arm lift button is pressed in 3 Amplifier controls set incorrectly wrong i...

Page 8: ...Replacement stylus ATN3600L The Bluetooth word mark and logos are owned by the Bluetooth SIG Inc and any use of such marks by Audio Technica Corporation is under license All other trademarks are property of their respective owners For product improvement the product is subject to modification without notice Tips For Better Performance When opening or closing the turntable cover handle it gently mo...

Page 9: ...ce 2 4 GHz que le tourne disque notamment des dispositifs avec la technologie sans fil Bluetooth des dispositifs qui utilisent le LAN sans fil des téléphones sans fil numériques et des micro ondes De même étant donné que les ondes radio du tourne disque peuvent affecter ces dispositifs prenez les précautions suivantes Installez les dispositifs utilisant la même bande de fréquence 2 4 GHz loin du t...

Page 10: ... tourne disque placé dessus 8 AXE CENTRAL Pièce de centrage pour positionnement du disque 12 10 9 ADAPTATEUR 45 TR MIN placé dans son logement sur l illustration Pour maintenir autour de l axe central les disques de 17 cm à trou large 10 SUPPORTS DE CHARNIÈRE DU COUVERCLE ANTI POUSSIÈRE Points de fixation des charnières du couvercle anti poussière 11 COUVERCLE ANTI POUSSIÈRE 12 ENSEMBLE BRAS DE LE...

Page 11: ...ez le vers le haut sans forcer et en exerçant une force égale de part et d autre fig 2c Conservez le couvercle à l abri dans un endroit propre 6 Pour remettre en place le couvercle anti poussière guidez et insérez les charnières du couvercle dans les deux logements situés à l arrière du boîtier du tourne disque Réglage du sélecteur de préamplification PHONO LINE Pour une plus grande souplesse d ut...

Page 12: ...ment 1 Réglez le dispositif récepteur Bluetooth en mode d appairage 2 Après avoir connecté la fiche du câble d alimentation à une prise secteur CA appuyez sur le bouton de fonction sans fil et maintenez le enfoncé pendant environ 4 secondes L indicateur LED du bouton commence à clignoter en rouge bleu 3 Lorsque l appairage est réussi l indicateur devient bleu Écoute de musique 1 Une fois l appaira...

Page 13: ...8b 8c Figure 10 Mise en place d une nouvelle pointe de lecture 10a 10b Attention Lorsque le bras de lecture arrive à la fin du disque le levage du bras et son retour sur le support sont commandés par le mécanisme automatique Lors de cette opération ne tentez pas d agir sur le mouvement du bras de lecture au risque d endommager le mécanisme Si le bras de lecture ne revient pas automatiquement sur s...

Page 14: ... à la main sur dix tours dans le sens des aiguilles d une montre de façon à faire effectuer un cycle complet au mécanisme automatique Le tourne disque fonctionne mais il n y a pas de son 1 La protection de la pointe de lecture est restée en place 2 Le bouton de levage du bras de lecture est enfoncé 3 Les réglages de l amplificateur sont incorrects sélection de sortie erronée contrôle d écoute acti...

Page 15: ...t sous licence Toutes les autres marques sont la propriété de leurs détenteurs respectifs Le produit est susceptible d être modifié sans préavis à des fins d amélioration Conseils d optimisation des performances En ouvrant ou en fermant le couvercle du tourne disque veillez à ne pas forcer le mécanisme des charnières prenez le couvercle par le milieu ou exercez une force égale de part et d autre s...

Page 16: ...t vor starken Erschütterungen Dieses Gerät sollte in der Nähe einer Steckdose platziert werden damit der Stecker des Netzkabels stets leicht gegriffen werden kann Trennen Sie im Notfall das Netzkabel des Geräts sofort Stellen Sie keine mit Flüssigkeiten gefüllten Gegenstände z B Vasen auf das Gerät Stellen Sie keine offenen Feuerquellen wie brennende Kerzen auf das Gerät um die Gefahr eines Brands...

Page 17: ...htung der Schallplatte 12 10 9 Single Adapter für 45 U min in seiner Aufbewahrungsmulde Adapter zum zentrierten Auflegen von 7 Zoll Schallplatten mit großem Mittelloch 10 AUFNAHMEN FÜR DIE SCHARNIERE DER STAUBSCHUTZHAUBE Hier werden die Scharniere der abnehmbaren Staubschutzhaube zur Anbringung eingeführt 11 STAUBSCHUTZHAUBE 12 TONARM TONABNEHMER Der Tonarm ist fest mit dem Tonabnehmer verbunden 1...

Page 18: ...hren Sie die Haube an einem sicheren sauberen Ort auf 6 Wenn Sie die Haube wieder anbringen möchten führen Sie die beiden Scharniere an der Haube in die Aufnahmen hinten am Plattenspielergehäuse ein Einstellen des Vorverstärker Wahlschalters PHONO LINE Zur Erweiterung des Einsatzspektrums verfügt dieser Plattenspieler über einen internen Phono Line Stereovorverstärker Der Vorverstärker Wahlschalte...

Page 19: ...f das Bluetooth Empfangsgerät nicht mehr als 1 Meter vom Plattenspieler entfernt sein 1 Versetzen Sie das Bluetooth Empfangsgerät in den Paarungsmodus 2 Nachdem Sie den Netzstecker des Plattenspielers an eine Steckdose angeschlossen haben halten Sie die Funktionstaste für kabellosen betrieb etwa 4 Sekunden lang gedrückt Die Anzeige LED der Taste blinkt rot blau 3 Nach erfolgreicher Paarung leuchte...

Page 20: ...Anbringen einer neuen Abtastnadel 10a 10b Vorsicht Wenn der Tonarm das Ende der Schallplatte erreicht hat wird er automatisch angehoben und zur Tonarmstütze zurückgeführt Bei Ablauf dieses Vorgangs darf die Bewegung des Tonarms nicht gestört werden da dies eine Beschädigung des Mechanismus zur Folge haben kann Falls der Tonarm am Ende einer Schallplatte nicht automatisch zur Tonarmstütze zurückgef...

Page 21: ... den Plattenteller G Halten Sie den Tonarm auf der Tonarmstütze fest und drehen Sie den Plattenteller mit der Hand langsam mindestens 10 Mal im Uhrzeigersinn damit die Automatik einwandfrei arbeitet Plattenspieler funktioniert aber kein Ton 1 Der Nadelschutz wurde nicht entfernt 2 Die Tonarmlift Taste ist eingerastet 3 Die Einstellungen am Verstärker stimmen nicht falscher Eingang gewählt Hinterba...

Page 22: ...h Audio Technica Corporation erfolgt unter Lizenz Alle anderen Markenzeichen sind Eigentum der jeweiligen Rechtinhaber Anderungen an technischen Daten bleiben zum Zwecke der Produktverbesserung ohne vorherige Ankundigung vorbehalten Tipps für störungsfreien Betrieb Öffnen und schließen Sie die Staubschutzhaube mit der entsprechenden Vorsicht und fassen Sie sie dabei entweder in der Mitte oder an b...

Page 23: ... in prossimità di una presa elettrica CA per agevolare il collegamento della alla spina del cavo di alimentazione In caso di emergenza scollegare rapidamente la spina del cavo di alimentazione Non collocare su questo apparecchio oggetti riempiti con liquidi ad esempio vasi di fiori Per evitare il pericolo di incendi non collocare fonti a fiamma viva ad esempio candele accese su questo apparecchio ...

Page 24: ...8 PERNO CENTRALE Perno di centraggio per registrare il posizionamento 12 10 9 ADATTATORE PER 45 GIRI mostrato nella sede Adatta dischi da 7 con fori centrali ampi per l inserimento nel perno centrale 10 CERNIERE DI ANCORAGGIO DEL COPERCHIO ANTIPOLVERE Punti d attacco per il coperchio antipolvere incernierato rimovibile 11 COPERCHIO ANTIPOLVERE 12 GRUPPO BRACCIO PORTATESTINA Il braccio è fissato in...

Page 25: ...i quindi sollevarlo verso l alto delicatamente e simultaneamente Fig 2c Conservare il coperchio in un luogo pulito e sicuro 6 Per rimontare il coperchio antipolvere guidare le cerniere all interno delle due fessure apposite presenti sul retro della struttura del giradischi Impostazione del selettore di preamplificazione PHONO LINE Per aumentare la versatilità di utilizzo questo giradischi dispone ...

Page 26: ...do da eseguirne correttamente l abbinamento 1 Impostare il dispositivo ricevitore Bluetooth nella modalità di abbinamento 2 Dopo aver collegato la spina del cavo di alimentazione del piatto rotante a una presa CA premere e tenere premuto il pulsante funzione wireless per circa 4 secondi La spia LED dell interruttore inizierà a lampeggiare rosso blu 3 Una volta che l abbinamento è stato eseguito co...

Page 27: ... 8b 8c Figura 10 Installazione di una nuova puntina 10a 10b Attenzione quando il braccio raggiunge la fine del disco si solleva e torna automaticamente alla sede di appoggio Quando questo accade non interferire con il movimento del braccio perché quest ultimo potrebbe danneggiarsi Se il braccio non torna automaticamente alla sede di appoggio al termine della riproduzione del disco è sufficiente pr...

Page 28: ...osizionare il tappetino antiscivolo sul piatto G Mantenendo il braccio in posizione di riposo girare lentamente il piatto con la mano eseguendo 10 giri in senso orario allo scopo di annullare il ciclo automatico del meccanismo Il giradischi funziona ma non si sente alcun suono 1 La protezione della puntina è ancora al suo posto 2 Il pulsante di sollevamento del braccio è inserito 3 I comandi dell ...

Page 29: ... sono di proprietà di Bluetooth SIG Inc e il loro utilizzo è concesso in licenza ad Audio Technica Corporation Tutti gli altri marchi sono proprietà dei rispettivi titolari Per un miglioramento del prodotto quest ultimo e soggetto a modifiche senza preavviso Suggerimenti per ottenere prestazioni migliori Quando si apre o si chiude il coperchio del giradischi è necessario maneggiarlo con delicatezz...

Page 30: ...en ser provocados por interferencias de ondas de radio de dispositivos que utilizan la misma banda de frecuencia 2 4 GHz como auriculares incluidos los dispositivos habilitados para Bluetooth dispositivos que utilicen una LAN inalámbrica teléfonos digitales inalámbricos y microondas Debido a que las ondas de radio del tocadiscos pueden afectar a estos dispositivos tome las siguientes precauciones ...

Page 31: ...locación del disco 12 10 9 ADAPTADOR DE 45 RPM se muestra en el receptáculo Adapta discos de 7 con grandes agujeros centrales para que ajusten en el eje central 10 SOPORTES DE LAS BISAGRAS DE LA CUBIERTA ANTIPOLVO Puntos de unión de la cubierta antipolvo abisagrada desmontable 11 CUBIERTA ANTIPOLVO 12 UNIDAD BRAZO DE LECTURA CABEZAL El brazo de lectura está unido de forma permanente al cabezal 13 ...

Page 32: ...lver a colocar la cubierta antipolvo sitúe las bisagras en los dos receptáculos situados en la parte trasera de la carcasa del tocadiscos Ajuste del conmutador PHONO LINE de preamplificador Para aumentar la flexibilidad de uso este tocadiscos dispone de un preamplificador fonográfico estéreo interno El conmutador PHONO LINE del selector del preamplificador está situado en la parte trasera del toca...

Page 33: ... tocadiscos para que el emparejamiento se realice correctamente 1 Seleccione el modo de emparejamiento en el dispositivo de Bluetooth 2 Después de enchufar el cable de alimentación del tocadiscos a una toma de CA mantenga presionado en botón de Función durante 4 segundos El indicador LED del botón parpadeará en rojo y azul 3 Cuando el emparejamiento se haya llevado a cabo correctamente la luz del ...

Page 34: ...guja y en el embalaje Arriba Figura 6 Figura 7 Abajo Figura 8 8a 8b 8c Figura 10 Instalación de una nueva aguja 10a 10b Precaución Cuando el brazo de lectura alcanza el final del disco se levanta y vuelve al soporte de forma automática En esta situación no interfiera con el movimiento del brazo de lectura o podrán producirse daños en el mecanismo Si el brazo de lectura no vuelve automáticamente al...

Page 35: ...entamente el plato con la mano en el sentido de las agujas del reloj al menos diez veces para iniciar el ciclo automático del mecanismo El tocadiscos funciona pero no suena 1 No ha retirado el protector de aguja 2 El botón de elevación del brazo de lectura está pulsado 3 Los controles del amplificador están definidos de forma incorrecta la entrada seleccionada no es correcta el monitor de cinta es...

Page 36: ...s de Bluetooth son propiedad de Bluetooth SIG Inc El uso de tales marcas por parte de Audio Technica Corporation es bajo licencia Todas las demás marcas registradas son propiedad de sus respectivos propietarios Con el fin de la mejora del producto el producto esta sujeto a modificaciones sin previo aviso Consejos para un mejor rendimiento Cuando abra o cierre la cubierta del tocadiscos hágalo con ...

Page 37: ...a desligar facilmente a ficha do cabo de alimentação em qualquer altura Em caso de emergência desligue rapidamente a ficha do cabo de alimentação do aparelho Não coloque objectos cheios de líquidos como jarras em cima do aparelho Para evitar o perigo de incêndio não coloque nenhuma fonte de chama livre p ex velas acesas sobre o aparelho Não instale este aparelho num espaço reduzido como uma estant...

Page 38: ...vitrola colocado em cima dela 8 EIXO CENTRAL Pino de centragem para posicionamento do disco 12 10 9 ADAPTADOR DE 45 RPM mostrado no recipiente Adapta álbuns de 7 com orifícios grandes para ficarem adequados ao eixo central 10 SUPORTES DAS DOBRADIÇAS DA PROTEÇÃO CONTRA PÓ Pontos de fixação para a proteção contra pó com dobradiças removível 11 PROTEÇÃO CONTRA PÓ 12 MONTAGEM DO BRAÇO CABEÇOTE O braço...

Page 39: ...rma cuidadosa e uniforme para desprendê la da vitrola Fig 2c Mantenha a em um local seguro e limpo 6 Para recolocá la coloque as duas dobradiças em seus recipientes localizados na parte de trás da vitrola Configuração da chave seletora do pré amplificador PHONO LINE Para aumentar a flexibilidade de uso esta vitrola tem um pré amplificador fono estéreo interno A chave seletora do pré amplificador P...

Page 40: ...ente 1 Configure o dispositivo receptor Bluetooth no modo de emparelhamento 2 Depois de conectar o cabo de alimentação da vitrola a uma tomada elétrica CA mantenha pressionado o botão de função sem fi durante cerca de 4 segundos O indicador LED do botão começará a piscar intermitentemente nas cores vermelha azul 3 Quando o emparelhamento for realizado com êxito o indicador ficará azul Ouvir música...

Page 41: ...balagem Saída Figura 6 Figura 7 Entrada Figura 8 8a 8b 8c Figura 10 Instalação da nova agulha 10a 10b Cuidado Quando o braço chegar ao final do álbum ele levantará e retornará ao seu suporte automaticamente Quando isso acontece não interfira no movimento do braço ou o mecanismo poderá ser danificado Se o braço não voltar automaticamente ao suporte após o final da reprodução do álbum simplesmente p...

Page 42: ... Coloque o prato na bandeja G Ao manter o braço na suporte gire lentamente a bandeja com a mão no sentido horário pelo menos por 10 rotações para liberar o ciclo automático do mecanismo A vitrola funciona mas não há som 1 A proteção da agulha ainda está no lugar 2 O botão Lift do braço está pressionado 3 Controles do amplificador configurados incorretamente entrada errada selecionada monitor de fi...

Page 43: ...removível Agulha de substituição ATN3600L A marca nominal e os logotipos de Bluetooth são propriedade da Bluetooth SIG Inc e o uso destas marcas pela Audio Technica Corporation está sob licença Todas as outras marcas registradas são propriedade de seus respectivos proprietários Para o melhoramento do produto o produto esta sujeito a modificacoes sem aviso previo Dicas para melhor desempenho Ao abr...

Page 44: ...вить рядом с электрической розеткой таким образом чтобы можно было легко получить доступ к штепселю шнура питания В случае аварийной ситуации быстро отсоедините штепсель шнура питания данного аппарата Не ставьте на аппарат емкости наполненные жидкостью например вазы Во избежание возгорания не размещайте на аппарате источники открытого огня например горящие свечи Не устанавливайте аппарат в замкнут...

Page 45: ... сверху на нем ковриком проигрывателя грампластинок 8 ЦЕНТРАЛЬНЫЙ ШПИНДЕЛЬ Центральный шпиндель для размещения грампластинки 12 10 9 АДАПТЕР НА 45 ОБ МИН показан в гнезде Служит для установки на центральный шпиндель пластинок на 7 с большим центральным отверстием 10 ДЕРЖАТЕЛИ ПЕТЕЛЬ ПЫЛЕЗАЩИТНОЙ КРЫШКИ Точки крепления съемной пылезащитной крышки 11 ПЫЛЕЗАЩИТНАЯ КРЫШКА 12 РЫЧАГ И ГОЛОВКА ЗВУКОСНИМА...

Page 46: ...омерно потяните ее вверх чтобы отсоединить ее от проигрывателя рис 2c Храните крышку в защищенном чистом месте 6 Для установки пылезащитной крышки вставьте петли крышки в два гнезда расположенные на задней части корпуса проигрывателя Выбор положения селектора предусилителя PHONO LINE Для повышения гибкости использования этот проигрыватель оснащен встроенным стереофоническим предусилителем Селектор...

Page 47: ...th Для обеспечения корректного сопряжения помещайте приемное устройство Bluetooth на расстоянии не более 1 метра от проигрывателя 1 Переключите приемное устройство Bluetooth в режим сопряжения 2 После подсоединения штекера шнура питания проигрывателя грампластинок к сетевой розетке нажмите и удерживайте кнопку беспроводной функции приблизительно в течение 4 секунд Светодиодный индикатор на кнопке ...

Page 48: ...сунок 10 Установка новой иглы 10a 10b Осторожно По достижении конца пластинки рычаг звукоснимателя поднимается и возвращается на подставку звукоснимателя автоматически Когда это происходит не создавайте помех движению рычага звукоснимателя иначе возможно повреждение механизма Если по достижении конца пластинки рычаг звукоснимателя не возвращается на подставку автоматически просто нажмите кнопку ST...

Page 49: ...нимателя на подставке медленно поверните диск от руки по часовой стрелке по крайней мере на 10 оборотов чтобы обеспечить согласованную работу автоматического механизма Проигрыватель запускается но отсутствует звук 1 Не снят щиток иглы звукоснимателя 2 Не нажата кнопка подъема рычага звукоснимателя 3 Неверно выбраны настройки усилителя выбран неверный вход включен монитор ленты выключена акустическ...

Page 50: ...ная пылезащитная крышка на петлях Запасная игла ATN3600L Словесное обозначение и логотипы Bluetooth принадлежат группе Bluetooth SIG Inc Audio Technica Corporation использует их по лицензии Все остальные товарные знаки принадлежат соответствующим правообладателям В целях усовершенствования изделия оно может подвергаться модификации без уведомления Рекомендации по обеспечению наилучших характеристи...

Page 51: ...51 ...

Page 52: ...441 Besuchen Sie unsere Website www audio technica com Kunden außerhalb Großbritanniens verweisen wir für Einzelheiten zur Garantie an ihren örtlichen Händler Zweijährige beschränkte Garantie Audio Technica Ltd garantiert für jedes in Großbritannien und der EU Europa erworbene Produkt von Audio Technica ab Kaufdatum zwei Jahre lang dass es frei von Material und Verarbeitungsfehlern ist Im Falle ei...

Page 53: ...tía de dos años desde la fecha de compra por parte de Audio Technica Ltd que garantiza que están libres de defectos en cuanto a materiales y mano de obra En caso de que exista algún defecto el producto se reparará inmediatamente sin coste alguno o a nuestra discreción se sustituirá por uno nuevo de igual valor o superior si el producto defectuoso pagado previamente se envía a Audio Technica Ltd ju...

Page 54: ...Memo ...

Page 55: ...Memo ...

Page 56: ...Audio Technica Corporation 2016 Audio Technica Corp 45mm 未満は 削除 45mm ATロゴとレジストレーションマーク 使用基準 株式会社オーディオテクニカ 2009 4 169501421C 2016 02 ...

Reviews: