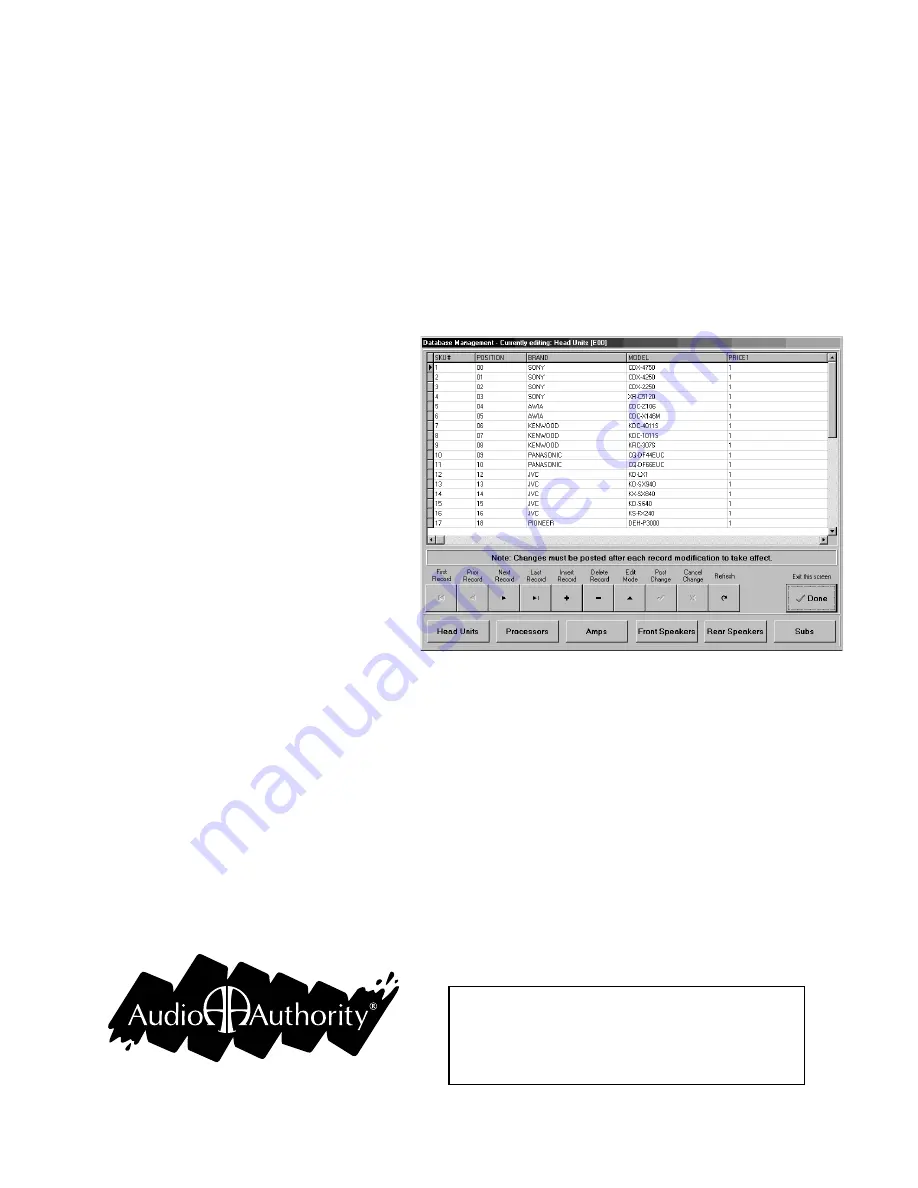
Figure 6.
752-298
5/00
Technical Support
If this guide does not help solve any problem you
encounter, call Audio Authority Technical Service at
800-322-8346, M-F 8:30 a.m. to 5:00 p.m., EST.
2048 Mercer Road, Lexington, Kentucky 40511-1071
Phone: 606-233-4599 • Fax: 606-233-4510
Customer Toll-Free USA & Canada: 800-322-8346
Website: http://www.audioauthority.com
Editing the Product Database
Press the small text on the bottom of the blue frame (Figure 5, detail 7) to access Administrative Mode. Type in the
password (default password is 111) and press enter. Choose Edit Database. In the Database Editing window, choose
the product group you wish to edit by pressing one of the buttons at the bottom of the window (Figure 5).
To edit an existing record, type in the information for each field, and press Tab, Enter, or select the next field using
the touchscreen, mouse or keyboard. To add a record, press the “Add Record” (+) button, or use the arrow keys to
scroll down to the bottom of the database until a blank record appears. To remove a record, select the product, press
the “Add Record” (–) button or press ctrl-delete on the keyboard.
The contents of the “Brands” pull-down menu can be edited in the System Setup dialog box. Add your most
commonly used brands, so that they are spelled correctly and abbreviated consistently. Amplifiers are sorted by type
within one group so that one amp may play in up to three positions. Use the pull-down menu to choose the desired
combination. When you have finished editing the database, click the Post Change button to make all changes
effective. Click Done to return to the main screen.
Database Editor
Field Descriptions
•
SKU#:
use any alphanumeric scheme to
identify product for internal use.
•
Position:
the corresponding position for
this product as it is connected to the
Access switching system. (The first
position is always zero, not one.)
•
Brand:
the brand of the product. Press-
ing the drop down arrow displays a list
of brand names that are defined in the
setup/brands section.
•
Model:
the model of the product.
•
Price1:
the selling price of the product.
This value MUST be entered (zero is
acceptable).
•
Description:
a description of the product
which can be a maximum of eighty characters.
•
Features:
a listing of the products’ features which can be a maximum of eighty characters.
•
War_Period:
the product warranty period.
•
Date Created:
not used internally by the software, used to show when the product was entered. (optional)
• Date Discontinued: not used internally by the software, used to show when the product should be removed.
(optional)
•
Comments:
use the place to add any other comments, this field is displayed at the bottom of the info win-
dow. Again, a maximum of eighty characters may be entered.
•
Type (Amp section only):
defines the type of amp and where it is displayed in the product selection list.
(Note: this also defines the Access module group. Normally this is Front = E04, Rear = E05 and Sub = E06.)
Pressing the drop down arrow displays a list of possible combinations. Choose from the menu only.
•
Amp_Position (Amp section only):
the corresponding position for this product on the Access module.


