


5
Interconnect Cables
Start by connecting the PPA-1 to the turntable(s), using high-quality stereo interconnect cables tipped with RCA plugs. Plug
the cables into either input 1 or input 2 of the PPA-1. (Either input can be set for MC or MM gain, so it doesn’t matter which
one you use.) Then connect the PPA-1’s output to the preamplifier (such as Audio Alchemy’s DDP-1 preamp/DAC) or inte-
grated amplifier. Grasp the cables by the plugs/connectors, not by the cable itself, otherwise you could damage the cable or
the jack panels of your audio components.
Ground Cable
In most systems, a ground cable should be connected between the turntable(s) and the PPA-1. Some phono interconnect
cables incorporate a ground cable. If yours doesn’t, you can buy a purpose-built ground cable terminated with spade lugs,
or just use a piece of thin speaker or hookup cable. Twist the threaded knob on the connector counterclockwise to loosen it,
then either insert the spade lug or wrap the bare wire around the connector. If you’re connecting two turntables, just stack
the spade lugs or wires on the connector. Twist the knob clockwise to tighten it. Tighten the knob only by hand, do not use
pliers or any other tools.
The ground cable is intended to minimize hum by putting the turntable and the phono preamp on the same ground connec-
tion. However, in a few systems, the ground cable may actually make the hum worse. If you hear excessive hum when you
use your turntable, try disconnecting the ground cable from the PPA-1 or the turntable. If the hum is reduced or eliminated,
just leave the ground cable disconnected.
Powering Up the PPA-1
Once the power supply is connected and all audio connections have been made, press the Power button on the front of the
PPA-1. We recommend you switch the PPA-1 on before you switch on your power amplifier. The LEDs surrounding the Pow-
er button will flash for a few seconds while the unit warms up. When the PPA-1 is ready to use, the LEDs will glow steadily.
Selecting an Input
The Input button on the left side of the PPA-1’s front panel toggles between inputs 1 and 2. The LED to the right of the Input
button will light up if input 2 is selected, and will go out if input 1 is selected.
Mute
To mute the audio, press the Mute button on right side of the front panel. The sound will go quiet and the LED to the left of
the Mute button will light up. Press the Mute button again to restore the sound.
Setting MC or MM Gain
Either of the PPA-1’s inputs can be used for moving-coil (MC) or moving-magnet (MM) cartridges. You will have to make sure
the gain is set correctly for the cartridge and the input you’re using. Use a toothpick or your fingernail to flip the DIP switch.
Set the switch up for MM gain, down for MC gain.
Selecting and Adjusting Cartridge Load Impedance
The PPA-1’s inputs can be individually adjusted for either fixed 47 K
Ω or adjustable
11000 Ω load impedance. MM cartridges require a
47 K
Ω load. Recommended load
impedances for MC cartridges varies from cartridge to cartridge. With MC cartridges,
we recommend starting with the manufacturer’s suggested load impedance, then
experimenting with different settings (even the fixed 47 K
Ω setting) if you want to try
to improve the sound.
Start by selecting fixed or variable loading. Use a toothpick or your fingernail to flip
the DIP switch, and be sure both DIP switches for the desired channel (switches 2
and 3 for input 1, switches 4 and 5 for input 2) are set the same. Set the switches up
for variable load, down for fixed 47 K
Ω load
To adjust load impedance precisely, you will need a digital multimeter. Practically
any meter will do; many are available online for less than $20. Turn the meter on
and set it to read resistance (ohms or
Ω
). Each channel of each input is adjusted separately. Touch the test probes from the
meter to the appropriate contacts, then turn the corresponding knob until the meter reads out the desired impedance. Here
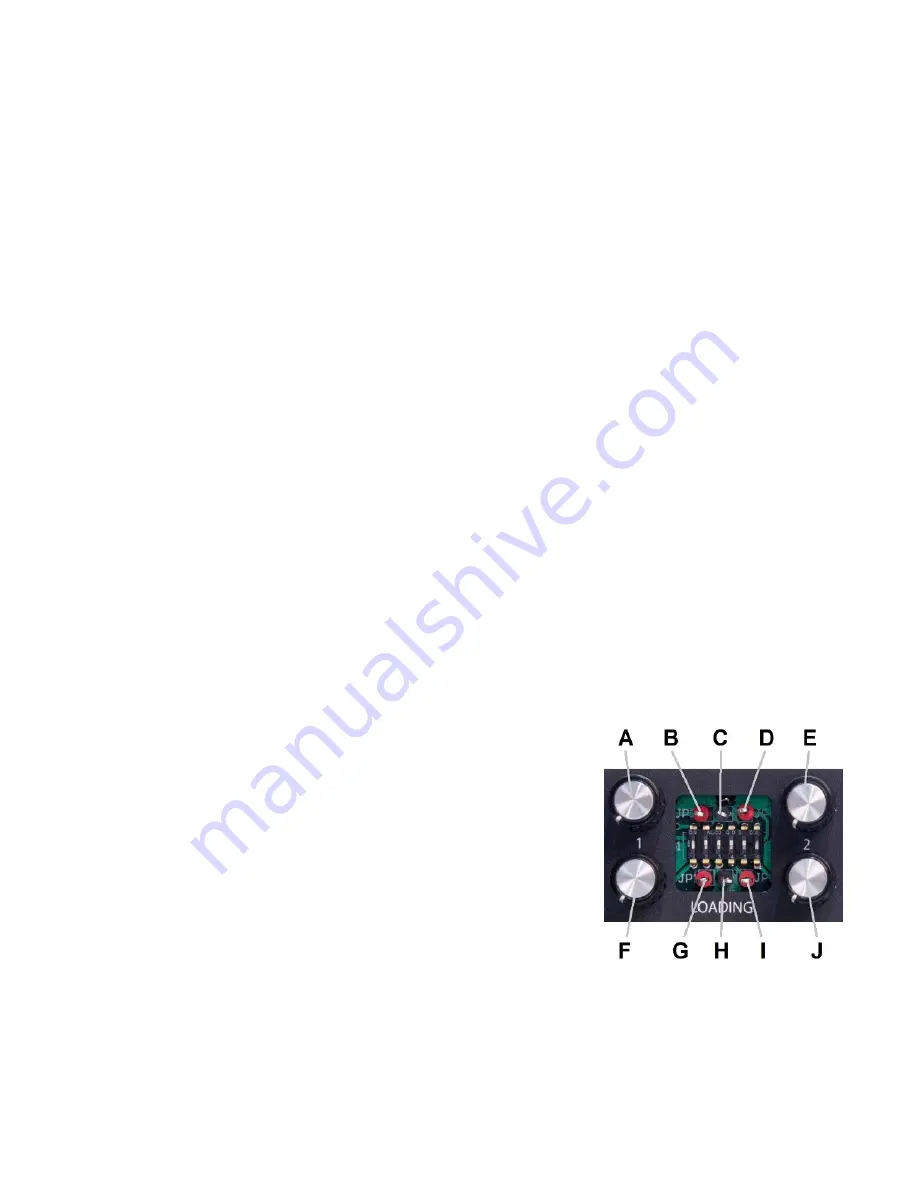
are the correct controls and contact points:
Input 1, left channel: contact points B and C, knob A
Input 1, right channel: contact points G and H, knob F
Input 2, left channel: contact points C and D, knob E
Input 2, right channel: contact points H and I, knob J
Operation


