AUBER INSTRUMENTS
WWW.AUBERINS.COM
2021.07
P2/3
5. Timer Display and Key Pad
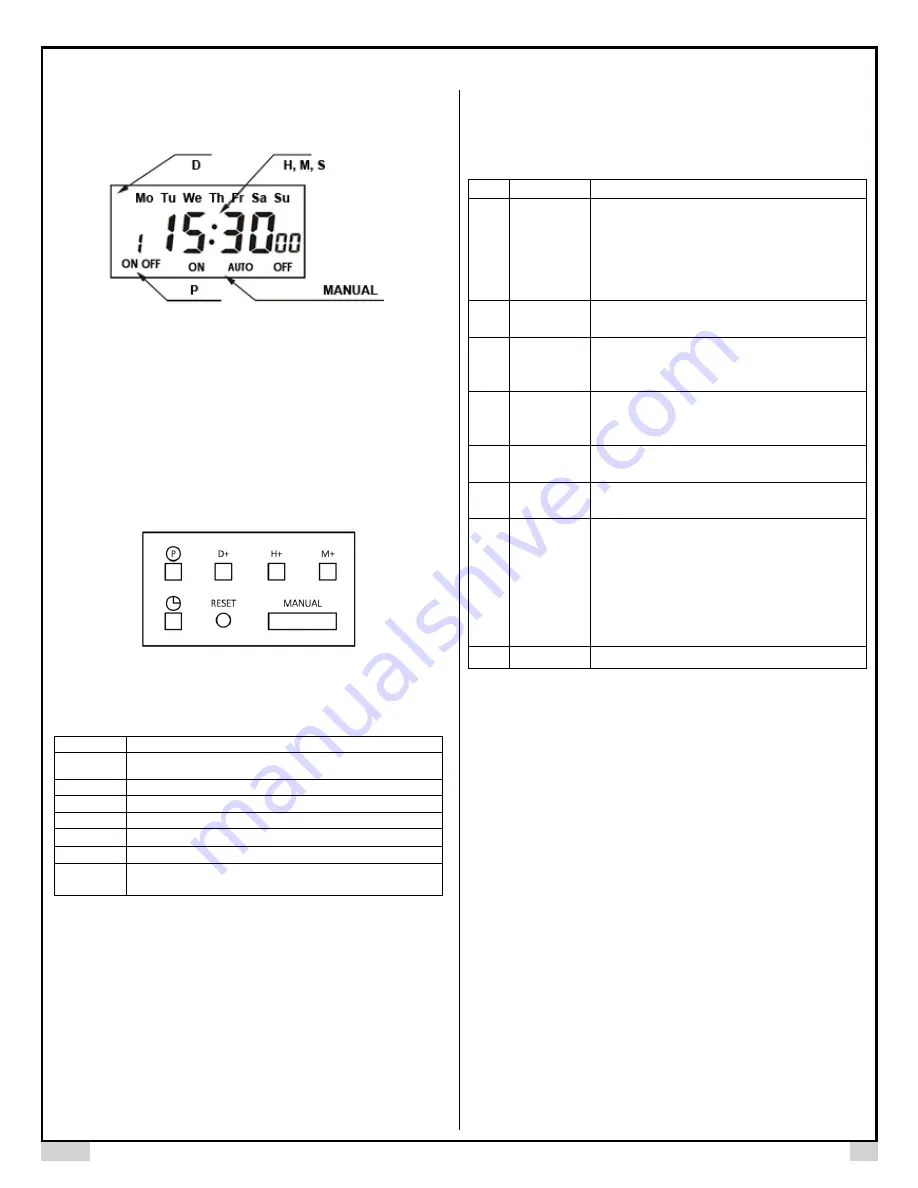
5.1 Timer Display Window
Figure 3. Display window of the timer.
Descriptions
D:
This section of the LCD shows the days of the week.
H, M, S:
Shows the time in the format of Hour: Minute: Second (HH:MM:SS).
P:
Program/event number.
“ON” or “OFF” will appear when editing the event
-
on time and the event-off time.
MANUAL:
Indicating whether the time switch is ON, in AUTO mode, or OFF.
5.2 Key Pad on the Timer Switch
Figure 4. Key pad of the timer switch.
Table 2. Key Functions.
Symbol
Function
○
P
Program the timer switch events
D+
Day adjustment
H+
Hour adjustment
M+
Minute adjustment
🕒
Clock setting
RESET
Reset
MANUAL
Switch mode between ON / AUTO / OFF;
Clear / reset the timer event.
6. Setup the Timer Switch
1. When you first use this timer switch, press RESET key to reset this timer
switch. This will clear all programmed events and reset the clock.
2. Set the Clock: Press and hold the CLOCK key (
🕒
), then press "D+", "H+" or
"M+" key to adjust the day, hour or minute respectively to match with the
current time.
3. Set up ON/OFF timer of each event. Please follow the steps in the Table 3 to
program the event.
4. To have the timer switch run by the programmed events, set the mode to
“AUTO” using MANUAL key. At any time, you can ma
nually turn on the timer
switch (
mode “ON”
) or turn off the timer switch (
mode “OFF”
) by pressing the
MANUAL key.
Table 3. Steps to program the event timer.
Step Action
Description
1
Press
○
P
Enter the Event Setting Mode. You can set up to 17
different relay events. Each event is numbered, and
has an ON time when the relay will pull in and an
OFF time when the relay will drop off. By pressing
○
P
key, you can go through all these settings.
2
Press H+ /
M+
Set hours and minutes for the current event.
3
Press D+
Select recurring days for this event. There are 15
different combinations. Keep pressing D+ briefly to
cycle through these available options.
4
Press
○
P
Confirm the current timer setting and go to the next
setting. For example, if you just edited the
“
1
ON
”
timer, by pressing this key, you will go to
“
1
OFF
”
.
5
Press H+ /
M+
Set hours and minutes for the current event.
6
Press D+
Select recurring days for this event. Keep pressing
D+ briefly to cycle through these available options.
7
Repeat step
2 - 6
Confirm your previous setting and go to next. Set the
ON/OFF timer for event 2 - 17. Leave the event timer
as blank i
f you don’t
want to use this event. If you
have previously set the timer for an event but no
longer need it, use the MANUAL key to clear the
timer setting.
If you don’t need the rest of the events,
press
🕒
to exit
the timer programming mode.
8
Press
🕒
Exit the timer programming mode.
NOTE:
1) As the execution of relay events relies on the clock setting, please adjust
your clock first before programming the event timer.
2) You can set up to 17 relay events on this timer switch. Each event has two
timer settings: the time to activate the relay (displayed as
“
1
ON
”
,
“
2
ON
”
, and so
on), and the time to deactivate the relay (displayed as
“
1
OFF
”
,
“
2
OFF
”
, and so
on).
3) To cancel or disable an event, please make sure both the ON and OFF timer
are cleared “
- - : - -
“.
4) When program the event timer, if no key is pressed for 10 seconds, the timer
display will automatically go back to normal display mode and no settings will
be saved.
5) To use the relay function, this timer must connect to external power supply.
The embedded battery only provide power to the clock/timer, it cannot energize
the coil of the relay.
5. Troubleshooting
If the relay had not been activated or deactivated at your pre-set time. Please
do the following steps:
1) Double check if the recurring weekday setting is correct for your event;
otherwise, just reset your event.
2) If the date and time were set correctly for both the ON and OFF timer, but
the relay is pulling in or dropping out at unexpected time, please check other


