


CHAPTER 9: MAINTENANCE TAB
9-4
DigiVu
®
Series Multichannel MPEG-2/H.264 Encoder/Multiplexer with QAM &/or IP Output - Installation & Operation Manual
need to be changed from time to time, see
“13.1 Field Replacement of Realtime Clock Battery” on page 13-1.
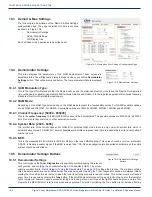
9.6.4 Refresh
This control reads the DigiVu’s stored settings and refreshes the page with the values. This also will read the encoder card
types installed and populate the display with the discovered types. This is useful when an encoder card type has been
changed or a new encoder card installed.
This is not a service affecting operation.
9.6.5 Submit
NOTE:
This is a service affecting operation
This control applies all of the changes made on the ‘Maintenance’ tab (except for ‘Network Settings’ which are applied
separately) and makes the changes part of the working configuration of the DigiVu system. If changes have been made click
Submit
button before navigating away from the page, to avoid all changes being lost. This attribute may be used to throw
away changes made if you change your mind.
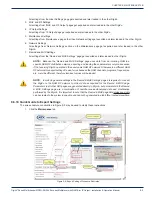
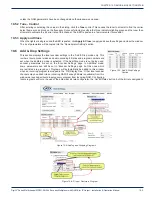
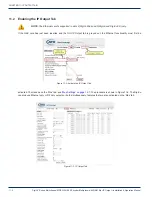
9.6.6 Export Settings
This control allows the operator to export the programmed
configuration as a file. The exported file may be used for
backup and archive purposes or to allow fast and easy
deployment of multiple DigiVu with similar configuration.
The file may be imported to any number of units requiring similar settings, thus saving the time to manually program each unit
before deployment. The process of exporting the configuration file is shown in Figure 9-9.
9.6.7 Import Settings
Importing a settings file is done with the same upload utility used for upgrading firmware. For information on importing a
settings file, see
“12.6 Firmware Upgrade Process” on page 12-3.
9.6.8 Import/Export Firmware Versions Must Match
Because different firmware versions might contain different features and therefore different fields for setting parameters,
export and upload will only work reliably and correctly if the originating and receiving DigiVu are running the same firmware
version. It is obvious that there will be problems if originating and receiving device don’t have same feature set and it will not
be known by the device how to configure settings.
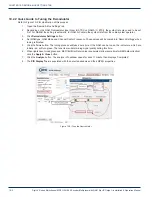
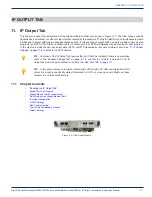
9.6.9 Settings Selection
The DigiVu platform provides several choices for the granularity of the amount of data
to be saved when settings are exported. To start the settings export process, click
the
Export Settings
button. When the export settings dialog is opened, see Figure
9-8, a number of choices are provided to allow just the required data to be exported.
One may be tempted to just select ‘All Settings’ as this may intuitively seem the best
choice but carefully consider the circumstances of the machine receiving the data. If
it intended to use the data as a backup which will be restored to the same DigiVu in
the same network, this is the best choice. If the receiving DigiVu is another machine in
another location, the choice of data exported must be made with careful consideration.
An explanation of the data that will be exported with each selection is outlined here:
1. All Settings
All settings of the entire DigiVu platform. Perfect for a backup database.
WARNING:—If
a remote re-configuration of a DigiVu (the target DigiVu) is performed while
connected through an IP network, the ‘All Settings’ check box has to be unchecked. Otherwise, the
exported ‘Network Settings’ of the source DigiVu (the source of the exported file) will load into the
target DigiVu and those settings will be incorrect unless the target and the source DigiVu are the
same machine. Every remotely accessible device has unique ‘Network Settings’ which will be
overwritten if we check this box. The result will be that internet access to the remote DigiVu is lost
and someone has to visit it locally to reset the Network Settings appropriately for network access.
2. Encoder Settings
Figure 9-7:
Export Settings Button
Figure 9-8:
Settings Selection


