background image


32

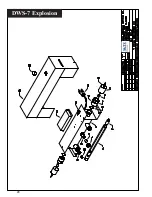
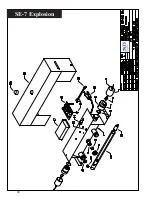
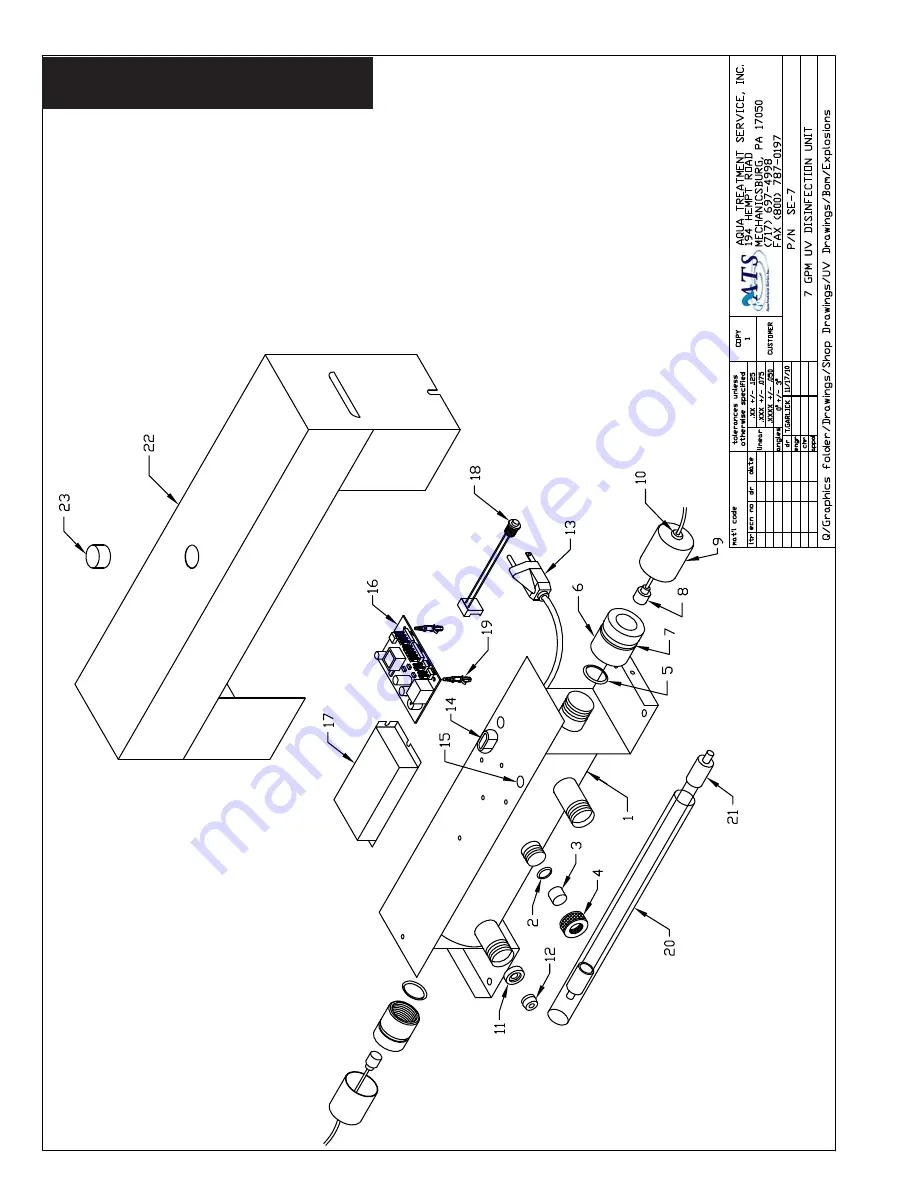
SE-7 Explosion

Summary of Contents for DWS-15

Page 1: ...ing normal operation the Green LED will flash every 5 10 seconds It is important that those responsible for the installation of this equipment as well as the owner operator read this manual and carefu...

Page 2: ...r sold by the manufacturer distributor may cause an unsafe condition 7 Intended for indoor use Do not install this disinfection system where it will be exposed to the weather Do not store this disinfe...

Page 3: ...y of the unit DESCRIPTION OF EQUIPMENT The DWS SE DWSW series are of unique design with an ultraviolet germicidal lamp housed within a single quartz sleeve surrounded by a stainless steel pressure cha...

Page 4: ...lamp in operation EXCEPT through an external Site Port lens located on the outside of the unit 3 U V disinfection units must always be properly grounded INSTALLATION The DWS SE DWSW series are always...

Page 5: ...selected Simply hand press or slightly tap in the flow control until it sits on the inside ledge of the machined port 3 Using the mounting box provided secure unit to wall or other surface Make sure t...

Page 6: ...6 ATS 280CB RESET BUTTON MOUNTED UNDER TOP PLATE OUTLET MAINS BALLAST LAMP...

Page 7: ...5 8 seconds until you hear a continuous tone At this point release the button The 1 year lamp timer has just been reset UV lamp Detector and Timer circuit board Lamp Operation and Alarm features UV S...

Page 8: ...and hold the reset push button A tone that descends in frequency once per second will be heard Hold the reset button down for approximately 5 8 seconds until you hear a continuous tone At this point...

Page 9: ...eposit onto the quartz sleeve After sufficient film has formed on the quartz sleeve the ability of the ultraviolet germicidal rays to pass though the quartz sleeve and into the water may be impaired T...

Page 10: ...shortwave U V to effectively kill bacteria Failure to replace the U V lamps every 9 000 hours may cause bacteriological breakthrough Should the use of the disinfection unit be intermittent in no case...

Page 11: ...to determine how much chlorine solution should be used In some instances removing the seal to measure the water can be a difficult task and it is easier to guess at the quantity of disinfectant needed...

Page 12: ...w to protect wells and springs and keep them from becoming contaminated call or visit your local Cooperative Extension office or your nearest certified water treatment specialist TABLE 1 Quantity of s...

Page 13: ...ater System Using Well Sanitizer Pellets Table 1 Well Diameter Inches Weight of Pellets lbs oz Cups of Pellets Number of Pellets To produce a 400 P P M chlorine dosage NOTE Pellets Weight 1 14 gram ea...

Page 14: ...n water back down the well this also rinses upper portion of well After about 15 minutes of recirculation the water a strong chlorine odor should be apparent Turn off hose 6 Bypass water softener and...

Page 15: ...gulator or above 120 volts Line cord disconnected Check replace or outlet defective Defective U V lamp Replace Defective lamp ballast Check output voltage Replace ballast Loose open circuit wire Trace...

Page 16: ...pproval by Aqua Treatment Service Inc the Dealer Distributor should return the item to Aqua Treatment Service Inc 194 Hempt Road Mechanicsburg PA 17050 prepaid If a part proves to be defective it will...

Page 17: ...ET OUTLET SIZE STD MNPT STD MNPT STD MNPT STD MNPT TOTAL DIMENSION INCL WALL MOUNT L X W X D 18 X 4 X 7 36 X 4 X 7 24 X 9 X 6 36 X 4 X 8 DISINFECTION CHAMBER MATERIAL WETTED PARTS 304 SS TUBING 304 SS...

Page 18: ...bottle or sterile container being used Holding the cap in a down position the operator should then hold his breath while taking the sample so as to avoid oral contamination of the sample The operator...

Page 19: ...19...

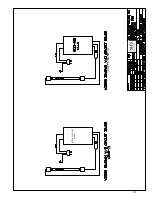
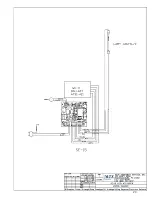
Page 20: ...20 WIRING DIAGRAM...

Page 21: ...21 ATS1 421 CCASE WH 3C DWS 15 DWSW 15...

Page 22: ...22 ATS1 421 CCASE WH 3C...

Page 23: ...23...

Page 24: ...24 ATS1 421 WH 3C...

Page 25: ...25...

Page 26: ...26...

Page 27: ...27 DRAWING AND PART NUMBERS...

Page 28: ...28 DWS 7 Explosion...

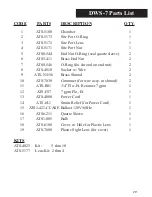
Page 29: ...ut 2 8 ATS 4010 Socket w Wire 2 9 ATS N1156 Brass Shroud 2 10 ATS 7030 Grommet for wire assy in shroud 2 11 ATS R01 3 4 Flo Et Retainer 7 gpm 1 12 ATS F07 7 gpm Flo Et 1 13 ATS 4000 Power Cord 1 14 AT...

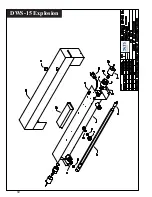
Page 30: ...30 DWS 15 Explosion...

Page 31: ...ut 2 8 ATS 4010 Socket w Wire 2 9 ATS N1156 Brass Shroud 2 10 ATS 7030 Grommet for wire assy in shroud 2 11 ATS R02 3 4 Flo Et Retainer 12 15 gpm 1 12 ATS F15 15 gpm Flo Et 1 13 ATS 4000 Power Cord 1...

Page 32: ...32 SE 7 Explosion...

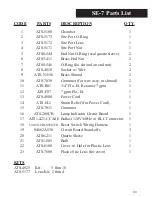
Page 33: ...e assy in shroud 2 11 ATS R01 3 4 Flo Et Retainer 7 gpm 1 12 ATS F07 7 gpm Flo Et 1 13 ATS 4000 Power Cord 1 14 ATS 6L1 Strain Relief for Power Cord 1 15 ATS 7031 Grommet 1 16 ATS 280CB Lamp Indicator...

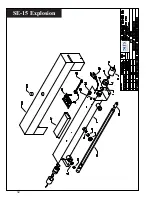
Page 34: ...34 SE 15 Explosion...

Page 35: ...re assy in shroud 2 11 ATS R02 Flo Et Retainer 12 15 gpm 1 12 ATS F15 15 gpm Flo Et 1 13 ATS 4000 Power Cord 1 14 ATS 6L1 Strain Relief for power cord 1 15 ATS 7031 Grommet 1 16 ATS 280CB Lamp Indicat...

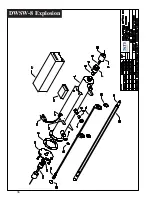
Page 36: ...36 DWSW 8 Explosion...

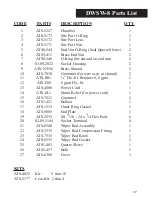
Page 37: ...oud 2 11 ATS R01 Flo Et Retainer 6 8 gpm 1 12 ATS F08 8 gpm Flo Et 1 13 ATS 4000 Power Cord 1 14 ATS 6L1 Strain Relief for power cord 1 15 ATS 7031 Grommet 2 16 ATS1 421 Ballast 1 17 ATS 1535 Outer Ri...

Page 38: ...38 DWSW 15 Explosion...

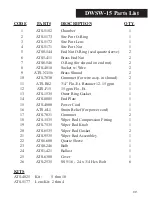
Page 39: ...assy in shroud 2 11 ATS R02 3 4 Flo Et Retainer 12 15 gpm 1 12 ATS F15 15 gpm Flo Et 1 13 ATS 1535 Outer Ring Gasket 1 14 ATS 0005 End Plate 1 15 ATS 4000 Power Cord 1 16 ATS 6L1 Strain Relief for pow...

Reviews:

Related manuals for DWS-15