ATON swisscom CL100 User Manual Download Page 7

Gigaset C45 / SWZ PTT en / A31008-M1753-F151-1-2x19 / starting.fm / 19.6.06

5

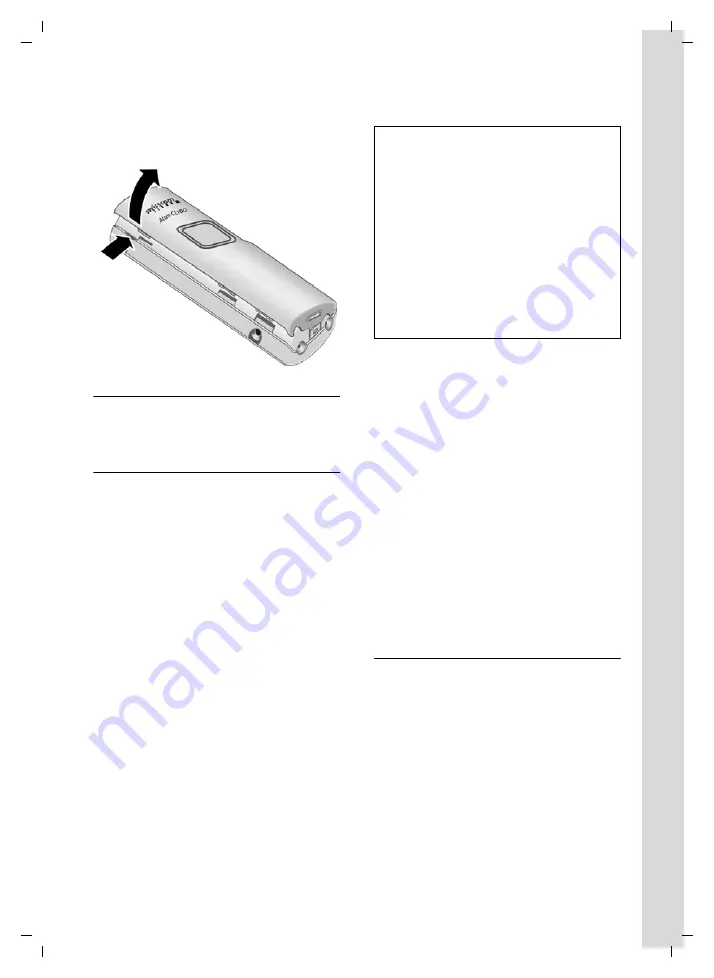
Opening the battery cover

¤

If fitted, remove the belt clip.

¤

Place your finger in the headset socket cav-

ity and pull the battery cover upwards. 

Connecting the charging cradle

Connecting up the charging cradle and mount-

ing it on the wall (if required) is described at the 

end of these instructions.

Registering your phone

Before you can use your Aton CL100 you must 

register it to a base station. The actual registra-

tion procedure will depend on the type of base 

station.

Automatic registration Aton CL100 

Important:

 The handset must not already be 

registered to any base unit.
Registering the handset to the Aton CL100 base 

is automatic.

¤

Place the handset in the charging cradle of 

the base unit with its 

display facing for-

ward

You will hear a confirmation tone.
Automatic registration can take up to five min-

utes. While registration is in progress the screen 

displays 

Registering

 and 

Base

 flashes. The hand-

set is assigned the lowest unassigned internal 

number (1–4). If several handsets are regis-

tered to the base, the internal number is shown 

in the display after registration, e.g. 

INT 2

. This 

means that the handset has been assigned the 

internal number 2. If the handset has been reg-

istered successfully, you will see the display key 

§INT§

 at the bottom left of the display. 

Manual registration Aton CL100

You must activate manual registration of the 

handset at both the handset and the base sta-

tion.
If the handset has been registered successfully 

you will see the display key 

§INT§

 at the bottom 

left of the display. Otherwise repeat the proce-

dure.

1. On the handset

Menu§


¢

Settings 

¢

Handset 

¢

Register Handset

~

Enter the system PIN of the base 

station (the default is 0000) and 

press 

§OK§

. You will see, e.g. 

Regis-

tering


Base

.

2. On the base station

¤

Within 60 seconds, initiate registration on 

the base as described in the base unit's 

instructions.

Charging batteries

¤

Plug the mains adapter of the charging cra-

dle into a mains power socket.

¤

Place the handset in the cradle with its dis-

play facing forward.

Battery charging is indicated in the top right of 

the display by a flashing battery icon 

e

V


or 

U

. During handset operation, the battery 

icon indicates the charge status of the batteries 

(page 1).

Notes:

– Automatic registration is not possible when the 

base on which you wish to register the handset is 

being used to make a call. 

– A key press cancels automatic registration.
– If four handsets are already registered to the base 

station there are two options:
– The handset with the internal number 4 is in 

idle status: the handset you wish to register is 

assigned the number 4. The handset that was 

previously number 4 is de-registered.

– The handset with the internal number 4 is 

being used: the handset you wish to register 

cannot be registered.

– If automatic registration does not work the hand-

set will have to be registered manually (page 5).

Summary of Contents for swisscom CL100

Page 1: ...Aton CL100 Gigaset C45 SWZ PTT en Internet cover fm 18 5 06 Handset Aton CL100 User manual...

Page 2: ...Aton CL100 Gigaset C45 SWZ PTT en Internet cover fm 18 5 06...

Page 3: ...6 Message key Opens calls and message lists Flashes new message or new call 7 Hash key Confer Flash press and hold Toggle between upper lower case letters and digits for text entry page 29 8 Micropho...

Page 4: ...nswering a call 9 Handsfree talking 9 Using the directory and lists 10 Directory 10 Last number redial list 11 Opening lists with the message key 11 Handset settings 12 Changing the display language 1...

Page 5: ...ent e g doctor s surgery The handset may cause an unpleasant humming noise in hearing aids Do not install the charging cradle in bathrooms or shower rooms The handset and charging cradle are not splas...

Page 6: ...es the right way round see figure The polarity is indicated in the battery compart ment The handset switches on automatically You will hear a confirmation tone Closing the battery cover First align th...

Page 7: ...ual registration Aton CL100 You must activate manual registration of the handset at both the handset and the base sta tion If the handset has been registered successfully you will see the display key...

Page 8: ...press OK Use q to move between the fields Your Aton CL100 is now ready for operation Notes After the first battery charge and discharge you may replace your handset in the charging cradle after every...

Page 9: ...eversed highlights The functions of the display keys change according to the operating situation Example 1 Current display key functions 2 Display keys The most important display icons are Back Go bac...

Page 10: ...ximately the same height as the display Press the belt clip to the back of the handset so that the lugs of the belt clip click into the notches The tongue of the belt clip must face the bat tery compa...

Page 11: ...ed on the screen Handsfree talking In handsfree mode you need not hold the hand set to your ear but place it e g on the table in front of you to allow others to participate in the call Activating deac...

Page 12: ...ries You have selected an entry page 10 Editing an entry Menu Edit Entry Edit the number if required and press OK Edit the name if required and press OK Using other functions s s select entry page 10...

Page 13: ...e directory the corresponding name will be displayed Dialling from the last number redial list c Press the key briefly q Select an entry c Press the talk key again The number is dialled Managing entri...

Page 14: ...lumination stays on perma nently or is switched off after a certain time permanently switched on Activating deactivating Auto talk When this function is activated when a call arrives you can simply li...

Page 15: ...isplay Re activating the ringtone P Press and hold the star key in idle status Advisory tones Your handset uses advisory tones to tell you about different activities and statuses The fol lowing tones...

Page 16: ...p time Enter the wake up time in hours and minutes then press OK When the alarm clock rings Alarm repeat after 5 minutes Snooze Press the display key or any key If you press Snooze three times the ala...

Page 17: ...dry warm place for at least 72 hours not in a microwave oven etc Do not switch on the handset again until it is completely dry When it has fully dried out you will normally be able to use it again Fau...

Page 18: ...price as well as time expenses The repair costs are additional out side the warranty period Batteries Battery cells are considered consumed mate rial which is not covered by the warranty serv ice Defe...

Page 19: ...ws the selection line of the characters assigned to the hash key u The first letter of a directory entry name is automatically capitalised and is followed by lower case letters Editing text When you p...

Page 20: ...31008 M1753 F151 1 2x19 appendix fm 19 6 06 Entering special characters Standard characters Directory and other lists When writing an SMS 1 Q P 1x Space Space Abc 123 2x 1 123 abc 3x 1 4x 5x 0 6x 7x 8...

Page 21: ...lours u Various different screensavers u Illuminated keypad u Handsfree operation u Polyphonic ringer melodies u Phonebook for around 100 entries u Alarm clock u Headset connection incl headset CL100...

Page 22: ...12 handset 7 handsfree talking 9 muting ringtone 13 Deleting characters 8 Dialling directory 10 last number redial list 11 Digital clock 12 Directory 10 copying number from text 11 opening 7 order of...

Page 23: ...ening lists 11 Muting the first ringtone 13 N Number copying from directory 11 storing in the directory 10 11 O On Off key 1 Operation preparing to use the handset 4 Order of entries in directory 17 P...

Page 24: ...23 Gigaset C45 SWZ PTT en A31008 M1753 F151 1 2x19 montage_charger fm 18 5 06...

Reviews: