© 201 8 Escalad e Sports
Fo r Custome r Servic e Cal l 1-888-996-2729
11
All Rights Reserved.
CA R E AND U SE OF YO UR T A B L E
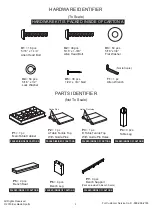
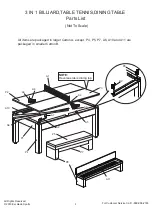
P R O D U C T P A R T S L I S T S
Q t y
D e s c r i p t i o n
P a r t #
Q t y
D e s c r i p t i o n
P a r t #
H1
H2
H3
H4
H5
T1
P1
P2
P3
P4
P5
P6
P7
16
48
64
64
36
1
1
1
1
4
2
4
4
A1
A2
A3
A4
A5
A6
A7
A8
A9
A10
A11
Table Tennis Net
Net Post
Table Tennis Paddle
Table Tennis Ball
Cue Chalk
Cue Stick
Billiard Ball Set
Triangle
Pool Playfield Brush
Table Tennis Playfield Support
Bench Carpet
1
2
2
2
2
2
1
1
1
2
2
5/16’’ x 1-1/4’’ Allen Head Bolt
5/16’’ x 1-3/8’’ Allen Head Bolt
5/16’’ x 3/4’’Flat Washer
5/16’’ x 1/2’’ Lock Washer
1/24‘’ x 3/4’’ Nail
Allen Wrench
Main Table Cabinet
“A” Table Tennis Top With
Guide Pins
“B” Table Tennis Top With
Guide Pin Holes
Table Leg
Bench Seat Assembly
Bench Leg
Bench Support
1. Use spray furniture polish to clean all exterior surfaces of your pool table.
2. Use the table brush provided to clean the cloth on the table.
3. Use only a slightly damp soft cloth to clean the table tennis top (do not use
Furniture Polish)
4. This product is intended for
INDOOR
use only .
5.
DO NOT
sit, climb or lean on the table.
6.
DO NOT
drag the table when moving it. This will damage the legs.
7.
DO NOT
set drinks on the table.
8. The purchase of a pool table cover will both protect and help keep clean the
entire top of the pool table.
9. Lastly, using a carpenters level and the leg levelers, level table for best play.
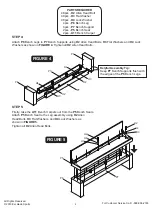
Congratulations! You have now assembled your 3 in1 Billiard table. Please note the
Care and Use instructions below to insure many years of trouble free use of your 3 in1
Billiard table.
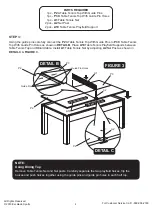
Corner Pocket
Middle Side Pocket
Leg Leveler (Factory Installed)
P8
P9
C1
4
2
4
Dampener Piston (Factory Installed)
C2
Hardware Kit
K1
Instruction Manual
M1
4
1
1
1/2” Phillips Head Hinge Screw (Factory Installed)
C3
48


