2
APPLICATION
The Aries 208/238 night vision weapon scope is a complex opticoelectronic system for the
observation of objects at low light levels (less than 1.0 lux.)
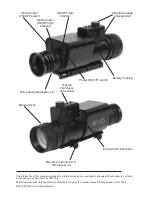
The Aries 208/238 consists of (see figure) the objective lens assembly, ocular lens assembly
and the body. The body contains the image intensifier tube assembly with the integrated high
voltage power source. The body also houses the electronics for the reticule as well as the bat-
tery compartment and the infra-red illuminator, located on the opposite side from the battery
compartment.
The objective lens protective cover (not shown) is designed to protect the lens from scratches
and abrasions. This cover is also aimed at image intensifier tube protection from high-level
illumination. The protective cover acts as a daylight filter, note the pinhole in the center of the
lens cap.
NOTE:
Please refrain from testing in the daylight for more than ten (10)
minutes at a time.
The on/off switch is to be found on the back of the unit. Next to this
switch you will find the switch to operate the built in infra-red illumina-
tor.
Adjustments for windage and elevation are covered inside screw top
caps. The caps keep the fine reticle adjustment screws from getting
clogged with debris.
To focus the Aries 208/238, first you will need to adjust the diopter.
Simply turn the diopter clockwise until it stops. Then, while looking through the diopter at a
subject, slowly turn the diopter back counter clockwise until the grain the image is sharp.
NOTE:
You will need to focus the diopter during daylight with the filter on. Next focus the front
lens until the image and the grain are both sharp. When you are in low-light conditions and the
daylight filter is off, you may focus the front lens to receive a sharp image, the diopter should not
be adjusted.
NOTE:
The front lens should be readjusted as you view objects at different distances.
For your mounting convenience the Aries 208/238 is supplied with the standard U.S. Weaver
mount. This is a standard 7/8” system. Mounting the Aries 208 should be no different than
mounting any scope to a Weaver style rail.
PREPARATION FOR OPERATION
Before getting started make sure to follow these steps:
• Take the Aries 208/238 out of the case.
• Install the battery into its housing with the polarity order shown on the main body of the unit.
• Switch on the Aries 208/238 with the protective tens cover still attached to the tens.
• Make sure that the green luminance of the light intensifier tube is present.
• Observe the scene, and adjust the diopter and/or lens for optimal image clarity.
• You may now enter a dark environment or simply shut the lights off in order to darken the
room.
• Next, remove the lens cap/daylight filter.
• Observe the scene, and adjust the front lens for ideal focus.
• Finally, you may want to turn the infra red (IR) illuminator on. Notice the ability of the Aries
208/238 to see in total darkness with the aid of the IR illuminator.
• You may need to clean the eyepiece and of the unit you have purchased from time to time
in order to guarantee top performance. When you receive your Aries 208/238 you should
check for dust on the eyepiece of the unit.


