


Installation Guide
3
1
2
3
1
2
3
GND
GND
+
-
+
-
1
2
3
1
2
3
GND
GND
+
-
+
-
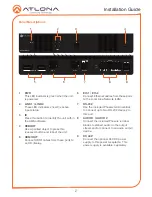
The AT-OMNI-122 provides RS-232 over IP which allows communication between an automation
system and an RS-232 device. This step is optional.
1. Use wire strippers to remove a portion of the cable jacket.
2. Remove at least 3/16” (5 mm) from the insulation of the RX, TX, and GND wires.
3. Insert the TX, RX, and GND wires into correct terminal on the included Phoenix block. If
using non-tinned stranded wire, presss the orange tab, above the terminal, while inserting
the exposed wire. Repeat this step for the TX, RX, and GND connections..
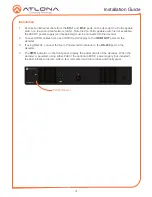
The AT-OMNI-122 provides the ability to embed analog audio on the output stream and output
downmixed 2-channel PCM, using the included dual five-pin Phoenix block. Use the top 5 pins
to connect audio input sources. Use the bottom five pins to connect to audio output devices.
1. Use wire strippers to remove a portion of the cable jacket.
2. Locate the included Phoenix block connectors. Press the orange tab, above the terminal,
while inserting the exposed wire. Release the orange tab to lock the wire in place.
Balanced or unbalanced audio can be used.
NOTE:
Typical DB9 connectors use pin 2 for TX, pin 3 for RX, and pin 5 for ground.
On some devices functions of pins 2 and 3 are reversed.
Push tab
to unlock
Balanced audio
Unbalanced audio
RS-232
Audio
Push tab
to unlock
GND
RX
TX


