background image

4

Installation Guide

AT-OMNI-112

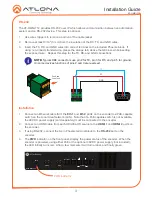
The AT-OMNI-112 encoder includes two 

mounting brackets and four mounting screws, 

which can be used to attach the unit to any flat 

surface.

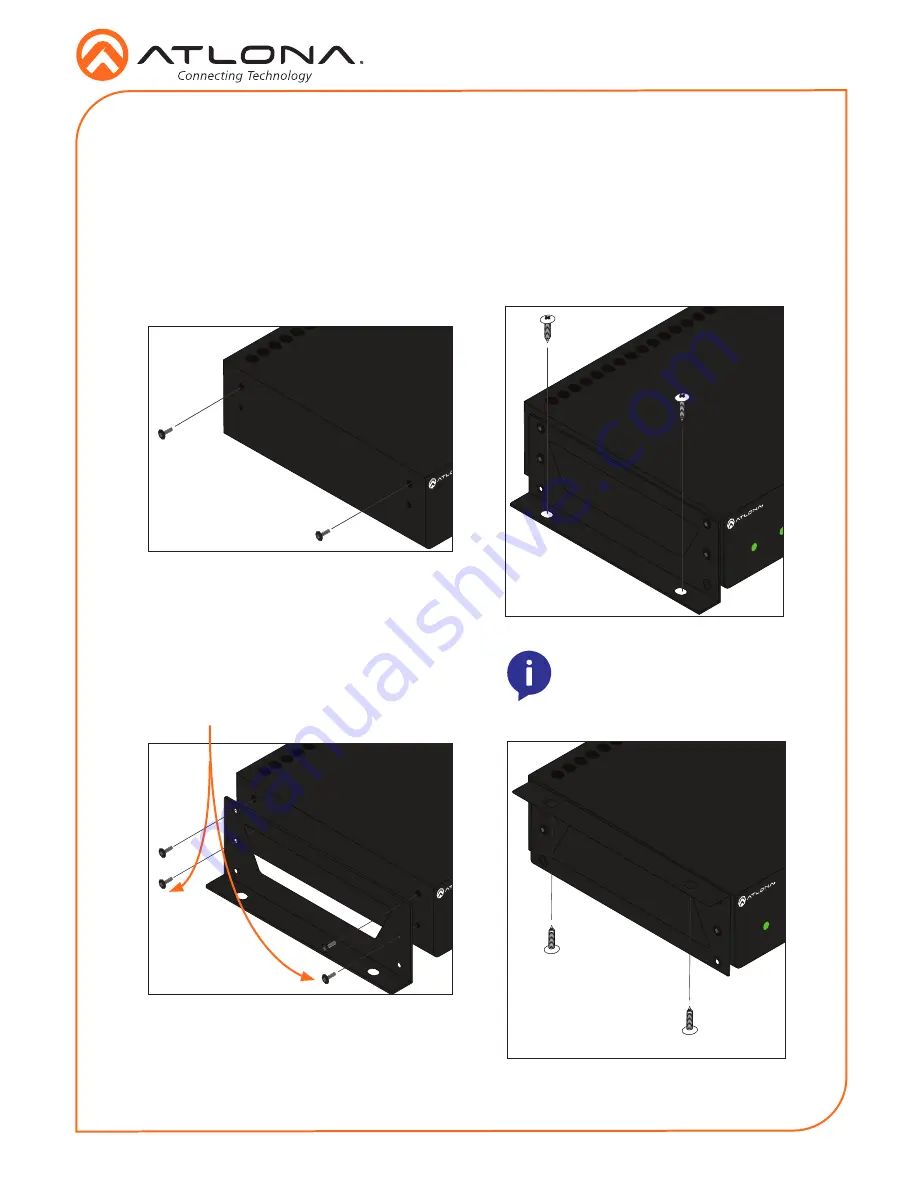
1.  Using a small Phillips screwdriver, remove 

the two screws from the left side of the 

enclosure. 


2.  Position one of the mounting brackets, as 

shown below, aligning the holes on the 

side of the enclosure with one set of holes 

on the mounting bracket.

3.  Use the enclosure screws to secure the 

mounting bracket to the enclosure. 


4.  To provide added stability to the mounting 

bracket, use two of the included screws 

and attach them to the two holes, directly 

below the enclosure screws, as shown 

above.

5.  Repeat steps 1 through 4 to attach the 

second mounting bracket to the opposite 

side of the unit.

6.  Mount the unit using the oval-shaped 

holes, on each mounting bracket.  If using 

a drywall surface, a #6 drywall screw is 

recommended. 


1

2

HDMI

PWR

1

2

LINK

DISPLA

Y

INPUT

ID

VOLUME

AT-OMNI-112

1

2

HDMI

PWR

1

2

LINK

DISPLA

Y

INPUT

ID

VOLUME

AT-OMNI-112

1

2

HDMI

PWR

1

2

LINK

DISPLA

Y

INPUT

ID

VOLUME

AT-OMNI-112

Included screws

NOTE:

 Mounting brackets can 

 also be inverted to mount the 

 unit under a table or other flat 

surface, as shown below.

1

2

HDMI

PWR

1

2

LINK

DISPLA

Y

INPUT

ID

VOLUME

AT-OMNI-112

Mounting Instructions


Summary of Contents for OmniStream 112

Page 1: ... for high density rack installations With two Ethernet ports the OmniStream 112 can also deliver duplicate AV streams to two networks for full system redundancy in mission critical applications IMPORTANT Visit http www atlona com product AT OMNI 112 for the latest firmware updates and User Manual 1 x AT OMNI 112 1 x Phoenix terminal block 6 pin push spring 1 x Wall table mounting brackets 4 x Rubb...

Page 2: ... INPUT Press this button to switch between HDMI 1 and HDMI 2 inputs 6 VOLUME Press these buttons to adjust the output volume of the desired display 7 ID Press this button to identify the unit within the AMS software 8 REBOOT Use a pointed object to press this recessed button and reboot the unit 9 HDMI 1 HDMI 2 Connect HDMI cables from these ports to an HD source 10 Eth 1 Eth 2 Connect Ethernet cab...

Page 3: ...eversed Push tab to unlock GND RX TX RS 232 1 2 1 2 HDMI PWR LINK VOLUME DISPLAY INPUT ID AT OMNI 112 DC 48V Eth 1 Eth 2 HDMI 1 HDMI 2 RS 232 RX TX 1 2 PWR indicator 1 Connect an Ethernet cable from the Eth 1 and Eth 2 ports on the encoder to a PoE capable switch on the Local Area Network LAN Note that if a PoE capable switch is not available the 48V DC power supply sold separately must be connect...

Page 4: ...ting bracket use two of the included screws and attach them to the two holes directly below the enclosure screws as shown above 5 Repeat steps 1 through 4 to attach the second mounting bracket to the opposite side of the unit 6 Mount the unit using the oval shaped holes on each mounting bracket If using a drywall surface a 6 drywall screw is recommended 1 2 HDMI PWR 1 2 LINK DISPLAY INPUT ID VOLUM...

Page 5: ...IP address of the encoder 1 Launch the Atlona Management System app 2 Launch a web browser and enter localhost 8080 in the address field 3 Enter the login information on the AMS web page then click the Login button Login admin Password admin123 4 Under the Domain View panel locate the IP address for the encoder Encoders will be labeled as OMNI 112 Connection Diagram 2 COM NC NO COM NC NO COM NC NO...

Page 6: ...coder When using an external power supply the PWR indicator will be red LINK indicator is red Connect an Ethernet cable to the Ethernet port Check the Ethernet cable for possible damage or loose connections OmniStream decoders are not displayed in AMS Verify that AMS and the decoder are on the same network If a DHCP server is not found within 60 seconds the decoder will be placed in Auto IP mode a...

Page 7: ...7 Installation Guide AT OMNI 112 Notes ...

Page 8: ... Atlona Inc All other brand names and trademarks or registered trademarks are the property of their respective owners Pricing specifications and availability subject to change without notice Actual products product images and online product images may vary from images shown here Version 1 atlona com 408 962 0515 877 536 3976 ...

Reviews: