Atlona AT-HDVS-200-TX-WP Installation Manual Download Page 3

3

Connecting

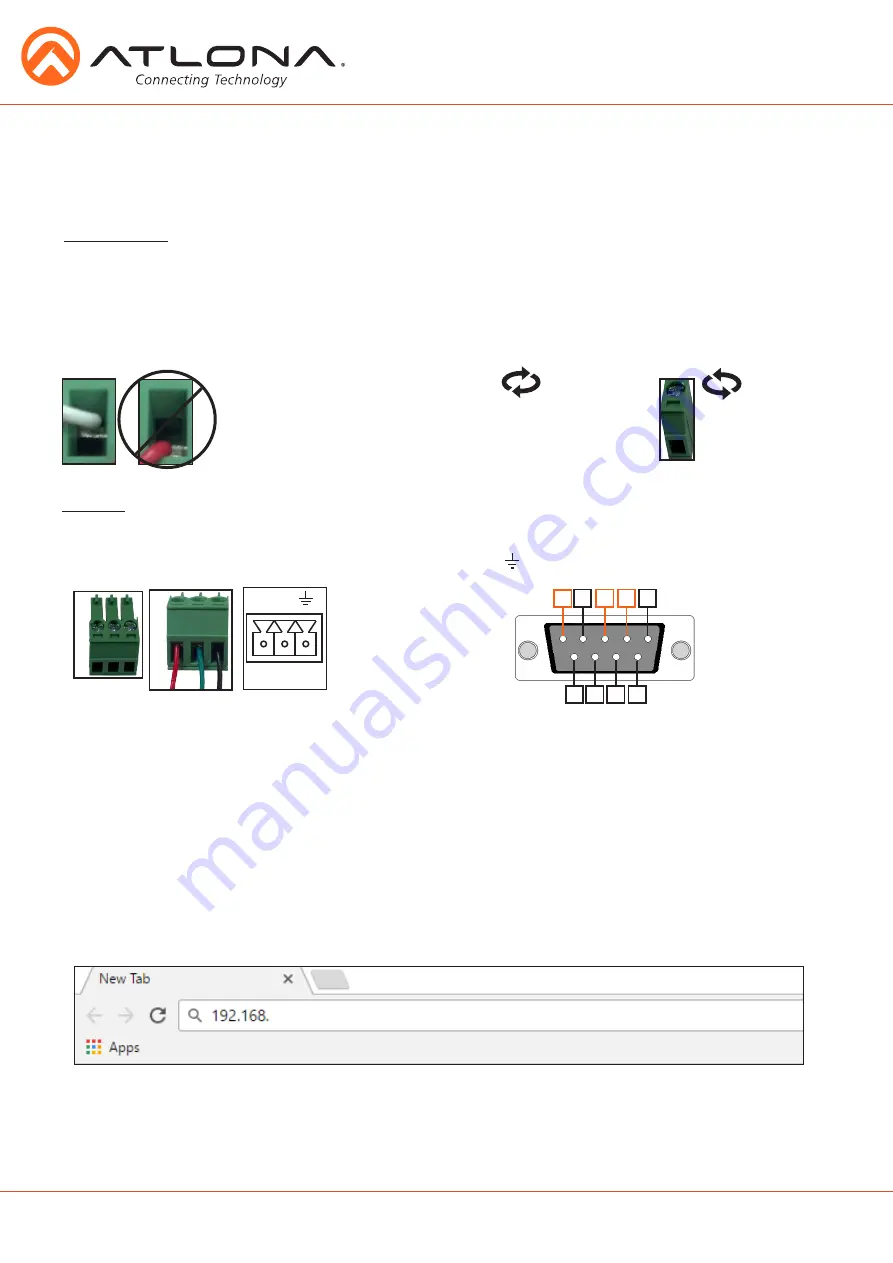
The captive screw connectors have 
a contact bar that is adjusted to 
compress the wire against the top 
contact plate. Use the screws at the 
top of the connector to compress 
the wire against the contact plate.

When connecting the cables to the female captive screw connector it is important that the wires be 
terminated correctly. The female captive screw connector has a contact plate at the top and must 
have the wires touching it for signal to pass. When wired correctly 

(see picture A)

 the signal will pass, 

incorrectly 

(see picture B)

 no signal will pass.

Clockwise

Counter

Clockwise

Turn the screws clockwise to 
raise the contact bar to the 
upper contact plate and hold 
the wires in place.

Turn the screws counter 
clockwise to lower the 
contact bar to release the 
wires.

A

B

atlona.com

Toll free: 1-877-536-3976

Local: 1-408-962-0515

RS-232 captive screw connector is included.  RS-232 pin out will be determined by the RS-232 
cable and will connect as Rx


(receiver)

Tx


(transmitter)

and    


(ground)

(See picture 1)

RS-232

Typical pin out:

2 - TX - Transmitter
3 - RX - Receiver
5 - GND - Ground

Pin out color will differ 
per RS-232 cable.

1

5 4 3 2

9 8 7 6

1

RS-232

RS-232

RX TX

The captive screw connectors allow you to cut cables to a suitable length, reducing cable clutter 
while providing a more reliable connection.

Captive Screw

 Note: 

IP addresses may also be found using common free IP scanner software such as “Advanced IP Scanner”


*

Atlona does not assume responsibility for damage caused by other programs installed onto a computer, verify programs before installing

*

webGUI

Atlona has created an easy to use webGUI for setup and changes to the configuration of the 
HDVS-200-TX-WP.
To begin, plug a LAN cable into the LAN port of the HDVS-200-TX-WP and the network switch, 
then type the IP address of the unit into a web browser of a PC connected to the same network 

(as 

seen below)

Important:

   If any stability issues are experienced, disable any anti-virus or firewall that may interfere with 


network communication to the switcher. Once set up is done and the switcher webGUI is no 


longer being used, the firewall and anti-virus can be re-enabled.

Summary of Contents for AT-HDVS-200-TX-WP

Page 1: ...reate a standalone AV switching and control system with scaling for classrooms and huddle rooms Display control and volume commands are transmitted via CEC IP or RS 232 to any display control system switcher or other controllable device 1 x AT HDVS 200 TX WP w face plate LAN port exposed 1 x Captive screw connector 3 pin RS 232 1 x Face plate w LAN port covered 1 x Installation Guide Package Conte...

Page 2: ...VOLUME buttons Adjust output volume of the switcher or connected device when programmed Note To mute or unmute output audio press both volume buttons together LED will turn red when muted 5 AUDIO IN port Connect analog audio here 6 HDMI IN port Connect HDMI source here 7 LAN black port Connect network switch or router to this port for Ethernet TCP IP or webGUI control 8 VGA IN port Connect VGA sou...

Page 3: ...receiver Tx transmitter and ground See picture 1 RS 232 Typical pin out 2 TX Transmitter 3 RX Receiver 5 GND Ground Pin out color will differ per RS 232 cable 1 5 4 3 2 9 8 7 6 1 RS 232 RS 232 RX TX The captive screw connectors allow you to cut cables to a suitable length reducing cable clutter while providing a more reliable connection Captive Screw Note IP addresses may also be found using commo...

Page 4: ...login screen will appear this is the same log in for admin and general users For the first log in and future admin changes the username is root and password is Atlona Note Only the admin password can be changed see User Manual The username will always remain root ...

Page 5: ...T Audio Ethernet Dry CC Control AT HDVS 200 TX WP Laptop FW RELAY AT HDVS 200 RX C1 C2 COM HDBaseT IN LAN HDMI OUT L 1 R 2 RX RX TX TX AUDIO RS 232 MENU AUTO PW LINK DC 48V ROUTER 2 4 5 1 2 3 4 i AT PA100 G2 Drop down projector screen contact closure controlled AT HDVS 200 RX Router Projector Dry CC Audio HDBaseT Video Control Ethernet Audio Video Document Camera Audio Video ...

Page 6: ...E IN LINE MIC 48V AUDIO IN TX RX TX RX TX RX TX PWRIR DC 48V FW RS 232 IR AUDIO OUT MASTER OUT IN RX TX 5 6 1 2 3 4 5 ENTER MENU 6 7 8 RX TX RX TX 7 8 8 1 1 2 2 RS 232 RX TX RX TX 9 10 RX TX RX TX LINE MIC 48V L R AUDIO OUT FW LINK POWER AT UHD EX 100CE RX RS 232 RXTX IR IN P S IR OUT S HDBaseT IN ETHERNET HDMI OUT ROUTER 2 4 5 1 2 3 4 i Router AT UHD EX 100CE RX AT UHD CLSO 824 Display HDBaseT Et...

Page 7: ...For the AT HDVS 200 RX DHCP can be turned on off by pressing the AUTO button for 15 seconds You can also toggle between DHCP and Static IP modes using the IPDHCP command via TCP IP or RS 232 or by using the webGUI or AMS 6 What is the default IP address The default static IP address is 192 168 1 254 Please note that the default static IP for both the wall plate transmitter HDVS 200 TX WP and the r...

Reviews: