background image

2                                                   

3                                                   

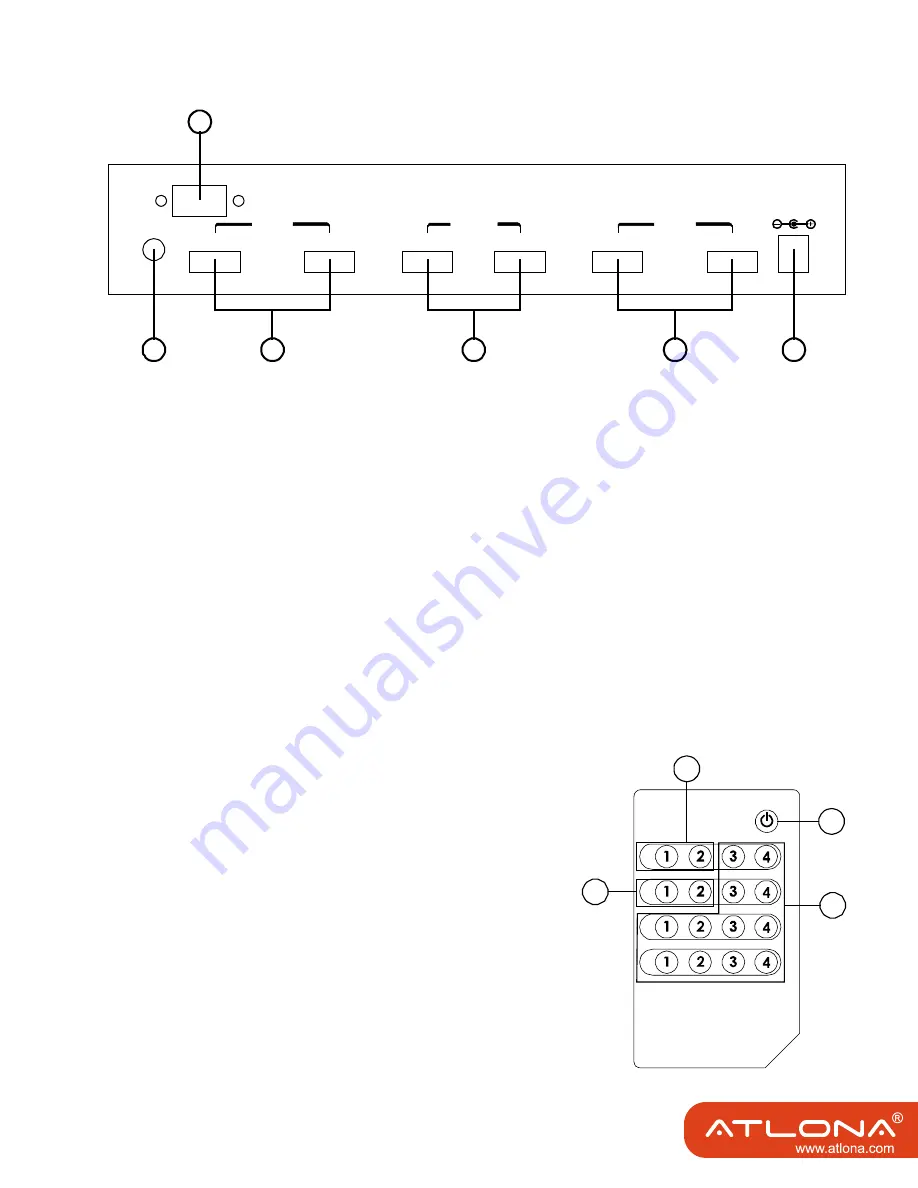
4.2 Rear Panel

4.3 Remote Control

1. IR IN Socket:

Plug the IR extender sensor (optional) into the socket for IR extension control.

2. RS-232 Communication Port:

Connect to the COM port of your PC for the distant control over RS-232 channel.

3. HDMI™ inputs 1 and 2:

Connect to the HDMI™ output of your source equipment such as DVD player or set-top-

box.

4. HDMI™ outputs A and B:

Connect each of these output ports to the HDMI™ input of an HDMI™ display.

5. HDMI™ inputs 3 and 4:

Connect to the HDMI™ output of your source equipment such as DVD player or set-top-

box.

6. Power:

1. Power:

Press the button to turn on/off the unit.

2. Input Select for HDMI™ OUT A:

Press 1, 2, 3 or 4 to select the desired input 

source for HDMI™ OUT A.

3. Input Select for HDMI™ OUT B:

Press 1, 2, 3 or 4 to select the desired input 

source for HDMI™ OUT B.

4. Void buttons (No function).

1

3

4

5

6

2

INPUT

1

2

OUTPUT

INPUT

3

4

A

B

RS-232

DC 5V

IR IN

OUTPUT

A

OUTPUT

D

OUTPUT

C

OUTPUT

B

POWER

1

2

3

4

Summary of Contents for AT-HDMI-42M

Page 1: ...AtlonA 4x2 HDMI Matrix Switch HDMI version 1 3 AT HDMI 42M User Manual...

Page 2: ...tion Controls and Functions 2 4 1 Front Panel 2 4 2 Rear Panel 3 4 3 Remote Control 3 4 4 RS 232 Protocol 4 4 4 1 Pin Definition 4 4 4 2 Commands 4 5 Specifications 5 5 1 General Specification 5 5 2 S...

Page 3: ...evel compensated phase error corrected and data jitter eliminated so the output is a regenerated brand new HDMI signal that can run for another 25 meters and can be cascaded 1 HDMI version 1 3 HDCP 1...

Page 4: ...dly to switch to your desired source and the LED will illuminate to indicate which input source is being selected and routed to HDMI A display 4 Input Select Indicators B Press the HDMI OUT B button r...

Page 5: ...onnect each of these output ports to the HDMI input of an HDMI display 5 HDMI inputs 3 and 4 Connect to the HDMI output of your source equipment such as DVD player or set top box 6 Power 1 Power Press...

Page 6: ...Output A select Input3 A2 Output A select Input4 B1 Output B select Input1 B2 Output B select Input2 B3 Output B select Input3 B4 Output B select Input4 RS 232 transmission format Baud Rate 9600 bps D...

Page 7: ...2 25Gbps single link HDMI v1 3 Input Output 4 in to 2 out HDMI female ports 5V DC power supply Dimensions 240 W x 165 D x 49 H mm Weight version 1 35Kgs 5 2 Support Resolution INTPUT PC VGA SVGA XGA S...

Page 8: ...plug the device and plug it back in Protect and route power cords so they will not be stepped on or pinched by anything placed on or against them Be especially careful of plug ins or cord exit points...

Page 9: ...OF THE THEO RYOF LIABILITY ARISING OUT OF OR RELATED TO THE USE OF OR INABILITY TO USE THE PRODUCT EVEN IF ATLONA HAS BEEN ADVISED OF THE POSSIBILITY OF SUCH DAMAGES IN NO EVENT ATLONA S LIABILITY TO...

Reviews: