background image

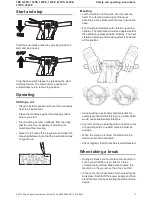
Start and stop

ON

Start the pneumatic breaker by pressing down the
start and stop device.

OFF

Stop the pneumatic breaker by releasing the start
and stop device. The start and stop device will
automatically return to the stop position.

Operating

Starting a cut

Stand in a stable position with your feet well away
from the inserted tool.

Press the machine against the working surface
before you start.

Start collaring at such a distance from the edge
that the machine is capable of breaking the
material without levering.

Never try to break off too large pieces. Adjust the
breaking distance (A) so that the inserted tool does
not get stuck.

A

Breaking

Let the machine do the work; do not press too
hard. The vibration-reducing handle must
absolutely not be pressed all the way down to the
base.

For pneumatic breakers with vibration-reducing
handles: The feed force should be adapted so that
the handles are pressed down 'half way'. The best
vibration damping and breaking effect is achieved
at this position.

Avoid working in extremely hard materials for
example granite and reinforcing iron (re-bar) which
would cause substantial vibrations.

Any form of idling, operating without insertion tool
or operating with an uplifted machine must be
avoided.

When the machine is lifted, the start and stop
device must not be activated.

Check regularly that the machine is well lubricated.

When taking a break

During all breaks you must place the machine in
such a way that there is no risk for it to be
unintentionally started. Make sure to place the
machine on the ground, so that it can not fall.

In the event of a longer break or when leaving the
workplace: Switch off the power supply and then
bleed the machine by activating the start and stop
device.

17

© 2012 Atlas Copco Construction Tools AB | No. 9800 0683 82f | 2012-08-07
Original instructions

Safety and operating instructions

TEX 140PS, 150PE, 180PS, 190PE, 220PS, 230PE,
270PS, 280PE

Summary of Contents for 140PS

Page 1: ...lidores pneumáticos manuais Istruzioni per la sicurezza e per l uso Demolitori pneumatici manuali Veiligheidsvoorschriften en bedieningshandleiding Handbediende pneumatische sloophamers Sikkerhedsinstruktioner og betjeningsvejledning Håndholdte tryklufthamre Säkerhetsinstruktion och instruktionsbok Handhållna tryckluftsspett Instrukcje bezpieczeństwa i obsługi Ręczny mlot pneumatyczny 2012 Atlas C...

Page 2: ...s to prevent freezing 15 Connecting a water separator 15 Lubrication 15 Checking the oil level and filling the integrated lubricator 15 Insertion tool 15 Selecting the right insertion tool 16 Narrow chisel 16 Moil point 16 Wide bladed chisel 16 Checking for wear on the tool shank 16 Fitting and removing the insertion tool 16 Operation 16 Start and stop 17 Operating 17 Starting a cut 17 Breaking 17...

Page 3: ...l vibration information 20 Noise and vibration data 21 EC Declaration of Conformity 22 EC Declaration of Conformity EC Directive 2006 42 EC 22 5 2012 Atlas Copco Construction Tools AB No 9800 0683 82f 2012 08 07 Contents TEX 140PS 150PE 180PS 190PE 220PS 230PE 270PS 280PE ...

Page 4: ... product support and expertise to ensure that our customers can work at maximum efficiency at all times For more information please visit www atlascopco com Atlas Copco Construction Tools AB 105 23 Stockholm Sweden About the Safety and operating instructions The aim of the instructions is to provide you with knowledge of how to use the pneumatic breaker in an efficient safe way The instructions al...

Page 5: ...ARNING Drugs alcohol or medication Drugs alcohol or medication may impair your judgment and powers of concentration Poor reactions and incorrect assessments can lead to severe accidents or death Never use the machine when you are tired or under the influence of drugs alcohol or medication No person who is under the influence of drugs alcohol or medication may operate the machine Installation preca...

Page 6: ...gnition can occur Explosions will lead to severe injuries or death Never operate the machine in any explosive environment Never use the machine near flammable materials fumes or dust Make sure that there are no undetected sources of gas or explosives WARNING Unexpected movements The inserted tool is exposed to heavy strains when the machine is used The inserted tool may break due to fatigue after ...

Page 7: ...erating and safety instructions Incorrect selection or lack of maintenance of consumables inserted tools other accessories may cause an unnecessary increase in dust or fumes Wear washable or disposable protective clothes at the worksite and shower and change into clean clothes before leaving the worksite to reduce exposure of dust and fumes to yourself other persons cars homes and other areas Avoi...

Page 8: ...t burning sensation stiffness throbbing tingling pain clumsiness weakened grip whitening of the skin or other symptoms occur at any time when operating the machine or when not operating the machine stop operating the machine tell your employer and seek medical attention Continued use of the machine after the occurrence of any such symptom may increase the risk of symptoms becoming more severe and ...

Page 9: ...ion Whenever fitting or removing the insertion tool switch off the air supply bleed the machine by pressing the start and stop device and disconnect the machine from the power source WARNING Noise hazard High noise levels can cause permanent and disabling hearing loss and other problems such as tinnitus ringing buzzing whistling or humming in the ears To reduce risks and prevent an unnecessary inc...

Page 10: ...reaker for the work to be performed A breaker that is too small means that the work will take longer A breaker that is too large means that there must be frequent repositioning which is unnecessarily tiring for the operator A simple rule for choosing the correct size of breaker is that a normal sized piece of broken material should be removed from the workpiece within 10 20 seconds operation If it...

Page 11: ...ol means that the machine is EC approved See the EC declaration which is delivered with the machine for more information If the CE symbol is missing it means that the machine is not EC approved Noise level label WA xxxdB The label indicates the guaranteed noise level corresponding to EC directive 2000 14 EC See Technical data for accurate noise level Safety label To avoid injury before using or se...

Page 12: ...he lubricant is important for the machine s function and has a great impact on the useful service life If there is no integrated lubricator then connect a separate lubricator to the air hose To guarantee good lubrication the length of the air hose between the separate lubricator and the pneumatic machine should not exceed 3 meters Use a synthetic lubricant such as Atlas Copco Breaker and hammer AI...

Page 13: ... work efficiently Checking for wear on the tool shank A B Use the gauge that corresponds to the insertion tool s shank dimension See section Technical data for correct tool shank dimensions Check if the gauge s hole A can be pushed down on the insertion tool s shank this means that the shank is worn out and the insertion tool should be replaced Check the length B that it is according to the ordere...

Page 14: ...The feed force should be adapted so that the handles are pressed down half way The best vibration damping and breaking effect is achieved at this position Avoid working in extremely hard materials for example granite and reinforcing iron re bar which would cause substantial vibrations Any form of idling operating without insertion tool or operating with an uplifted machine must be avoided When the...

Page 15: ...d that the claw coupling is free from damage Check regularly that the oil plug is tightened Check that the O ring on the oil plug is undamaged and that it closes tightly Check the threads in the machine lubricator and on the oil plug Make sure they are not damaged or worn out Too big a clearance between the insertion tool s shank and the chisel bushing will generate increased vibrations To avoid g...

Page 16: ... air system supplies the machine with sufficient air pressure to give full power Check that the dimension and length of the air hose are according to the recommendations See Installation If there is a risk of freezing check that the machine s exhaust ports are not blocked If the machine function is still not satisfactory after this procedure contact an authorised service workshop Storage Clean the...

Page 17: ... for comparison with the declared values of other tools tested in accordance with the same directive or standards These declared values are not suitable for use in risk assessments and values measured in individual work places may be higher The actual exposure values and risk of harm experienced by an individual user are unique and depend upon the way the user works in what material the machine is...

Page 18: ... Declared Values Additional Vibration Information Three axes values Sound power Sound pressure Asphalt Concrete EN ISO 20643 2000 14 EC EN ISO 11203 F m s 2 ave E m s 2 range D m s 2 ave C m s 2 range B m s 2 spreads A m s 2 value Lw guaranteed dB A rel 1pW Lp r 1m dB A rel 20µPa Type 2 0 15 2 104 91 TEX 140PS 22 x 82 5 25 x 108 25 x 108 US 4 0 3 5 4 5 4 4 4 2 4 7 1 3 4 5 104 91 TEX 150PE 22 x 82 ...

Page 19: ...TEX 190PE 28 x 160 152 7 103 104 TEX 220PS 25x108 7 104 106 TEX 220PS 28 32 x 160 152 7 103 104 TEX 230PE 25x108 7 104 106 TEX 230PE 28 32 x 160 152 7 103 105 TEX 270PS 7 103 105 TEX 280PE Following harmonised standards were applied EN ISO 11148 4 Following other standards were applied Lloyds Register Quality Assurance NoBo no 0088 Technical Documentation authorised representative Per Forsberg Atl...

Reviews: