background image

Manual, Fluid/Air, FS2
Document #9620-20-D-FS2-04

Pinnacle Park • 1031 Goodworth Drive • Apex, NC 27539 • Tel: 919.772.0115 • Fax: 919.772.8259 • 

www.ati-ia.com


• Email: 

[email protected]


D-14

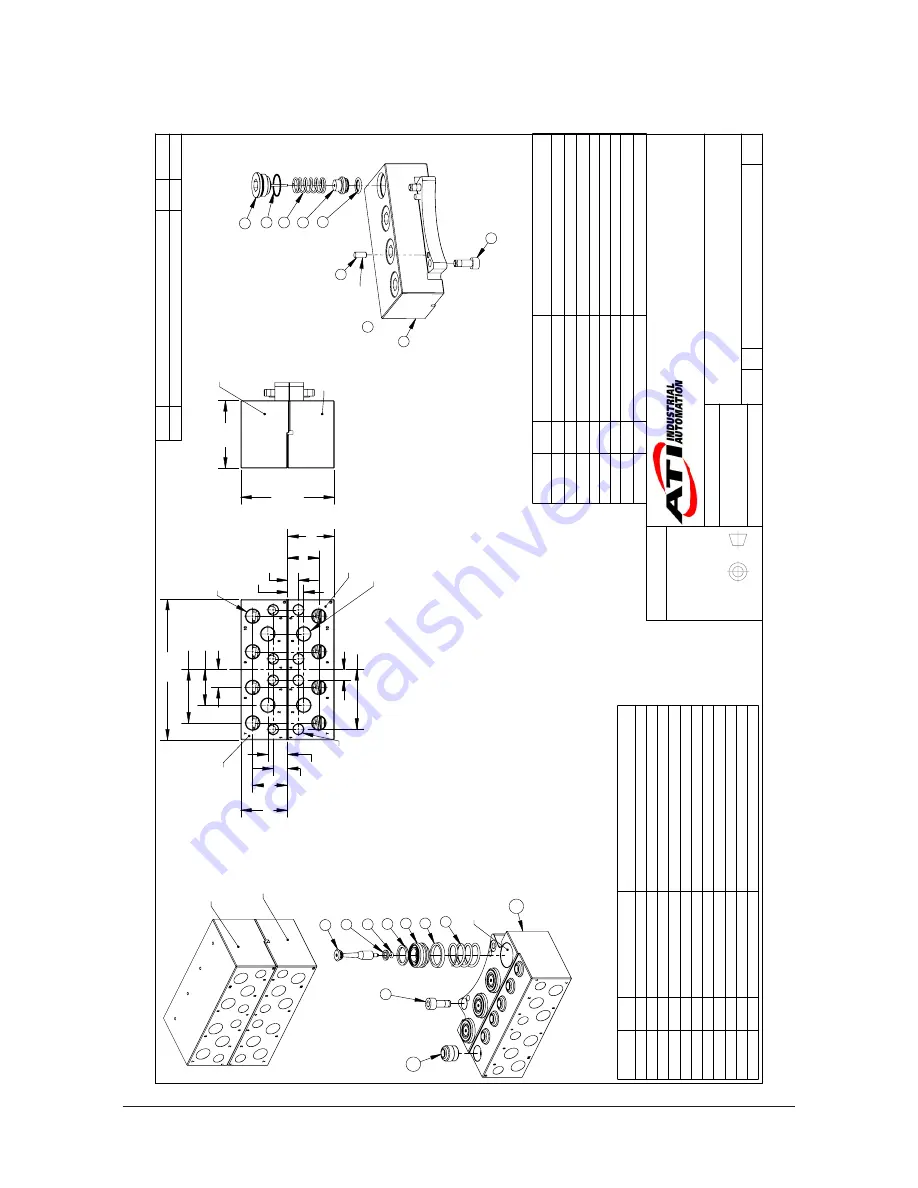
8.  Drawings

3rd ANGLE PROJECTION

9121-FS2-M Master

9121-FS2-T Tool

9

3

1

8

2

7

10

5

Magnalube

Magnalube

Magnalube Bores

Magnalube After Installation

4

Magnalube

11

Note 

4.

/ 45 in-lb

Note 

3.

/ 10 in-lb

8

2

6

5

1

7

3

Magnalube

30 in-lb

Magnalube

4

Note 

4.

/ 45 in-lb

NOTE: Dowel on Master side

is balloon 

6


 125.4 

 15.9 Typ. 

 47.6 Typ. 

 31.8 Typ. 

 9.5 Typ. 

 53.2 Typ. 

 12.7 

 17.5 

 31 

 9.5 

 14.3 

 27.8 

 41.7 

 41.6 

9121-FS2-M

Master

9121-FS2-T Tool

G1/4 Checked Ports (4 Master / 4 Tool)

G1/4 Through Ports (2 Master / 2 Tool)

G1/8 Through Ports (4 Master / 4 Tool)

 60.3 

83.5

Coupled Approx.

9121-FS2-T Tool

9121-FS2-M Master

Note:  Service Kit 9120-F1-T-Kit Contains (1) each of items 1, 

2, & 6

Note:  Service Kit 9120-F2-M-Kit Contains (1) each of items 1, 

2, 3, & 7

Notes: Materials of Construction:

Housings & Springs - Stainless Steel

1.

Valve Components - Stainless Steel, PVC, Nitrile & Viton Rubber

2.

Replacement stem contains pre-applied thread locker. Use Loctit

e 7649 

3.         primer and Loctite 222 if reassembling with original st

em.

Replacement screw contains pre-applied thread locker. Use Locti

te 7649 

4.         primer and Loctite 242 if reassembling with original sc

rew.

Guidelines for Operation:

Maintain pH near neutral.

5.

Minimize particle count & size.

6.

Keep mating surfaces clean and free of debris.

7.

Rev.

Description

Initiator

Date

02

ECO 14748: Added Notes 3 & 4 to Materials of Construction.

TBC

9/26/2016

ITEM NO.

QTY.

PART NUMBER

DESCRIPTION

1

4

3410-0001065-01

O-Ring 14MM X 2MM Buna

2

4

3410-0001068-01

Mini U-Cup Seal 18mm ID x 22mm Buna

3

4

3410-0001183-01

O-Ring 6MM X 2MM Buna D90

4

4

3410-0001397-01

O-Ring, 2mm ID x 1.5mm W, Viton, D75

5

2

3500-1066016-21A

M6-1 x 16mm SHCS, SS, Pre-Applied

6

2

3540-0105010-21

5mm x 10mm Dowel Pin SST

7

4

3700-20-1459

SW-150A Master Fluid / Air Spring SS

8

4

3700-20-2994

Master Check Valve Piston, FA44

9

4

3700-20-2996

VALVE STEM, HIGH STRENGTH

10

1

3700-20-8620

FS2 Housing, Master

11

6

4010-0000021-01

1/4"  NPT Rubber Bushing, Nitrile

ITEM NO.

QTY.

PART NUMBER

DESCRIPTION

1

4

3410-0001067-01

O-ring, 10mm x 2mm, Buna N, Dur. 90

2

4

3410-0001284-01

O-ring, .669OD x .047 wall, 70D, Buna-N

3

2

3500-1066016-21A

M6-1 x 16mm SHCS, SS, Pre-Applied

4

2

3540-0105010-21

5mm x 10mm Dowel Pin SST

5

4

3700-20-1457

SW-150A Tool Check Valve Piston

6

4

3700-20-1460

SPRING, F/A TOOL

7

1

3700-20-8621

FS2 Housing, Tool

8

4

9005-20-2267

F/A Plug Assembly, Tool, 3/8" Valves

B

1:2

1

1

REVISION

NOTES:  UNLESS OTHERWISE  SPECIFIED.

DO NOT SCALE DRAWING.   ALL DIMENSIONS ARE IN  MILLIMETERS.

DRAWN BY:

CHECKED BY:

D.Lawson-1/9/14

D.Swanson-1/10/14

TITLE

SCALE

SIZE

DRAWING NUMBER

PROJECT #

SHEET       OF 

9630-20-FS2

131203-2

02

PROPERTY OF ATI INDUSTRIAL AUTOMATION, INC. NOT TO BE REPRODUCE

D IN ANY 

MANNER EXCEPT ON ORDER OR WITH PRIOR WRITTEN AUTHORIZATION OF A

TI.

1031 Goodworth Drive, Apex, NC 27539, USA Tel: +1.919.772.0115      Email: [email protected] Fax: +1.919.772.8259      www.ati-ia.com ISO 9001 Registered Company


FS2 Fluid/Air Module Customer Drawing

Summary of Contents for FS2

Page 1: ...uct Overview D 2 2 Installation D 3 2 1 Module Installation D 3 2 2 Module Removal D 4 3 Operation D 5 4 Maintenance D 6 4 1 Preventive Maintenance D 6 5 Troubleshooting and Service Procedures D 7 5 1 Troubleshooting Procedures D 7 5 2 Service Procedures D 8 5 2 1 Master Side Self Sealing Valve D 8 5 2 2 Tool Side Self Sealing Valve D 10 5 2 3 Rubber Bushing Replacement D 12 6 Recommended Spare Pa...

Page 2: ... the FS2 module Assistance is required to overcome these forces when coupling the Tool Changer Table 1 1 Fluid Air Modules Module Description FS2 M Stainless Steel Fluid Air Module with 4 G1 4 BSPP self sealing 2 G1 4 BSPP and 4 G1 8 BSPP pass through ports Master side FS2 T Stainless Steel Fluid Air Module with 4 G1 4 BSPP self sealing 2 G1 4 BSPP and 4 G1 8 BSPP pass through ports Tool side Figu...

Page 3: ...tool changer is dependent on a continuous supply of compressed air at a pressure of 60 to 100 psi Robot motion should be halted if the air supply pressure is below 60 psi CAUTION Thread locker applied to fasteners must not be used more than once Fasteners might become loose and cause equipment damage Always apply new thread locker when reusing fasteners 2 1 Module Installation Refer to Figure 2 1 ...

Page 4: ...a secure location 2 Uncouple the Master and Tool plates 3 Turn off and de energize all energized circuits e g electrical air water etc NOTICE Debris can be expelled at high velocity during the purge take all required safety precautions 4 All customer plumbing connections to the module must be purged a Verify that the supply lines are turned off b Cover the valves with a rag for safety c Manually a...

Page 5: ...pronounced as the operating pressure is increased In all liquid coupling applications the customer is advised to take the following steps Plumb the ports on the fluid air modules using flexible hoses which are able to absorb pressure spikes and pulses Highly reinforced hoses and hard pipe must not be used Turn off the supply pump to the circuit and discharge pressure in the lines prior to a tool c...

Page 6: ...d verify all circuits are de energized before performing maintenance or repair s on the Tool Changer or modules 4 1 Preventive Maintenance A visual inspection and preventive maintenance schedule is provided in Table 4 1 Table 4 1 Preventive Maintenance Schedule Tool Change Frequency Inspection Schedule Action Required 1 minute Weekly Clean and inspect 6 months Seal replacement 1 minute 6 months or...

Page 7: ...Fluid Air Leakage Damaged Worn seals Replace O rings U cup seal and rubber bushings as needed Refer to Section 5 2 1 Master Side Self Sealing Valve and Section 5 2 2 Tool Side Self Sealing Valve and Section 5 2 3 Rubber Bushing Replacement Debris blocking valve seal Clean in and around valve components Ensure fluid stream is free of large particulates filter as necessary Bent stem Replace stem Ref...

Page 8: ...anually actuate the module s self sealing valves to purge the line pressure Note Debris can be expelled at high velocity during the purge take all required safety precautions 5 Depending on the type of service or repair connections to the module might also need to be disconnected 6 Remove the valve stem using a 2 5 mm Allen wrench Do not strip the hex on the valve stem during removal 7 Remove the ...

Page 9: ...7 If the threaded end of the valve stem does not have pre applied adhesive apply Loctite 7649 primer and then Loctite 222 or similar thread locker to the threaded end of the valve stem If the module housing is stainless steel also add Loctite 7649 primer to the housing threads Figure 5 2 Master Self Sealing Valve Installation Bore in Module Housing Lubricate Valve Stem Check Valve Spring O Ring Fa...

Page 10: ... the self sealing valves to purge the line pressure 5 If required disconnect connections to the module NOTICE You might need to remove the Tool side module to access the plug 6 Remove the plug assembly from the bottom of the air module using a 10 mm Allen wrench 7 Remove the spring and valve assembly from the housing Figure 5 3 Tool Self Sealing Valve Disassembly 10 mm Allen Wrench Plug Assembly S...

Page 11: ...installed over the step on the check valve CAUTION Do not use excess force when installing the plug assembly into the housing Using excessive force can damage the O ring and strip the threads on the plug assembly Thread the plug assembly into the Tool housing by hand until several threads are engaged into the housing Then use a 10 mm Allen wrench to complete the installation Torque the plug to 30 ...

Page 12: ...ced 1 Remove damaged rubber bushing by grasping with fingers and pulling the bushing out of the body 2 Dip new bushing in water to aid in installation 3 Insert the beveled chamfered end of the rubber bushing into the bore leaving ribbed end of the bushing facing outward 4 Press the bushing in by hand until it is seated completely in the bore If necessary use a plastic or rubber soft faced mallet t...

Page 13: ...cket Head Cap Screw SS ND Microspheres Epoxy Yellow 0 3 uncoated lead thds 5 7 coated thds IFI525 7 Specifications Table 7 1 Master Module Specifications Module Description Weight Air Ports qty Size Cv Pressure Maximum 9121 FS2 M Stainless Steel Fluid Air module with 4 G1 4 Checked 2 G1 4 and 4 G1 8 Pass Thru ports Master 4 56 lbs 2 07 kg 4 G1 4 BSPP 1 50 2 G1 4 BSPP 1 03 4 G1 8 BSPP 0 65 100 psi ...

Page 14: ...on Initiator Date 02 ECO 14748 Added Notes 3 4 to Materials of Construction TBC 9 26 2016 ITEM NO QTY PART NUMBER DESCRIPTION 1 4 3410 0001065 01 O Ring 14MM X 2MM Buna 2 4 3410 0001068 01 Mini U Cup Seal 18mm ID x 22mm Buna 3 4 3410 0001183 01 O Ring 6MM X 2MM Buna D90 4 4 3410 0001397 01 O Ring 2mm ID x 1 5mm W Viton D75 5 2 3500 1066016 21A M6 1 x 16mm SHCS SS Pre Applied 6 2 3540 0105010 21 5m...

Reviews: