background image

 15

CHAPTER 4: 

Display Properties

This chapter describes how to use the advanced display, multiple-monitor, 
and 3D graphics features in ATI’s Display Properties options.

Accessing the Display Properties Tabs

The ATI display properties tabs are accessed through the Windows®


Display Properties

 dialog. To access the 

Display Properties

 dialog, 

right-click on the Windows® desktop or navigate through the Windows®


Control Panel

, which is located in the 

Start

 menu.

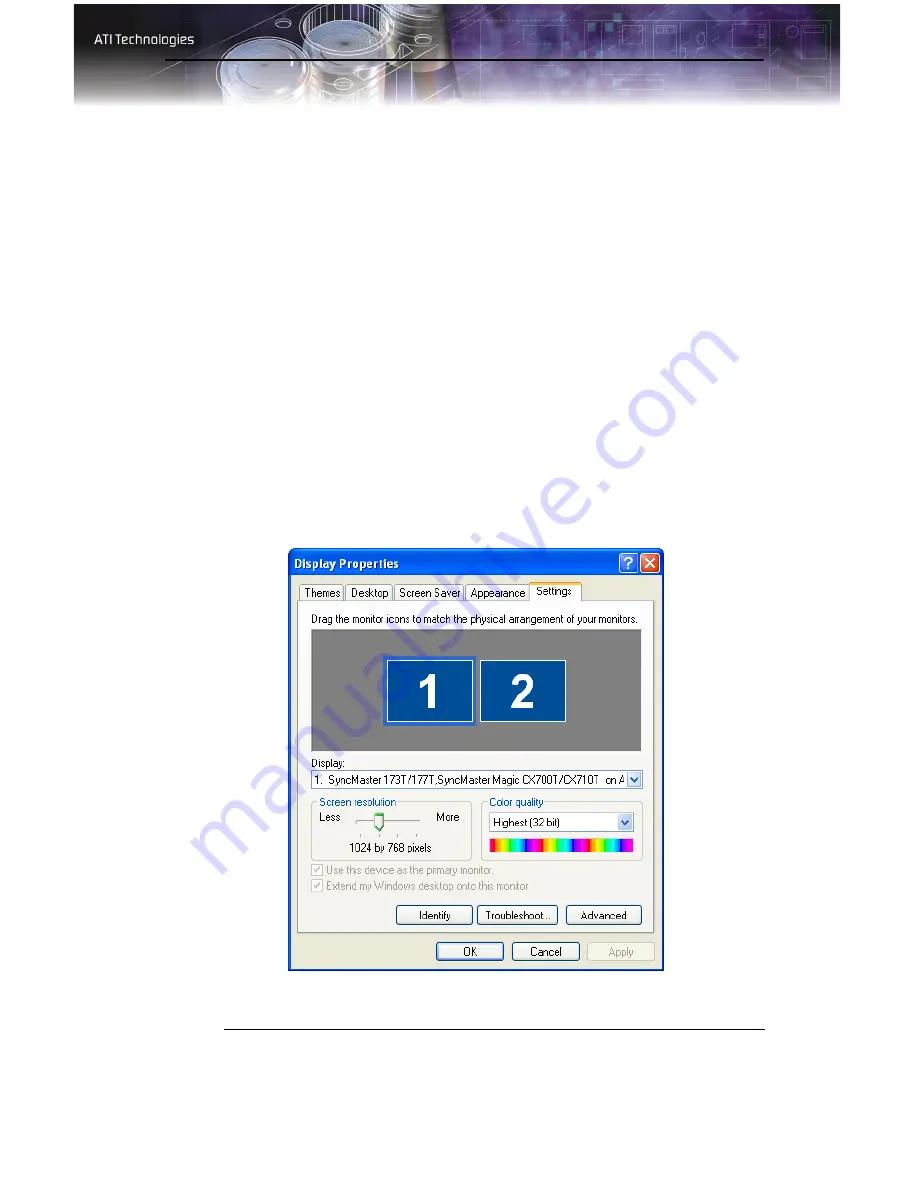
To access ATI display properties tabs

1

Open the Windows® Display Properties dialog.

Windows® Display Properties Settings Tab

Summary of Contents for 100-505103 - Firegl V5000 128MB Pcie 2PORT Dvi-i Retail

Page 1: ...P N 137 50053 10 FireGL TM V5000 User s Guide...

Page 2: ...oncerning such products or this documentation for any interruption of service loss or interruption of business loss of anticipatory profits or for punitive incidental or consequential damages in conne...

Page 3: ...is a safety feature If you are unable to insert the plug into the outlet contact your electrician to replace the obsolete outlet Do not defeat the safety purpose of the grounding type plug Secure Atta...

Page 4: ...iv...

Page 5: ...ulti monitor Management 11 Installing Drivers and Software in Windows 11 Software Installation Prerequisites 11 Monitor Configuration 13 Reinstalling Drivers 14 Display Properties 15 Accessing the Dis...

Page 6: ...mation 40 Industry Canada Compliance Statement 40 CE Compliance Information 41 Informations de conformit de la CE 41 Electrical Safety 41 Waste Electrical and Electronic Equipment WEEE Directive Compl...

Page 7: ...d Linux platforms Software drivers optimized and certified for professional workstation applications SMARTSHADER HD technology for creating complex visual effects SMOOTHVISION HD technology for advanc...

Page 8: ...ocated on a sticker on the back of the card Write these numbers down before installing your new ATI product Operating System Windows 2000 with Service Pack 1 or higher Windows XP Home or Pro with Serv...

Page 9: ...current graphics card still in your computer 1 Close all applications that are currently running 2 Navigate to the Control Panel and select Add Remove Programs 3 Select your current graphics card dri...

Page 10: ...4 Before You Begin...

Page 11: ...if you have not already done so Note If you are using a motherboard containing an on board graphics solution and do not intend to use it as part of a multiple monitor display disable it 2 Shut down an...

Page 12: ...r computer documentation 5 Locate the appropriate slot and if necessary remove the metal back plate cover L Consult your system builder or OEM to ensure that your system has an adequate power supply A...

Page 13: ...computer s power cord 9 Turn on the monitor and then your computer Connecting Display Devices The following connections are available Your FireGL TM V5000 card can connect one or two monitors either D...

Page 14: ...VGA to DVI I Adaptor X VGA Monitor Connector Y VGA to DVI I Adaptor Z DVI I Connection Display Configuration Connector s Used Comments Single DFP display DVI I connector DFP digital flat panel displa...

Page 15: ...NSUPPORTED Quad buffered stereographics will not function correctly if two monitors are enabled Disable one monitor before using stereographics CRT display DFP display Quad buffered stereographics dev...

Page 16: ...be running in a basic video mode Higher refresh rates are not available at this stage of the installation Once you have installed the FireGLTM V5000 drivers and software you can use the Display Prope...

Page 17: ...he HYDRAVISION check box For more information concerning HYDRAVISION consult the user s guide included on the ATI Installation CD ROM Installing Drivers and Software in Windows You will need to instal...

Page 18: ...the operating system has started If your CD ROM auto run is not enabled or the ATISETUP utility does not start automatically a Click the Start button in the task bar b Click Run c Select ATISETUP EXE...

Page 19: ...drop down list 5 Click OK until you return to the desktop To set up a multi monitor display 1 From the Start menu click Control Panel then Display Click the Settings tab to access the basic multi moni...

Page 20: ...if you insert the ATI Installation CD ROM into your CD ROM drive after the operating system has started If your CD ROM auto run is not enabled or the ATISETUP utility does not start automatically per...

Page 21: ...Properties Tabs The ATI display properties tabs are accessed through the Windows Display Properties dialog To access the Display Properties dialog right click on the Windows desktop or navigate throu...

Page 22: ...the assignment of Primary and Secondary displays The Displays Tab ATI Displays Tab Scheme Displays the drop down list of available display device configurations that have previously been created New...

Page 23: ...to have active 2 Type a name into the Scheme drop down list field 3 Click Save to save the scheme Display Configuration button These are the buttons that contain the name of the devices that can be co...

Page 24: ...Property dialog under Settings For more information consult your Windows documentation To assign your Primary monitor 1 Click the buttons to assign the Primary monitor Clicking the button will reassig...

Page 25: ...ATI Color Tab 19 The ATI Color Tab Desktop Settings...

Page 26: ...the configured settings will only be apparent within a full screen 3D application environment Profiles for Indicates whether the profiles in the drop down list are for your Desktop or a full screen 3D...

Page 27: ...ve Brightness slider Increases or decreases the color brightness of your Desktop or full screen 3D application Changing the brightness adjusts the vertical position of the color curve Contrast slide I...

Page 28: ...button 2 Select the profile name from the drop down list box 3 Click Apply or OK To apply the settings for a Full Screen 3D profile 1 Choose the Full Screen 3D radio button 2 Select the profile name...

Page 29: ...Current Profile action through the Hotkeys dialog make sure that the profile you prefer is selected from the drop down list box and click OK Once inside the 3D application use the hotkeys to trigger t...

Page 30: ...ATI taskbar icon from this dialog The Options Tab ATI Options Tab Version Information Shows the driver build version Details button Gives access to the Details tab which lists the card s hardware det...

Page 31: ...ATI icon from the system tray without disabling the ATI icon applications Disable quick resolution feature The quick resolution feature is accessible by left clicking the ATI icon in the system tray...

Page 32: ...ation actions with which you can associate a hotkey The options are Standard Landscape 0 Rotate 90 Right Rotate 180 Rotate 90 Left Toggle between 0 and 90 Right Toggle between 0 and 180 Toggle between...

Page 33: ...settings by clicking the appropriate button 5 Click OK or Apply ATI Configuration Tab The Configuration Tab enables you to customize display profiles for individual applications Typically you would c...

Page 34: ...the information to the necessary Windows registry settings If prompted restart Windows If you subsequently experience problems with your application or if you want to try to optimize the performance...

Page 35: ...o display only available for those FireGLTM V5000 cards equipped with a stereo video connector SMOOTHVISION improves image quality by removing jagged edges anti aliasing from 3D images resulting in sm...

Page 36: ...option results in high quality images at the price of a negligible reduction in the application s performance When Always on is enabled you can apply anti aliasing using different sample patterns and...

Page 37: ...ireGL TM V5000 Card The Enable Quad Buffer Stereo option works in conjunction with the stereographics connection on your FireGL TM V5000 card Enabling this feature while using compatible stereo glasse...

Page 38: ...32 ATI Advanced Settings Tab...

Page 39: ...e following troubleshooting tips may help if you experience problems ATI s documentation contains helpful installation configuration tips and other valuable feature information Please contact your dea...

Page 40: ...he card Make sure that the monitor and computer are plugged in and receiving power If necessary disable any built in graphics capabilities on your mother board For more information consult your comput...

Page 41: ...ble is digital only DVI D but not integrated analog digital DVI I Refer to your monitor s documentation and contact your supplier or the manufacturer of the DFP monitor for information on how to obtai...

Page 42: ...se of an address conflict try to modify the I O address of the add on card that causes the conflict To support the special graphics processor on the FireGL card the system BIOS should automatically as...

Page 43: ...AM 5 30PM EST Monday to Friday Toll free Support available in English Spanish and Portuguese Telephone Mexico 001800 514 3276 9 00AM 5 30PM EST Monday to Friday Toll free Support available in English...

Page 44: ...es Inc warrants to the original purchaser of the hardware that the product is in good working condition according to its specifications at the time of shipment for a period of three years from the dat...

Page 45: ...of such product ATI may use new or equivalent to new replacement parts Defective product will be sent in for repair or replacement only ATI makes no other representations or warranties as to fitness...

Page 46: ...e orient or relocate the receiving antenna Increase the separation between the equipment and receiver Connect the equipment to an outlet on a circuit different from that to which the receiver is conne...

Page 47: ...num rique de Classe B EN 55022 2003 CISPR 22 1997 Classe B Limites et m thodes de mesure des caract ristiques d interf rences radiophoniques Mat riel des technologies de l information EN 55024 1998 CI...

Page 48: ...n Waste Electrical and Electronic Equipment WEEE Directive Compliance This product was manufactured by ATI Technologies Inc VCCI Class B ITE Compliance Information MIC Certification Information BSMI C...

Page 49: ...settings 18 C card specification information 24 color hotkeys 21 color preview color settings 21 color settings brightness 18 color preview 21 contrast 18 21 desktop 20 gamma 18 Hotkeys 22 profiles 20...

Page 50: ...operational mode 25 F full screen 3D 18 G gamma 21 22 color settings 18 gamma correction 21 Getting Additional Accessories 39 H Hotkeys color settings 22 HYDRAVISION 11 12 L Linux installation 11 M mu...

Page 51: ...45 S safety instructions iii secondary display 16 serial number 2 single display rotate 27 SMOOTHVISION 30 stereographics enabling 31 troubleshooting 35 system requirements 1...

Page 52: ...46...

Reviews: