Athletic 100BA-03368 Instruction Manual Download Page 11

11

WARRANTY

General Warranty Terms

a. The warranty will be carried out only upon presentation of 
the original bill of sale/receipt, and within the time limits set 
out  in  this  Agreement.  The  warranty  is  provided  by  the 
Authorised Technical Service .
b. The conditions set out in this Agreement are guaranteed to 
the first user purchaser of this product for a period of one (1) 
year (including the legal guarantee period - first 90 (ninety) 
days  counted  from  the  date  of  issuance  of  the  note  /  tax 
coupon sale, in case of exclusively residential use.
c.  Warranty  periods  and  coverage  starting  from  the  date  of 
issuance of the note / tax coupon sale, including the statutory 
period of ninety (90) days:

d. Parts repaired or replaced under this warranty does not stop 
nor extend the warranty period originally stipulated.
e.  To  utilize  this  warranty,  the  equipment  must  have  been 
installed by Authorised Technical Service, except for residential 
products.
f.  The  warranty  does  not  cover  installation  and  preventive 
maintenance  services  such  as  cleaning,  lubrication  and 
adjustment of the product.
g.  No  dealer  is  authorized  to  receive  client  product  from  a 
costumer to send it to the support or to return to it and provide 
information in the name of Manufacturer / Supplier about the 
progress  of  the  service.  The  Manufacturer  /  Supplier  or 
Authorised  Technical  Service  will  not  be  responsible  for  any 
damage or delay because  of this non-compliance.
h. The Manufacturer / Supplier will hold a spare parts inventory 
until they cease the manufacture or import the equipment. If 
ceased  the  production  or  import  of  the  equipment  the 
Manufacturer / Supplier spare supply its line of equipment for 
a reasonable period of time, according to the law.
i. Within the period of 30 (thirty) days if the equipment presents 
some functional problem, the customer may choose to take 
the  product  to  an  authorized  posts  or  requesting  service  in 
your  home  without  travel  expenses  in  those  municipalities 
covered by the Authorised Technical Service. After the period 

of  thirty  (30)  days  or  municipalities  not  covered  by  the 
Authorised  Technical  Service  expenses  resulting  from  any 
transport or equipment to a freight service, displacement or 
technical visit by qualified assistant, are due to the customer, 
whether or not this equipment covered by this warranty.
j.  Lubricants,  silicones  for  treadmills,  vaseline  to  the  guide 
weights and micro oil to the joints of weight stations, should be 
exclusively  recommended  by  the  manufacturer,  available  in 
the Authorised Technical Service.
k. Components that wear out with regular use of equipment 
such  as  motor  brushes,  belts,  pads,  brake  bands,  felt,  steel 
chains  and  cables,  when  present  in  the  equipment,  will 
guarantee  for  a  period  of  90  days  from  the  invoice  or 
manufacturing  defect  found  by  the  Authorised  Technical 
Service.

End of Warranty
This warranty will be considered void when:
a. The normal period of its validity.
b.  The  equipment  is  delivered  for  repair  by  anyone  not 
authorized  by  Manufacturer  /  Supplier,  signals  are  checked 
violation of its original features or assembly outside the factory 
default.
c.  Damage  that  it  will  suffer  as  a  result  of  misuse,  use  of 
improper  cleaning  products,  oxidation  originating  from 
external  agents,  weathering,  neglect,  modification,  use  of 
accessories not recommended, bad design for the application 
for  which  it  is,  falls,  perforations,  use  and  installation  not  in 
accordance with the instruction manual, wiring unfit tensions, 
ungrounded in bad sized grids and / or excessive fluctuations 
and overloads.
d. For residential line is forbidden any type of user equipment 
maintenance  or  a  third  party  other  than  the  Authorised 
Technical Service.
e.  The  product  is  used  in  academies,  condos,  clinics,  clubs, 
saunas, submerged in water or any use so that it resembles that 
does not end for residential application or purpose for which it 
is intended.

Observations
a. Cables, carabiners, pedals when existing in the product must 
be replaced once a year.
b.  The  Manufacturer  /  Supplier  is  not  responsible  for  any 
accidents and their consequences, arising from breach of the 
original  features  or  assembly  outside  the  factory  default  of 
their equipment.
c. Customer's responsibility are the costs of unfounded judged 
call answering.

Note: The Manufacturer / Supplier reserves the right to make 
changes without notice this.
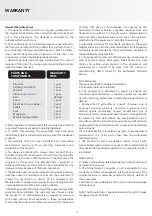
1 year
1 year
1 year
1 year
90 days
1 year
1 year
1 year
1 year
1 year
1 year

WARRANTY
TIME

PARTS AND
COMPONENTS

Structure
Painting (oxidation)
Monitor
Strain control motor
Belt
Cover
Plastic parts  and rubber
Pedals
Seat
Manpower
Manufacturing defects

Summary of Contents for 100BA-03368

Page 1: ...Instruction Manual Manual de Instrucciones Manual de Instru es Bike Air...

Page 2: ...incentivo e oportunidade de praticar exerc cios aer bicos e musculares conquistando assim a prepara o f sica necess ria pra se sentir bem A Universal Fitness lhe garante um produto con vel e moderno...

Page 3: ...S AND TECHNICAL SPECIFICATIONS 6 ASSEMBLY 7 THE MONITOR 9 WARRANTY 10 INFORMACI N DE SEGURIDAD 11 COMPONENTS Y ESPECIFICACIONES T CNICAS 12 MONTAJE 13 EL MONITOR 15 GARANT A 16 INFORMA ES DE SEGURAN A...

Page 4: ...t be attached to the equipment Always wear shoes to work out Do not walk barefoot or in sandals Periodically make sure that the equipment is in good condition by checking the connections and fasteners...

Page 5: ...in frame 6 Front feet 7 Rear feet 8 Pedal 9 Seat 10 Adjust knob Product Packaged Net weight approximate 17 50 kg Maximum width 529 mm Maximum length 1014 mm Maximum height 1135 mm Gross weight 19 50 k...

Page 6: ...ome Nuts 27 and tighten to x NOTE Place the packaging with the equipment on a level surface It is recommended that you place a protective cover for your floor Exercise caution when you are loading and...

Page 7: ...bar inside it Therefore take the bottle holder 08 and screw the screws 21 back through the bottle holder 08 Next assemble the left handle 03L which is marked with an L on the left side of the end of t...

Page 8: ...es of the Washer and C open slot of the Link Arm Then x the Pedal onto the Crank 09 as shown below The Left Pedal tightens anti clockwise onto the Crank as shown on Diagram 3 4 Then screw on the Lock...

Page 9: ...rt the Seat Adjust Knob 37 to lock into position Always ensure it is tightly locked STEP 6 Remove the Nut attached at the end of the Flexible Monitor Stand then x the Flexible Monitor Stand onto the M...

Page 10: ...ecreased by adjusting the Tension Strap 47 Turn the Tension Adjust Knob 46 anti clock wise until it stops Pull the Tension Strap through the strap s buckle at the top end of the Main Frame to make the...

Page 11: ...or technical visit by qualified assistant are due to the customer whether or not this equipment covered by this warranty j Lubricants silicones for treadmills vaseline to the guide weights and micro o...

Page 12: ...nimales dom sticos sobre todo durante el uso y no entrar o salir de los objetos en las aberturas del equipo Utilizar ropa deportiva adecuada No use ropa suelta que pueda ser conectado al equipo Siempr...

Page 13: ...5 Estructura principal 6 Pies delanteros 7 Pies traseros 8 Pedal 9 Assiento 10 Perilla Producto Envasado Peso neto aproximado 17 50 kg Largo m xima 529 mm Ancho m ximo 1014 mm Altura m xima 1135 mm P...

Page 14: ...necesario pida la ayuda de otra persona MONTAJE Coloque el pie delantero 06 atentando que los agujeros cuadrados deben colocarse boca abajo Alinee los ori cios del pie con los ori cios en el soporte...

Page 15: ...la manija en su interior Por lo tanto tome el soporte de botella 08 y vuelva a atornillar los tornillos 21 a trav s del soporte de botella 08 Luego ensamble la manija izquierda 03L que est marcada co...

Page 16: ...Luego je el pedal en la manivela 09 como se muestra a continuaci n El pedal izquierdo se aprieta en sentido contrario a las agujas del reloj en la manivela como se muestra en el Diagrama 3 4 A continu...

Page 17: ...la de ajuste del asiento 37 para jar en su posici n Siempre aseg rese de que est bien cerrado PASO 6 Retire la tuerca unida al extremo del soporte del monitor exible luego je rmemente el soporte del m...

Page 18: ...Ajuste de Tensi n 46 en sentido antihorario hasta que se detenga Tire de la correa de tensi n a trav s de la hebilla de la correa en el extremo superior del bastidor principal para ajustar la correa...

Page 19: ...este equipo cubierto por esta garant a j Lubricantes siliconas para caminadoras vaselina para los pesos de gu a y micro aceite a las articulaciones de las estaciones de peso se recomienda exclusivamen...

Page 20: ...rajes esportivos adequados N o use roupas folgadas que eventualmente possam ficar presas ao equipamento Use sempre t nis para exercitar se N o ande descal o ou com sand lias Periodicamente certifique...

Page 21: ...a principal 6 P frontal 7 P traseiro 8 Pedal 9 Assento 10 Man pulo Produto Embalagem Peso l quido aproximado 17 50 kg Largura aproximada 529 mm Comprimento aproximado 1014 mm Altura aproximada 1135 mm...

Page 22: ...e monte o equipamento onde o mesmo ser utilizado Se necess rio pe a o auxilio de uma pessoa Coloque o p dianteiro 06 cuidando pra que os furos quadrados quem voltados para baixo Alinhe os furos do p...

Page 23: ...tubo de conex o com a barra de rota o do punho dentro dele Portanto xe o porta garrafa 08 com os parafusos 21 Em seguida monte o pegador esquerdo 03L que est marcado com um L no lado esquerdo da extr...

Page 24: ...ca esteja inserida corretamente Em seguida xe o pedal na manivela 09 como mostrado abaixo O pedal esquerdo pressionado no sentido anti hor rio na manivela como mostrado no Diagrama 3 4 Em seguida aper...

Page 25: ...ra o man pulo 37 para prend lo na posi o Certi que se sempre de que esteja bem fechado PASSO 6 Remova a porca conectada na extremidade do suporte ex vel do monitor e em seguida prenda rmemente o supor...

Page 26: ...ode ser aumentada ou diminu da ajustando a correia de tens o 47 Gire o bot o de ajuste de esfor o 46 no sentido anti hor rio at que ele pare Puxe a correia de tens o pela vela do cinto na extremidade...

Page 27: ...at a Assist ncia T cnica Autorizada e vice versa correm por conta do cliente j Os lubri cantes silicones para esteiras vaselina para o guia de pesos e micro leo para as jun es das academias residenci...

Page 28: ...28 161239 000 05 04 18 28 Servi o de Atendimento ao Consumidor sac athletic com br Para acessar nossa Rede de Assistencia T cnica Acesse o site O cial Athletic www athletic com br...

Reviews: