background image

VT46-HUF TPMS TOOL User guide 


UM-365HUA-U User 

manual 

VT46-HUF 

Page 4/34 

3. CAUTION 

PLEASE READ THESE INSTRUCTIONS BEFORE USE


Your Tire Pressure Monitoring (TPM) tool has been designed to be durable, safe, and 
reliable when properly used. 

All 

TPMS TOOLS

 are intended for use only by qualified and trained automotive 

technicians or in a light industrial repair shop environment. Please read all instructions 
below before use. Always follow these safety instructions. If you have any questions 
pertaining to the safe or reliable use of this tool, please call your local dealer.


3.1. R

EAD 

A

LL 

I

NSTRUCTIONS


All warnings on the tool and in this manual should be adhered to. All operating instructions 
should be followed. 


3.2. R

ETAIN 

I

NSTRUCTIONS


The safety and operating instructions should be retained for future reference. 


3.3. H

EED 

W

ARNINGS


Users and bystanders must wear safety goggles and must read instructions before use. 
Do not use on live electrical circuits, due to risk of entanglement. 


3.4. C

LEANING


Clean with a soft dry cloth, or if necessary, a soft damp cloth. Do not use any harsh 
chemical solvents such as acetone, thinner, brake cleaner, alcohol, etc as this may 
damage the plastic surface. 


3.5. W

ATER 

&


M

OISTURE


Do not use this tool where contact or immersion in water is a possibility. Never spill liquid 
of any kind onto the tool. 


3.6. S

TORAGE


Do not use or store the tool in an area where it is exposed to direct sunlight or excessive 
moisture. 


3.7. U

SAGE


To reduce the risk of fire, do not operate the tool in the vicinity of open containers or 
flammable liquids. Do not use if the potential for explosive gas or vapors exists. Keep the 
tool away from heat generating sources. Do not operate the tool with the battery cover 
removed.   

Summary of Contents for Huf VT46-HUF

Page 1: ...USER GUIDE VT46 HUF Version JHUF2 07 Powered by Reference UM 365HUA U...

Page 2: ...the information contained in this user manual and the features and design of this device are subject to be changed without prior notice Edition Revision Reference Date week year Chapters updated Firs...

Page 3: ...N KEYS 6 6 POWER ON 7 7 OPERATING INSTRUCTIONS 8 TOOL USAGE 9 1 CHECK SENSOR 9 2 SERVICE TPMS 13 3 PROGRAM BLANK SENSOR 16 SETTINGS 20 1 SETTINGS 20 RECENT SENSOR DATA 25 1 RECENT SENSOR DATA 25 RKE T...

Page 4: ...L W D 20 0 cm x 12 0 cm x 4 0 cm Case Material High Impact ABS Response Frequency Main frequencies 315 MHz and 433 92 MHz supporting most specific frequencies Low Battery Indication LCD bar graph disp...

Page 5: ...ng two conditions 1 This device will not cause harmful interference and 2 This device will accept any interference received including interference that may cause undesired or improper operation WARNIN...

Page 6: ...ructions should be retained for future reference 3 3 HEED WARNINGS Users and bystanders must wear safety goggles and must read instructions before use Do not use on live electrical circuits due to ris...

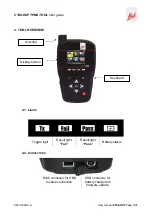
Page 7: ...VT46 HUF Page 5 34 4 TOOL OVERVIEW 4 1 LIGHTS Trigger light Result light Fail Result light Pass Battery status 4 2 CONNECTORS RJ45 connector for OBD module connection USB connector for battery charge...

Page 8: ...HUA U User manual VT46 HUF Page 6 34 5 FUNCTION KEYS Power ON OFF switch Test or trigger sensor Next continue or confirm Cancel previous step Navigate to select up Navigate to select down Navigate to...

Page 9: ...UA U User manual VT46 HUF Page 7 34 6 POWER ON Press key to turn on the device The TPMS TOOL First displays the logo as Fig 1 Fig 1 The software version and the work zone as Fig 2 Fig 2 The MAIN MENU...

Page 10: ...dure allows you to quickly identify damaged or defective sensors because some vehicles do not report a damaged or defective sensor condition on the instrument cluster for up to 20 minutes Note If the...

Page 11: ...in this manual is used as an example and may not represent specific instructions each make and model may require When performing various functions with the tool it is important to refer to the on scre...

Page 12: ...User guide UM 365HUA U User manual VT46 HUF Page 10 34 1 2 SELECT CAR MODEL continue previous 1 3 SELECT YEAR continue previous 1 4 SELECT NUMBER OF WHEELS This option does not appear for all vehicles...

Page 13: ...User guide UM 365HUA U User manual VT46 HUF Page 11 34 1 5 TEST SENSORS TRIGGER Select tire continue previous 1 6 TEST RESULTS LF To select another tire or The tool is triggering the sensor to select...

Page 14: ...OOL User guide UM 365HUA U User manual VT46 HUF Page 12 34 Trigger all wheels continue previous and erase results no save LF The tool does not detect a sensor Press to test again Or press to move on t...

Page 15: ...d to read all sensor spare part numbers available by vehicle Select SERVICE TPMS menu continue previous Select car manufacturer Select car model Select year 2 1 OBDII RELEARN This menu is to reprogram...

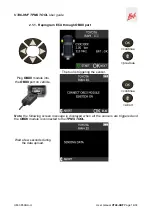
Page 16: ...OBDII port The tool is triggering the sensor continue previous Plug OBDII module into the OBDII port on vehicle continue abort Note the following screen message is displayed when all the sensors are t...

Page 17: ...this feature is not supported on all vehicles The data has been successfully transferred to the ECU The OBDII module can now be unplugged from the ECU abort 2 2 PART LOOKUP This spare parts data base...

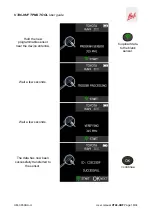
Page 18: ...in a blank sensor If the old sensor can be read use the COPY ORIGINAL SENSOR menu to recover the ID If it cannot be read use the CREATE NEW SENSOR menu to create a randomized ID Select PROGRAM SENSOR...

Page 19: ...S TOOL User guide UM 365HUA U User manual VT46 HUF Page 17 34 3 1 COPY ORIGINAL SENSOR MENU continue previous to trigger the original sensor Wait a few seconds ID of the old sensor is displayed contin...

Page 20: ...UA U User manual VT46 HUF Page 18 34 Hold the new programmable sensor near the device antenna to upload data to the blank sensor Wait a few seconds Wait a few seconds The data has now been successfull...

Page 21: ...F Page 19 34 3 2 CREATE NEW SENSOR SECTION continue previous Hold the new programmable sensor near the device antenna to upload data to the blank sensor Wait a few seconds Wait a few seconds The data...

Page 22: ...criptions REGION to select the area of work AMERICA EUROPE and KOREA UNITS change the air pressure and temperature display kPa Bar or PSI with F or C FORMAT change the format of sensor ID display BUZZ...

Page 23: ...and down to select the zone menu confirm previous Scroll up and down to select a zone confirm previous The tool will load the new database for the selected zone 1 2 CHANGE UNITS SETTINGS Scroll up and...

Page 24: ...TO display sensor ID format in the way sensor is transmitting DECIMAL force to display sensor ID in decimal 0 to 9 HEXADECIMAL force to display sensor ID in hexadecimal 0 to F 1 4 CHANGE BUZZER ON SET...

Page 25: ...Scroll up and down to select function or settings continue previous The selection turns red Scroll up and down to set the time continue previous Change from 1 to 60 min or DISABLED 1 6 CHANGE LANGUAGE...

Page 26: ...MS TOOL User guide UM 365HUA U User manual VT46 HUF Page 24 34 1 7 ABOUT MENU This menu displays the current firmware version and information about the device Select the ABOUT menu continue previous o...

Page 27: ...omatically stored in the RECENT SENSOR DATA menu You may recall the result and continue to trigger the entire vehicle The data is automatically replaced if a new vehicle is triggered The data remains...

Page 28: ...5HUA U User manual VT46 HUF Page 26 34 RKE TEST 1 RKE TEST This is to test the strength of the keyfob RF signal Select SETTINGS menu continue previous 1 1 SELECT CAR MANUFACTURER continue previous 1 2...

Page 29: ...Press keyfob buttons To reset the device and start a new test previous The device waits for RF signal 1 3 TEST RESULTS PASS High signal strength more than 50 green range To reset the device and start...

Page 30: ...DO NOT use the tool with low battery status because the transmission and emission may not be reliable When charging the battery light is red and becomes green when the battery is fully charged Fig 5...

Page 31: ...bleshooting guide 1 The vehicle does not have a sensor even though a metal valve stem is present Be aware of rubber style snap in stems used on TPMS systems 2 The sensor itself may be damaged or defec...

Page 32: ...ination location click Next 5 Follow the instructions until the window with the Finish button appears 6 Click Finish when the WebVT installation is complete Note To order an annual update software lic...

Page 33: ...int of purchase and any other product related questions should be addressed directly to HUF The addresses and customer service contact information for HUF can be found in the documentation accompanyin...

Page 34: ...y immediately after use and while still hot Leave it to cool down to ambient temperature If you see any smoke or liquid coming from the battery stop the charge immediately Disconnect the charger and p...

Page 35: ...ng two conditions 1 This device may not cause harmful interference and 2 this device must accept any interference received including interference that may cause undesired operation 7 CE STATEMENTS DEC...

Page 36: ...tion keys 6 K Keyfob test 26 L Language 23 Light functions 5 M Main Menu 9 O Operating instructions 8 Overview 8 P Power supply 32 Product content 2 Program blank sensor 16 R Recent sensor data 25 Rec...

Page 37: ......

Page 38: ...Powered by This document is the exclusive property of HUF IntelliSens It may not be communicated reproduced or used without prior consent...

Reviews: