ATEN VE849 User Manual Download Page 17

2. Hardware Setup

9

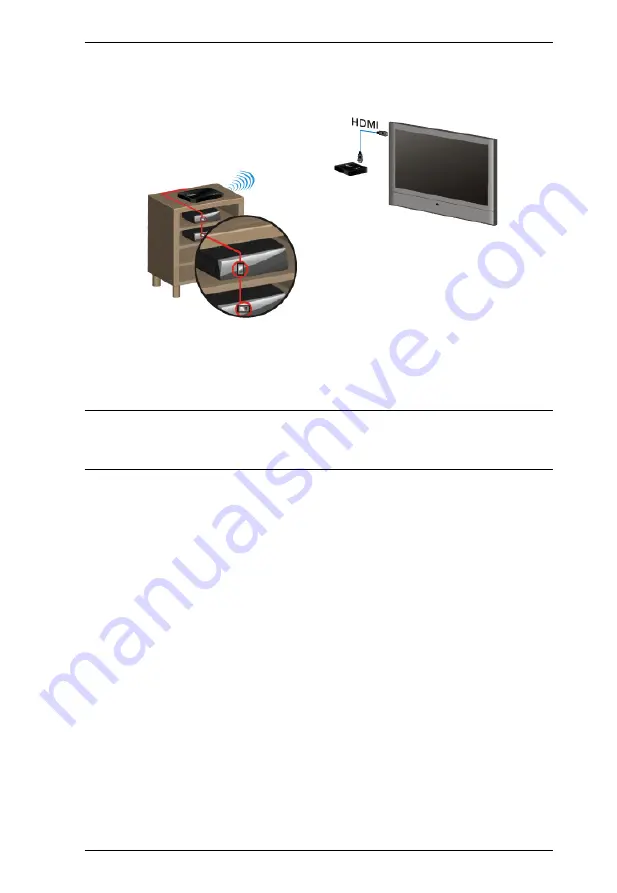
3. Place the IR Blaster’s sensors on or near the source device(s) front panel 

IR sensor port(s) (refer to the devices user manual for the exact location), 
so that it can communicate with the IR signal, as shown in red below. 

4. Adjust the IR Blasters’ sensors until the remote control can be used 

effectively from the receiver side of the installation 

5. For IR Blaster operational instructions, see

IR Blaster

, page 15, for details.

Note:

 The IR supports 47KHz to 56KHz to 38KHz recurring (NEC) remote 

signal protocols. Therefore, it is possible that some devices may not be 
supported for use. 

Summary of Contents for VE849

Page 1: ...Multicast HDMI Wireless Extender VE849 User Manual www aten com...

Page 2: ...VE849 User Manual ii RoHS This product is RoHS compliant SJ T 11364 2006 The following contains information that relates to China...

Page 3: ...ve following their purchase the buyer and not the manufacturer its distributor or its dealer assumes the entire cost of all necessary servicing repair and any incidental or consequential damages resul...

Page 4: ...e present and that nothing got damaged in shipping If you encounter a problem contact your dealer Read this manual thoroughly and follow the installation and operation procedures carefully to prevent...

Page 5: ...es 2 Requirements 3 Source Device 3 Display Device 3 Components 4 VE849T Transmitter Front View 4 VE849R Receiver Front View 4 VE849T Transmitter Rear View 5 VE849R Receiver Rear View 5 IR Remote Cont...

Page 6: ...VE849 User Manual vi Appendix Safety Instructions 18 General 18 Technical Support 20 International 20 North America 20 Specifications 21 Troubleshooting 22 Limited Warranty 24...

Page 7: ...enefits are presented its front and back panel components and remote control are described Chapter 2 Hardware Setup describes how to set up your installation The necessary steps needed to install the...

Page 8: ...ndicates keys you should press For example Enter means to press the Enter key If keys need to be chorded they appear together in the same bracket with a plus sign between them Ctrl Alt 1 Numbered list...

Page 9: ...ated and less commonly used range greatly reduces Wi Fi signal interference and improves transmission quality and stability The included IR remote control allows you to switch between HDMI source devi...

Page 10: ...MI 1 4a compliant Wireless 3D Supported Wireless HD in Full 1080p and 5 1 channel Dolby with AC3 and DTS digital audio Video Resolutions 480p 720p 1080i and 1080p 24 30 60fps Local Transmitter 2 HDMI...

Page 11: ...1 Introduction 3 Requirements Source Device A source player with an HDMI Type A output connector Display Device A display device or receiver with an HDMI Type A input connector...

Page 12: ...selected for use 2 Port Selection Pushbutton The port selection pushbutton switches the VE849 between the two connected HDMI media sources 3 Power Pushbutton LED Press this button to turn the VE849 on...

Page 13: ...ug into these ports 4 HDMI Out Plug the local HDMI display into this port 5 IR Blaster Port Plug the IR Blaster cable that came with your unit into this port 6 Service Port This port is used by the ma...

Page 14: ...itch the IR Blaster frequency to meet the media source devices requirements Please refer to your source devices IR specifications for the correct frequency The IR Blaster frequency ranges from 47KHz t...

Page 15: ...deo display HDTV to the HDMI output port on the rear of the VE849T 3 Plug the provided power adapter into an appropriate power source plug the power adapter cable into the power jack on the VE849T 4 C...

Page 16: ...R 4 Connect the IR Blaster cable included with your package into the IR Blaster port see IR Cable Installation page 8 Optional 5 Repeat these steps to install up to 4 receivers VE849R IR Cable Install...

Page 17: ...ith the IR signal as shown in red below 4 Adjust the IR Blasters sensors until the remote control can be used effectively from the receiver side of the installation 5 For IR Blaster operational instru...

Page 18: ...ing mode Only one receiver can be powered on when its being paired with the transmitter 1 On the transmitter press and hold down the power button 2 With the power button pressed plug in the power adap...

Page 19: ...ote control to put the receiver into pairing mode See RX PAIR page 16 for details 6 With the receiver s power button pressed plug in the power adapter 7 Press the power button until the power LED flas...

Page 20: ...D of the transmitter and receiver will light solid blue and the image below will appear on the receiver s TV screen 12 To pair another receiver unplug the power adapters for both the transmitter and r...

Page 21: ...off for 5 10 seconds Powering off and then on the remote HDMI TV will cause the local HDMI display signal to turn off for 5 10 seconds Powering off the VE849 Transmitter or Receiver will cause the re...

Page 22: ...e receiver side turn the TV on and select the TV s HDMI input source for the VE849 Receiver s connection 4 From the Transmitter turn on the source device s and press the Source button on top of the un...

Page 23: ...smitter or Receiver When either unit is powered on via remote control and a good wireless connection is established the other unit will power on as well This allows you to wirelessly power on both uni...

Page 24: ...ormation from the displays and determines the best common video resolution and audio format to send to the video source to program EDID on the device i e Blu ray players auto resolution setting In ord...

Page 25: ...3 Operation 17...

Page 26: ...lation has been provided Never spill liquid of any kind on the device Unplug the device from the wall outlet before cleaning Do not use liquid or aerosol cleaners Use a damp cloth for cleaning The dev...

Page 27: ...hort out parts resulting in a risk of fire or electrical shock Do not attempt to service the device yourself Refer all servicing to qualified service personnel If the following conditions occur unplug...

Page 28: ...orehand Product model number serial number and date of purchase Your computer configuration including operating system revision level expansion cards and software Any error messages displayed at the t...

Page 29: ...ax Resolution Distance Up to 1080p 60Hz 30m Up to 1080p 60Hz 30m Audio Input 2 x HDMI Type A Female Black N A Output 1 x HDMI Type A Female Black 1 x HDMI Type A Female Black Control IR 1 x 2 5mm Mini...

Page 30: ...he wireless connection If this is the first time the two units have been powered on and the two devices haven t been paired see IR Blaster page 15 Searches available channels if the VE849 cannot estab...

Page 31: ...urther troubleshooting The VE849 is working properly and the video format is recognized Solid Blue Solid Blue HDMI1 CH10 1280x1024 Signal Quality Source Channel and resolution are displayed To change...

Page 32: ...vendor makes no warranty or representation expressed implied or statutory with respect to the contents or use of this documentation and especially disclaims its quality performance merchantability or...

Reviews: