background image

CS1912 / CS1914 User Manual

8

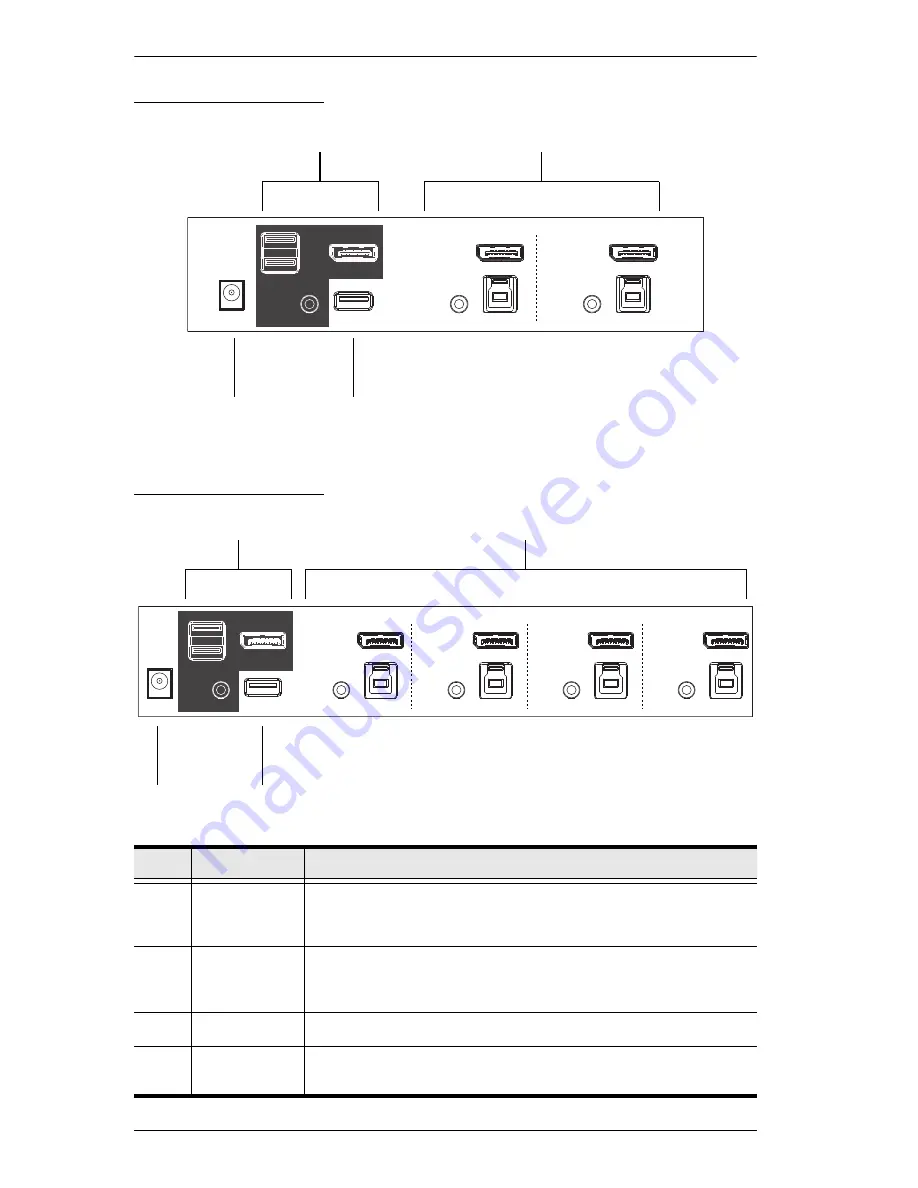
CS1912 Rear View

CS1914 Rear View

No.

Component

Description

1

Console Ports

The cables from your DisplayPort monitor, USB keyboard, USB 
mouse, speakers, and microphone plug in here. Each connector is 
marked with an appropriate icon to indicate its use.

2

KVM Ports

The cables that link the switch to your computers plug in here. Each 
KVM port section is comprised of a speaker jack, USB type B socket 
and a DisplayPort connector. 

3

Power Jack

The power adapter cable plugs into this jack.

4

USB 3.1 Gen 
1 Hub

USB peripherals (printers, scanners, drives etc.) plug into this port. 
USB 3.1 Gen 1 port features 5 Gbps transfer rates.

1

3

2

4

1

2

3

4

Summary of Contents for CS1912

Page 1: ...2 4 Port USB 3 0 DisplayPort KVMP Switch User Manual CS1912 CS1914 www aten com...

Page 2: ...of this equipment in a residential area is likely to cause harmful interference in which case the user will be required to correct the interference at his own expense The device complies with Part 15...

Page 3: ...oftware described in this manual is sold or licensed as is Should the programs prove defective following their purchase the buyer and not the manufacturer its distributor or its dealer assumes the ent...

Page 4: ...ions Check to make sure that all the components are present and that nothing got damaged in shipping If you encounter a problem contact your dealer Read this manual thoroughly and follow the installat...

Page 5: ...ction Overview 1 Features 2 Requirements 4 Console 4 Computers 4 Cables 4 Operating Systems 5 Components 6 CS1912 Front View 6 CS1914 Front View 6 CS1912 Rear View 8 CS1914 Rear View 8 Chapter 2 Hardw...

Page 6: ...d Language 25 Hotkey Beeper 25 Port Switching Keys 25 Firmware Upgrade Mode 25 Restore Default Settings 26 Alternative Manual Port Selection 26 Mouse Emulation 26 Mouse Port Switching 26 Keyboard Emul...

Page 7: ...up describes how to set up your installation The necessary steps are provided Chapter 3 Basic Operation explains the fundamental concepts involved in operating the CS1912 CS1914 Chapter 4 Keyboard Emu...

Page 8: ...at you should key in Indicates keys you should press For example Enter means to press the Enter key If keys need to be chorded they appear together in the same bracket with a plus sign between them Ct...

Page 9: ...est mouse port switching functionality which allows a double click of the mouse s scroll wheel to change ports A Power On Detection feature also ensures that if one computer is powered off the CS1912...

Page 10: ...er Dual Mode DisplayPort technology DP supports passive HDMI and DVI adapters Hot pluggable add or remove computers without powering down the switch Mouse emulation bypass feature supports most mouse...

Page 11: ...Chapter 1 Introduction 3 4 PC keyboard combinations emulate Mac keyboards Mac keyboards only work with their own operating system...

Page 12: ...ort port Type A USB port Audio port for sound Cables Two DisplayPort cables two USB 3 0 cables and two 3 5 mm Audio cables included with the CS1912 package Four DisplayPort cables four USB 3 0 cables...

Page 13: ...tion 5 Operating Systems OS Version Windows 2000 XP Vista 7 8 8 1 10 Linux RedHat 6 0 and higher SuSE 8 2 and higher Mandriva Mandrake 9 0 and higher Novell Netware 5 0 and higher Mac OS 9 and higher...

Page 14: ...CS1912 CS1914 User Manual 6 Components CS1912 Front View CS1914 Front View 1 4 2 3 4 1 2 3...

Page 15: ...are built into the Port Selection Pushbuttons The upper are KVM Port LEDs the lower are USB LEDs KVM Lights DIM ORANGE to indicate that the computer attached to the corresponding port is connected on...

Page 16: ...with an appropriate icon to indicate its use 2 KVM Ports The cables that link the switch to your computers plug in here Each KVM port section is comprised of a speaker jack USB type B socket and a Di...

Page 17: ...kers into the console audio port located on the unit s rear panel 5 Using the cables provided with this package plug the DisplayPort USB 3 0 and speaker connectors into their corresponding sockets in...

Page 18: ...nto the switch s Power Jack and then plug the other end into a power source 9 Power on the computers Note 1 By default the switch links to the first computer that is powered on 2 It is recommended tha...

Page 19: ...Chapter 2 Hardware Setup 11 Installation Diagram 1 8 4 7 2 Audio DisplayPort USB 3 0 Cables 6 5 3 7 Audio DisplayPort USB 3 0...

Page 20: ...CS1912 CS1914 User Manual 12 This Page Intentionally Left Blank...

Page 21: ...rresponding port Press and hold a port selection pushbutton for more than 2 seconds to bring the KVM focus plus the USB and Audio focus to the computer attached to its corresponding port Press and hol...

Page 22: ...do the following 1 Shut down all the computers that are attached to the switch 2 Unplug the switch s power adapter cable 3 Wait 10 seconds then plug the switch s power adapter cable back in 4 Once th...

Page 23: ...bring the KVM audio and USB focus to the computer attached to its corresponding port Press a port selection pushbutton twice to bring the audio focus to the computer attached to its corresponding por...

Page 24: ...CS1912 CS1914 User Manual 16 This Page Intentionally Left Blank...

Page 25: ...emulation mappings are listed in the table below Note When using key combinations press and release the first key Ctrl then press and release the activation key PC Keyboard Mac Keyboard Shift Shift C...

Page 26: ...CS1912 CS1914 User Manual 18 This Page Intentionally Left Blank...

Page 27: ...page 23 for details Cycling Through the Ports Hotkey Action Scroll Lock Scroll Lock Enter Brings the KVM USB hub and audio focus from the port that currently has the KVM focus to the next port on the...

Page 28: ...ub and audio focus remain where they are Scroll Lock Scroll Lock n U Enter Brings only the USB hub focus to the computer attached to the specified port The KVM and audio focus remain where they are Sc...

Page 29: ...regain normal control of the console 2 Although the video focus switches from port to port the keyboard mouse and USB focus do not switch They stay at the port they were on when Auto Scanning started...

Page 30: ...M See page 23 for details 2 The minus key must be released within one half second otherwise Hotkey invocation is canceled When HSM is active the Caps Lock and Scroll Lock LEDs flash in succession They...

Page 31: ...ocedure is a toggle between the two methods To revert back to the original HSM invocation keys invoke HSM then press and release the H key again Alternate Port Switching Keys The port switching activa...

Page 32: ...table below After completing this procedure you automatically exit HSM List Switch Settings To see a listing of the current switch settings do the following 1 Open a text editor or word processor and...

Page 33: ...2 Press and release B The Beeper toggles On or Off Port Switching Keys To disable the Port Switching Keys Scroll Lock Scroll Lock Ctrl Ctrl do the following 1 Invoke HSM see page 22 for details 2 Pres...

Page 34: ...Selection Settings page 15 for details Mouse Emulation To toggle between mouse emulation enabled and disabled do the following 1 Invoke HSM see page 22 2 Press M Mouse Port Switching Mouse Port Switc...

Page 35: ...o enable Note When keyboard emulation is disabled the M W F2 F4 F5 F6 and F10 hotkey operations are disabled Power on Detection With Power on Detection if the focus computer is powered off the switch...

Page 36: ...shbutton operation settings T Toggles between the default Scroll Lock Scroll Lock and alternate Ctrl Ctrl Port Switching keys u p g r a d e Enter Invokes Firmware Upgrade Mode W Enables Disable mouse...

Page 37: ...hem http www aten com download download_fw php Before you Begin 1 From a computer that is not part of your KVM installation go to our Support Download site and choose the model name that relates to yo...

Page 38: ...SB Type B connector can be connected to any KVM port section but the Port Selection pushbutton in Step 5 below must be Port 1 5 Press and hold the Port 1 selection pushbutton While you are holding the...

Page 39: ...and line to enter the full path The Firmware Upgrade Utility Welcome screen appears 2 Read the License Agreement click the I Agree radio button 3 Click Next The Firmware Upgrade Utility main screen ap...

Page 40: ...es the device s firmware level with that of the upgrade files If the device s version is higher than the upgrade version a dialog box gives you the option to Continue or Cancel If you did not enable C...

Page 41: ...uccessful Click Finish to close the Firmware Upgrade Utility After a successful completion the CS1912 CS1914 exits Firmware Upgrade Mode and resets itself Upgrade Failed If the Upgrade Successful scre...

Page 42: ...CS1912 CS1914 User Manual 34 This Page Intentionally Left Blank...

Page 43: ...kind on the device Unplug the device from the wall outlet before cleaning Do not use liquid or aerosol cleaners Use a damp cloth for cleaning The device should be operated from the type of power sourc...

Page 44: ...d into or through cabinet slots They may touch dangerous voltage points or short out parts resulting in a risk of fire or electrical shock Do not attempt to service the device yourself Refer all servi...

Page 45: ...support or to contact an ATEN regional office www aten com support When you contact us please have the following information ready beforehand Product model number serial number and date of purchase Yo...

Page 46: ...deo 2 x DisplayPort Black 4 x DisplayPort Black Speakers 2 x 3 5 mm Mini Stereo Jack Green 4 x 3 5 mm Mini Stereo Jack Green USB Hub 1 x USB 3 1 Gen 1 Type A Blue Front 1 x USB 3 1 Gen 1 Type A Blue R...

Page 47: ...power Use a DC 5V power adapter if you are not already using one If you are already using a power adapter check that it matches the system specifications and that it is plugged in and functioning prop...

Page 48: ...ttings The hotkey factory default settings are as follows Setting Default Port Switching Scroll Lock Scroll Lock Invoking HSM Number Lock Auto Scan Interval 5 Seconds Beeper On Keyboard Operating Plat...

Page 49: ...or makes no warranty or representation expressed implied or statutory with respect to the contents or use of this documentation and especially disclaims its quality performance merchantability or fitn...

Page 50: ...anual Part No PAPE 0374 AT1G Printing Date 2016 11 04 ATEN and the ATEN logo are registered trademarks of ATEN International Co Ltd All rights reserved All other brand names and trademarks are the reg...

Reviews: