background image


OnBoard User’s Manual,

 Page 17


Setup


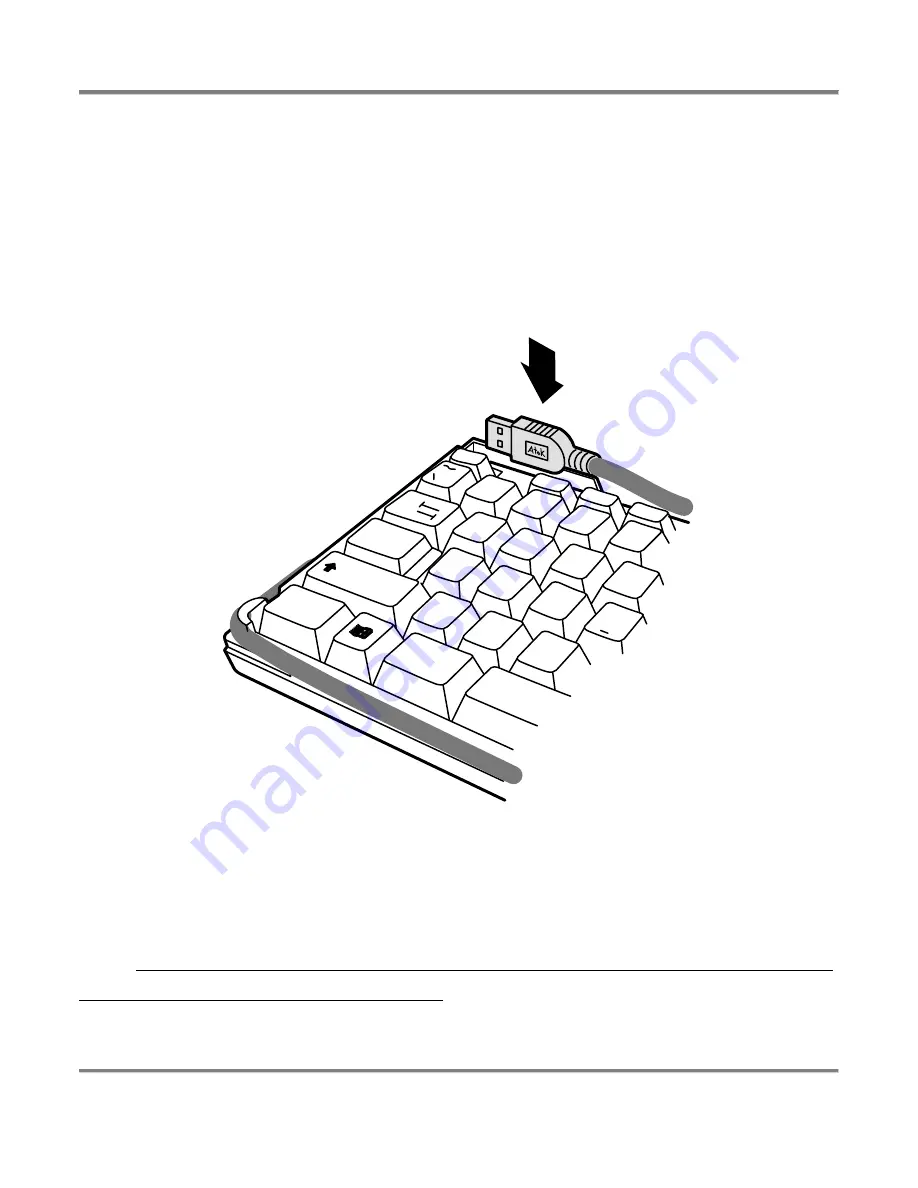
Closing the keyboard 

When you are done using the keyboard, wrap the cord around the post 
on the bottom left corner of the keyboard first, then around the two on 
the right side, and then push the connector into the nesting area where 
you will find it fits snuggly.  


W

E

R

F

D

S

A

Q

Z

X

C

Alt

Ctrl

CapsLock

Tab

2

3

4

1

Esc

!

@

#

$

Shift

F1

F2

F3


When you wrap the cord around each post, gently pull some of the 
slack out of the cord so that it does not sag too much over the side of 
the keyboard and so that the connector reaches well into the nesting 
area. For proper sliding action, nest the connector as close to the far left 
side of the nesting area as possible. 

Summary of Contents for OnBoard

Page 1: ......

Page 2: ... If you still cannot resolve the problem after reading the user s manual please check our website www atek com for possible additional information and updates If you are still unable to find a solution please contact your computer manufacturer or consultant or our technical support department for assistance You can reach Atek s technical support department Monday through Friday from 9 a m to 5 p m...

Page 3: ...osition and proper set up of your work environment Your keyboard should be directly in front of you Your keyboard should be close enough to your body so that you do not have to stretch to reach it Usually that means your elbows are at the side of your body when your fingers are on the middle row of the alphanumeric keys Your chair height should be adjusted so that your keyboard is at a comfortable...

Page 4: ...d Help 1 Health Safety Information 2 Introduction 4 Compatibility System Requirements 5 Features 6 Setup 13 Installation 20 Troubleshooting 21 Maintenance Service Support 26 One Year Limited Warranty 27 Regulatory Information 29 Purchase Record 30 Contact Information 31 ...

Page 5: ... a meeting in a conference room or do field work at remote locations you will find that the OnBoard Travel Keyboard makes using your laptop computer an even more enjoyable and productive experience Please register at www atek com for product updates On our website you can also learn about other Atek products including the Tote Remote presentation remote control Logio Secure Password Organizer LogK...

Page 6: ...BILITY SYSTEM REQUIREMENTS Your OnBoard Travel Keyboard must be plugged into the USB port USB 1 1 or 2 0 on your computer or into a USB hub or USB extension cable The computer must be running Windows Vista Windows XP Windows 2000 Windows Me or Windows 98 SE Second Edition ...

Page 7: ...umeric sections are almost identical in width Number of Keys A typical laptop computer keyboard may have only about 90 keys By comparison the OnBoard Travel Keyboard has 99 keys including all the alphanumeric keys all the navigation keys a full numeric keypad and most of the function keys found on a standard 104 key desktop keyboard The five keys the OnBoard Travel Keyboard does not have that are ...

Page 8: ... Backspace key Numeric keypad closer to main part of keyboard In order for the overall width of the OnBoard Travel Keyboard to be narrow enough to fit inside most shoulder bags and laptop computer cases we moved the numeric keypad closer to the alphanumeric part of the keyboard Overall Size The OnBoard Travel Keyboard is enclosed in a compact frame When in the stored position it measures approxima...

Page 9: ... computer keyboards this difference does not fully or even substantially account for the difference in typing productivity Nor does the spacing of the keys The general impression is that laptop keyboards are cramped and although it is true that laptop keyboards do not have separate numeric keypads careful measurement of many laptop keyboards not including miniature types shows that the spacing bet...

Page 10: ...aptop keyboard keycap Desktop and laptop keyboard keycaps have nearly identical widths at the top and at the base of the keycap but because a desktop keyboard keycap is taller the side flares out more gradually going from top to bottom of the keycap 3 A desktop keyboard key travels further before it engages So how do these factors come together to make desktop keyboard keycaps easier to use The de...

Page 11: ...ou push a key on a desktop keyboard your fingertip remains above the widest part the base of the adjacent keycap when the key is pushed all the way down So even if you hit it off center you are unlikely to touch the adjacent keycap However on a typical laptop keyboard when you push a key the top of the keycap typical travels down to and usually even below the base of an adjacent keycap which is th...

Page 12: ...r finger to find and stay in the center of a laptop keycap When a keycap travels down the top of the key travels down to or below the widest part of an adjacent keycap which means you are more likely to mistakenly touch the adjacent keycap when your finger is off center on a laptop keyboard You are more likely to mistakenly engage that adjacent key because it does not require as much travel distan...

Page 13: ...t or in a tilt position by placing it inside the upside down top cover The rubber footpads on the keyboard and top cover provide slide free operation no matter which way you use the keyboard See Setup section of this user s manual for more information about how to set up the keyboard in the tilt position Special Cord The OnBoard Travel Keyboard utilizes special enamel coated wire inside the cord a...

Page 14: ...oard by holding the keyboard in your left hand and using your right hand to slide the cover off to the right You will find the keyboard is a little tighter in the first part of the pulling action because there are catches on the side rails that help keep the cover snuggly in place A W Q Z S C a p s Lock Ctrl Alt Shift T a b 2 1 E sc F 1 ...

Page 15: ...ce and pull the connector out of its nesting area Pull the connector not the cord as pulling the cord may put too much stress on the area where the cord and connector come together and may damage the cord W E R F D S A Q Z X C Alt Ctrl C a p sL o c k T ab 2 3 4 1 Esc Shift F1 F2 F3 ...

Page 16: ...om the post on the bottom left side 5 6 9 8 3 2 1 4 7 E n t e r _ D e l I n s e r t E n d H o m e F 1 2 F 1 1 P g D n E n d N u m L o c k H o m e P g U p B a c k s p a c e E n t e r S h i f t 0 I n s P g D n D e l Post Post A Z S X Q C W E D F G V C t r l A l t 2 3 4 5 R T F 4 F 3 F 2 F 1 1 E s c Tab Caps Lock Post Shift ...

Page 17: ...eyboard inside the upside down top cover and then let the back of the keyboard lean against the back edge of the upside down top cover The back edge of the keyboard should land just inside the two little plastic tabs so that it is stable 6 9 8 5 4 7 1 2 3 H o m E n d D e l I n s e r t 9 N u m L o c k P g U p En d PgDn Enter Del 0 Ins B a c k s p a c e F 1 1 F 1 2 E n t e r Sh i f t PgDn PgUp H o m...

Page 18: ...he nesting area where you will find it fits snuggly W E R F D S A Q Z X C Alt Ctrl C a p sL o c k T ab 2 3 4 1 Esc Shift F1 F2 F3 When you wrap the cord around each post gently pull some of the slack out of the cord so that it does not sag too much over the side of the keyboard and so that the connector reaches well into the nesting area For proper sliding action nest the connector as close to the...

Page 19: ...around the posts A Z C t r l A l t Tab Caps Lock Shift Push cord into groove After you have put the cord in this stored position it is easiest to put the cover back on the keyboard by following this procedure Put the keyboard flat on your work surface Let the left side of the cover the open end lightly touch the top of the keycaps on the far right side of the keyboard Gently slide the cover all th...

Page 20: ...board As mentioned previously there are catches on the left side of the keyboard that keep the cover snuggly mated to the keyboard after you slide it all the way closed so you will have to use a little extra force to complete the final part of the sliding action End Del Insert Enter 9 8 9 3 5 2 7 4 1 0 End Ins Del PgDn PgUp Home Num Lock Home Cover ...

Page 21: ...pplication software is used and therefore no diskette or CD is included with the keyboard The OnBoard Travel Keyboard uses standard operating system drivers already on your computer If you are using Windows Vista XP or 2000 usually there is an onscreen indication of this installation activity such as a small pop up window WAIT PATIENTLY AND DO NOT INTERRUPT THIS PROCESS as several separate driver ...

Page 22: ...B port is not physically damaged and that the connection with the keyboard connector is snug Possible Cause Other problems with USB ports Solution Make sure your USB port is enabled and properly configured by testing whether another USB device such as a USB mouse works on the port Try plugging the keyboard connector into a different USB port If you have other devices installed that conflict with t...

Page 23: ...Manager Navigate to the Device Manager by going to Start Settings Control Panel System Hardware Device Manager or simply right click on the My Computer icon on your desktop and select Properties then go to Hardware Device Manager Click on the sign next to the word Keyboards The directory tree will expand and you should see something called HID Keyboard Device Right click on HID Keyboard Device and...

Page 24: ...cess to the drives on your computer or network where the drivers reside If the drivers are not on your computer s hard drive or on an available network drive you may need the original operating system CD in order for the drivers to be found and installed Make sure you have the latest Windows Updates from Microsoft Try re booting your computer with the keyboard already plugged in and if that does n...

Page 25: ...l to see whether that solves the problem Depending on what operating system you have you may also be able to change the Power Management settings in the Device Manager Navigate to the Device Manager by going to Start Settings Control Panel System Hardware Device Manager or simply right click on the My Computer icon on your desktop and select Properties then go to Hardware Device Manager Click on t...

Page 26: ...een instead This situation can also occur when you push a key such as Num Lock on your OnBoard Travel Keyboard intentionally and then the laptop computer keyboard also goes into that mode without you realizing it Solution If the laptop computer is not in the mode you want normally you can change it by simply pushing a key on the laptop computer s keyboard such as the Num Lock key to change the mod...

Page 27: ...ble additional information and updates If you are still unable to find a solution contact your computer manufacturer computer consultant or our technical support department for assistance Most keyboard problems are easy to solve on the telephone You can reach Atek s technical support department Monday through Friday from 9 a m to 5 p m Pacific time at 1 888 889 9990 or 714 258 0100 or email us at ...

Page 28: ... MAKES NO OTHER WARRANTIES EXPRESS IMPLIED OR OF MERCHANTABILITY OR FITNESS FOR A PARTICULAR PURPOSE OR USE FOR THIS PRODUCT Some states do not allow limitations on how long an implied warranty lasts so this limitation may not apply to you Warranty Remedies Coverage Exclusions If this Atek product does not function in accordance with this express warranty Atek Inc at its option will repair or repl...

Page 29: ...a risk of electrical shock Repair or replacement are Atek Inc s only obligations under this warranty ATEK INC WILL NOT BE RESPONSIBLE FOR ANY CONSEQUENTIAL OR INCIDENTAL DAMAGES RESULTING FROM THE SALE USE OR IMPROPER FUNCTIONING OF THIS ATEK PRODUCT Such damages for which Atek Inc will not be responsible include but are not limited to loss of revenue or profit or cost of any substitute equipment ...

Page 30: ...ons may cause harmful interference to radio communications However there is no guarantee that interference will not occur in a particular installation If this equipment does cause harmful interference to radio or television reception which can be determined by turning the equipment off and on the user is encouraged to try to correct the interference by one or more of the following measures Reorien...

Page 31: ...0 S N _____________________________________________________ Place of purchase __________________________________________ Date of purchase __________________________________________ SAVE YOUR DATED RECEIPT AS PROOF OF PURCHASE DATE OF PURCHASE MUST BE VERIFIABLE IN ORDER FOR WARRANTY SERVICE TO BE PROVIDED ...

Page 32: ...en Monday through Friday from 9 a m to 5 p m Pacific time excluding holidays 2007 Atek Inc All rights reserved Atek OnBoard Logio LogKey Tote Remote and Super Mini are trademarks or registered trademarks of Atek Inc Windows Windows Vista Windows XP Windows 2000 Windows Me and Windows 98 are trademarks and or registered trademarks of Microsoft Corp in the U S and or in other countries Information i...

Page 33: ......

Reviews: