background image


 16  

Operating and Safety Instructions


7.1.15 The router bit and triple drill unit should be moved down only after the regular 
rotation has been reached. 


8. CHANGING THE ROUTER BIT AND DRILL BITS  


8.1

 If it becomes necessary to replace the router bit for any reason, follow the following 

order for replacement:  


8.1.1

 Unplug the machine 

8.1.2

 With the 2 wrench keys 14 and 17 loosen the router bit holder by turning the bolt of 

the router bit holder in counter clockwise direction. Remove the router bit from its holder. 
Insert the new router bit into the holder, and tighten the bolt with the wrench keys.  


NOTE: Ensure that the router bit is fixed properly.  


8.1.3


Check the router bit before using it. The router bit has to be inserted into the holder 

properly. Don't use damaged router bits with improper function. Operate the machine for 
at least 30 seconds to be sure that the router bit has been inserted and fixed correctly. 


8.2 CHANGING THE TRIPLE DRILL BITS 


8.2.1

 Unplug the machine. 

8.2.2

 Loosen the screw on the connection of the triple drilling unit’s drill shaft with a 3 mm 

hexagonal key. Replace the drill bit, and tighten the screw.  


NOTE: Ensure that the drill bit is tightened properly. 


    CAUTION!  


Summary of Contents for LIBRA-02 HM

Page 1: ...1 Operating and Safety Instructions LIBRA 02 M LIBRA 02 HM COPY ROUTER User s Manual ...

Page 2: ... 10 3 3 General safety information 10 4 Transport of the machine 12 5 Installation of the machine 12 5 1 Preparation 12 5 2 Electric connection 14 6 Machine s safety information 14 7 Operation 15 7 1 Starting to work 15 8 Changing the router bit and the drill bits 16 9 Adjusting the air pressure 17 10 Maintenance 19 10 1 Periodic controls and routine maintenance at the end of the day 19 11 Informa...

Page 3: ...01 556 9789 Toll Free 1 866 80A TECH Fax 1 301 542 0140 Website www atechna com E mail info atechna com In case of any technical problem please contact your nearest ATECH dealer through the above mentioned phone fax or e mail address Technical labels with the model description of the machine are fixed onto the front side of each machine The machine s serial number and manufacturing year are stipul...

Page 4: ...n all your correspondence regarding the machine with the manufacturer and or your ATECH dealer Machine model Machine s serial number Voltage and frequency Name of dealer where machine was purchased Date of purchase Description of the machine fault Average daily operation period ...

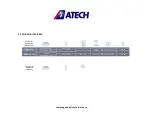
Page 5: ...ctions 2 2 TECHNICAL FEATURES Technical Features American LIBRA 02 M 800W 1200W 110V 220V 60Hz 14000 rpm 90 psi 24x22x57 160 lb LIBRA 02 HM 800W 220V 440V 60Hz 14000 rpm 3000 rpm 90 120 psi 26x26x54 210 lb Technical Features Metric ...

Page 6: ...6 Operating and Safety Instructions 2 3 OVERALL DIMENSIONS Figure 1 ...

Page 7: ...7 Operating and Safety Instructions 2 4 PART LISTS AND TECHNICAL DRAWINGS Figure 3 ...

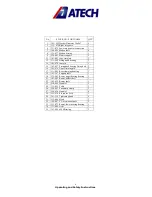
Page 8: ...1 15 145 017 Fixing knob bearing fixing bolt 2 16 141 074 Upper limiting pin 2 17 111 081 Rear clamping housing 1 18 141 267 Support shaft 1 19 111 083 Router upper bearing housing 1 21 141 085 Router holder shaft 1 22 142 022 Router shaft 1 23 550 009 Handle 1 2 25 111 051 Table 1 26 550 003 Pneumatic clamp 2 27 550 010 Handle 3 4 28 111 076 Set square left 1 29 141 138 Tightening knob 6 31 111 0...

Page 9: ...end 25x35x40 PP 16 47 111 078 Motor cover 1 48 141 069 Bearing shaft connection sleeve 2 53 141 089 Fixing knob shaft bearing 2 58 111 070 Axis bearing 1 63 141 084 Drill bearing support 1 65 204 001 Diameter 10mm Drill bit 2 66 204 002 Diameter 13mm Drill bit 1 68 112 007 Drill bearing 1 70 111 079 Lower motor front cover 1 71 142 021 Lower rotor shaft 1 81 141 077 Arm connection 1 84 111 066 Col...

Page 10: ...s for the operator s safety 3 2 3 Before starting to work with the machine the operator should check the features of the machine learn all details of the machine s operation 3 2 4 The machine should be operated only by staff members who have read and understood the contents of this manual 3 2 5 All directives recommendations and general safety rules contained in this manual have to be observed ful...

Page 11: ...n for the safety of the operator ISO 8995 89 The Lighting of Indoor Work Systems 3 3 8 Don t leave anything on the machine 3 3 9 Don t use any materials other than those recommended by the manufacturer for cutting operations on the machine 3 3 10 Ensure that the work piece is clamped appropriately by the machine s clamp or vice 3 3 11 Ensure safe working position always keep your balance 3 3 12 Ke...

Page 12: ...lectric connections 4 TRANSPORT OF THE MACHINE 4 1 1 The transport should be done by qualified personnel only 4 1 2 The machine should be transported by lifting with proper equipment not touching the ground during the transport 4 1 3 Machines are covered with nylon for delivery unless the customer has not required other method of packing 4 1 4 For the weight dimensions and technical features of th...

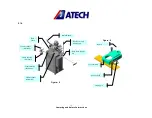
Page 13: ...ence No 5 using the handle No 29 Fix the fence support No 113 with its special screw No 27 Figure 5 Figure 4 Clamp housing Mechanic Clamp cylinder Mechanic Back Fence Clamp housing Pneumatic Clamp cylinder Pneumatic Back fence support bar Handle for triple drilling unit Router Handle Moving head Copy template Locking pin Button ...

Page 14: ...se the cutting tools to break or get damaged NOTE THIS IS VALID FOR THREE PHASE MOTORS 6 MACHINE SAFETY INFORMATION 6 1 1 The machine should not be used without the transparent protection shield in front of the router bit 6 1 2 Lifting installation electric maintenance of the machine should be carried out by qualified personnel only 6 1 3 Routine maintenance and scheduled maintenance should be car...

Page 15: ...e See Figure 5 7 1 8 Push the system start button to position 1 7 1 9 Start to operate the router bit by keeping the pushbutton on the moving head pressed See Figure 5 At the same time move the pin inside the shape to copy it onto the profile Push the height adjustment handle down so that the router bit reaches the desired depth See Figure 4 7 1 10 For the horizontal triple drilling operation whil...

Page 16: ...it from its holder Insert the new router bit into the holder and tighten the bolt with the wrench keys NOTE Ensure that the router bit is fixed properly 8 1 3 Check the router bit before using it The router bit has to be inserted into the holder properly Don t use damaged router bits with improper function Operate the machine for at least 30 seconds to be sure that the router bit has been inserted...

Page 17: ...nt button in clockwise direction increases the pressure b Turning the adjustment button in counter clockwise direction decreases the pressure 9 2 Once you read 6 8 Bar on the manometer push the adjustment button of the conditioner down and lock it in that position The air supply to the machine has to balance 6 8 Bar 90 120 psi pressure Don t operate the machine at an air pressure lower than 6 Bar ...

Page 18: ...18 Operating and Safety Instructions Figure 6 Figure 7 Manometer Pressure adjustment button Oil cylinder Oil filling cap Triple drilling adjustment screw Air pressure and water discharge screw ...

Page 19: ...r with a key 10 1 3 Check the router bit for its proper function at each operation Replace damaged router bit 10 1 4 If you have used water or water based liquids during drilling operations dry the machine with a dry cloth after the operation is finished If the machine will not be used for a long time lubricate the unpainted sections of the machine as protection against corrosion 10 1 5 Remove all...

Page 20: ... 4 165 020 PEK 2 5 MM BEIGE CONNECTOR 5 165 021 NO 1 ROW CONNECTOR 0 07 165 025 PEK 2 5 mm BLUE CONNECTOR 1 165 028 TERMINAL SHEET NPP 2 5 10 3 165 029 PG 11 SLEEVE 1 165 031 PG 13 5 1 165 033 PG 16 3 165 040 WARNING LABEL IP 2S 2 165 048 GROUNDING CONNECTOR WGT4 2 11 2 PNEUMATIC COMPONENTS STOCK CODE PART NAME QTY 241 004 6mm AIR HOSE 2 2 241 005 AIR GUN HOSE 2 5 241 009 FRC 1 8 D MINI CONDITIONE...

Page 21: ...e Damaged or blunt router bit use Check the tip of the router bit and its cutting flutes the tip could be broken If so replace the router bit Motor does not work although the start button on the lever is kept pressed There is no power supply to the machine Check the electric connections Check the power sockets Motor runs but the pneumatic clamp pistons do not work The air supply connections are mi...

Reviews: