AWM-P40X Page 2 of 2
Unstacked
Stacked
Cables can
exit from the
side of the
cable cover
PUSH
PUSH
DO NOT
remove label
and ensure
alignment
insert stays
in place.
Use guide marks on post
channels as a reference
for setting the height of
each arm.
NOTE
Additional
adjustments may be
required once monitors
are installed.
PUSH
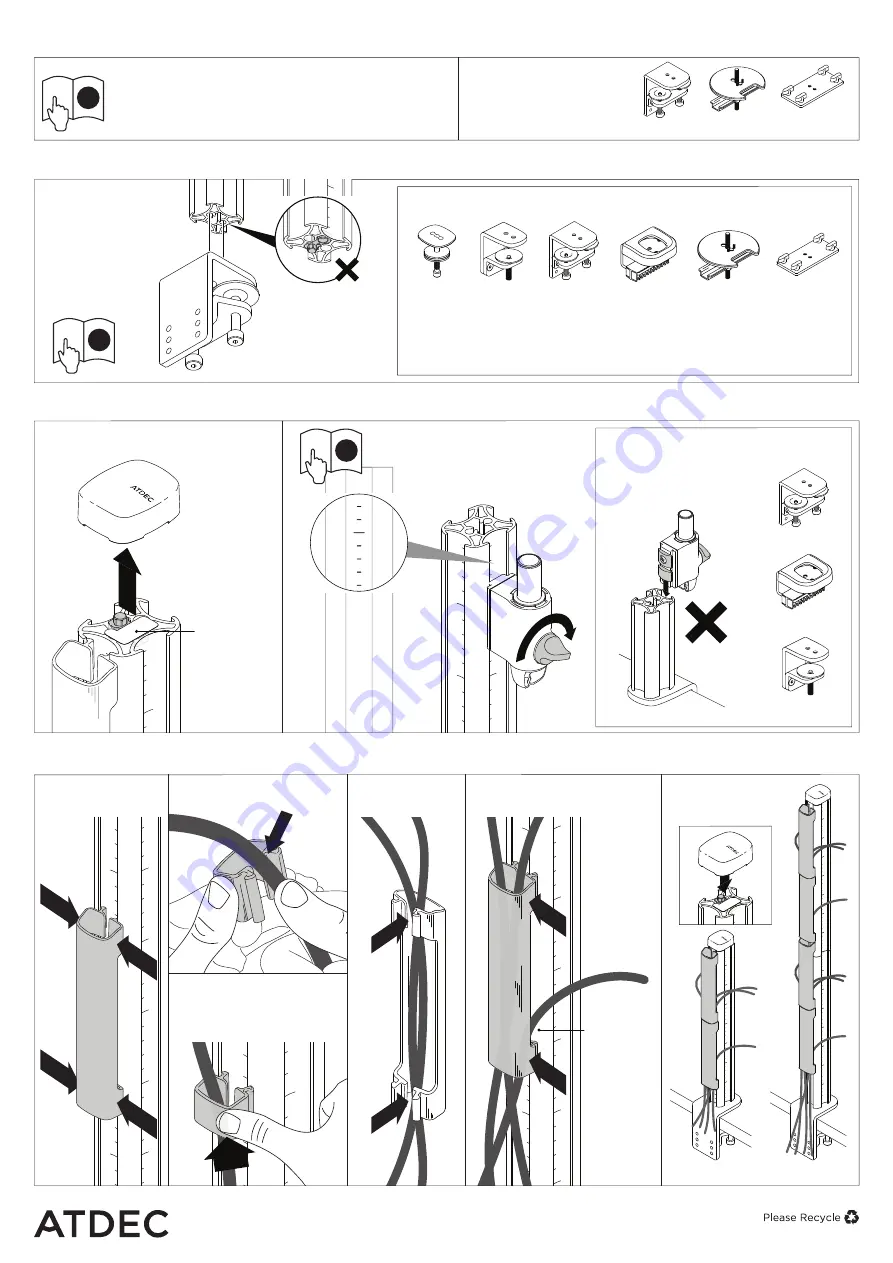
2.
Attach Post to Fixing
(fixing sold separately)
1. Optional
Stack Posts
(Stack Kit AWM-X40 sold separately)
3.
Mount Arms onto Post
4.
Cable Management
NOTE:
Do not mount monitor
arms on rear channel of post
when using the following
desk clamps:
3.1
Remove post cap
3.2
Follow the installation guide
provided with your arm(s) to
mount it to the post.
4.2a
Load cables into
cable clip.
4.1
Unclip clips and
covers from post.
4.2b
Insert one side of the
cable clip into a channel
on the post, then push in
the other side.
No portion of this document or any artwork contained herein should be reproduced in any way without
the express written consent of Atdec Pty Ltd. Due to continuing product development, the manufacturer
reserves the right to alter specifications without notice. ©
20201030
AWM-FH
AWM-FC
AWM-FF
AWM Fixing options
AWM-FH
Heavy Duty
F Clamp
AWM-FH
AWM-FC
C Clamp
AC-GC
Grommet
Clamp
AC-GC
Atdec
Custom
Rail Plate
Atdec Custom
Rail Plate
AWM-FF
F Clamp
AWM-FB
Bolt
Through
Kit
2.1
Follow the
installation
guide provided
with your fixing
to attach it to
the post and
fit it to the
worksurface.
1.1
Follow the installation
guide provided with the
AWM Stack Kit to extend
the post to 800mm (31.5”).
Load cables into
cable cover
SQUEEZE
SQUEEZE
SQUEEZE
SQUEEZE
4.3a
Load cables
into cable cover.
IMPORTANT:
When stacking posts
only the following heavy
duty fixings can be used:
NOTE:
Posts can be stacked
before or after attaching
to desk fixing.
4.3b
Clip the cable cover onto
any of the four post channels.
4.4
Fit post cap
to complete
installation
i
i
i
DO NOT
Attach
fixing to end of
post with label
and alignment
insert.


