

AWM-HN Page 2 of 2
1.
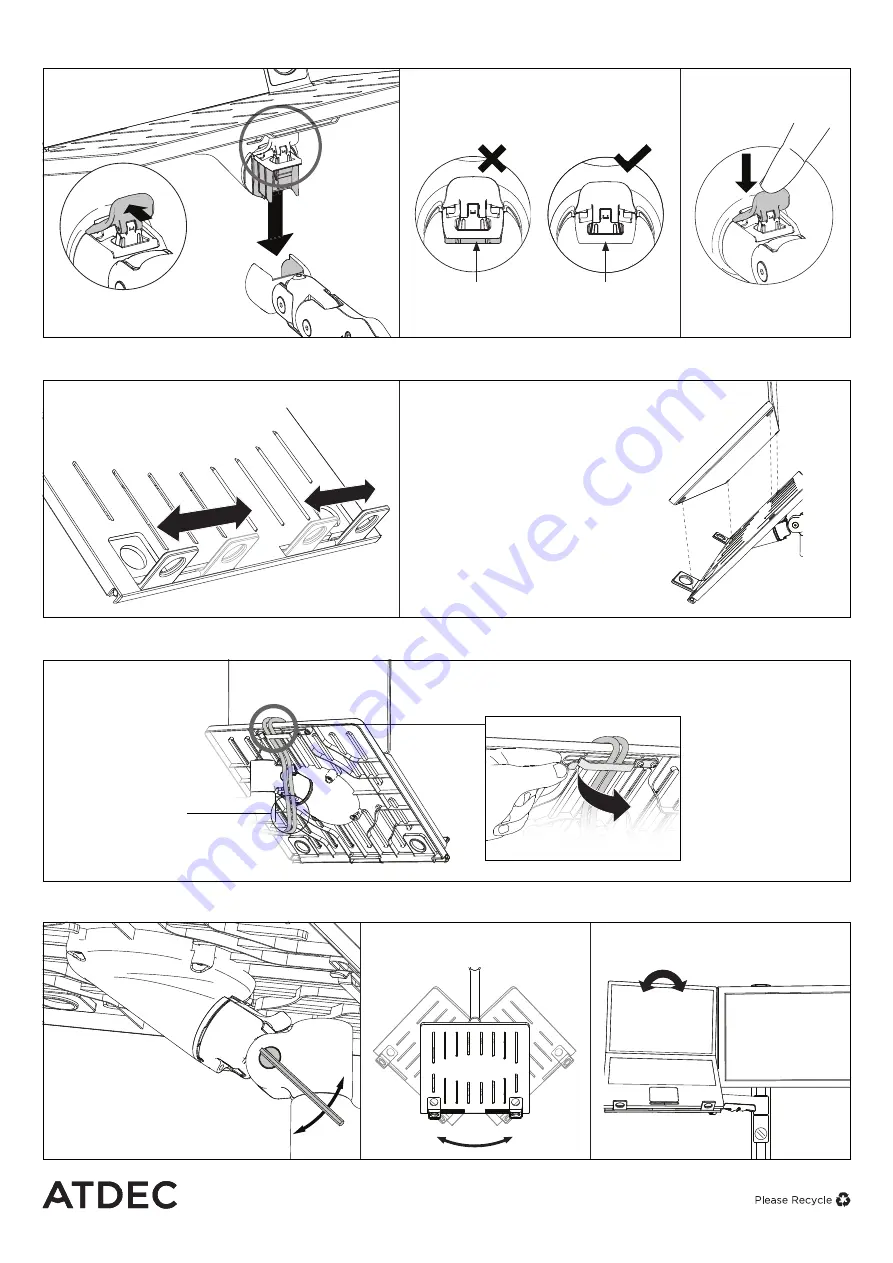
Mount Notebook Tray onto arm
2.
Mount notebook computer
3.
Cable management
4.
Adjust Notebook Tray
1.3
Push the lever down
to secure it to the arm
assembly.
1.2
Ensure that the Notebook Tray is seated
fully into the receptacle at the end of the
monitor arm. There should be
no
gap.
1.1
Insert Notebook Tray into
the monitor arm
Gap
No gap
Note:
Ensure the lever is
unlocked when fitting.
2.1
Adjust the support tabs to
suit the width of the notebook
computer ensuring that cable
ports are not obstructed.
2.2
To increase stability, use the
self adhesive Hook-and-Loop
Fasteners supplied.
a.
Peel off the backing paper to
the fasteners.
b.
Attach fasteners to both the
Notebook Tray and notebook
computer.
c.
Ensure that each set of
fasteners are correctly aligned
i.e. Hook to Loop.
3.1
Cable clips and covers
can be used to further
manage cables.
4.1
Adjust monitor
arm tilt tension using
4mm allen key.
Tighten
Loosen
4.3
Position and align notebook with
other monitors.
4.2
Pan Notebook Tray to desired
position.
Note:
After
connecting the
notebook computer
cables, route them
through the cable
management clip
on the back of the
Notebook Tray.
Note:
Ensure enough
cable slack is given to
allow for movement.
No portion of this document or any artwork contained herein should be reproduced in any way without
the express written consent of Atdec Pty Ltd. Due to continuing product development, the manufacturer
reserves the right to alter specifications without notice. ©
20201201
LIFT
Note:
Ensure Notebook
Tray is supported whilst
making tilt adjustments.
+/- 5°
Levelling
Adjustment