background image

7

1

3

7

-

D

T

A

 :

l

e

d

o

M


n

o

T


2

 :

y

ti

c

a

p

a

C


SETUP, OPERATION & PREVENTIVE MAINTENANCE

Ύ

 Setup 

Prior to each use, visual inspe

ĐƟŽŶ

 (See Pg. 5) shall be made to the device by checking 

for abnormal 

ĐŽŶĚŝƟŽŶƐ͕

 such as cracked welds, leaks, and damaged, loose, or missing 

parts. 
Consult the vehicle owner’s manual to determine the 

ůŽĐĂƟŽŶ

 of 

ůŝŌ

 points. 

Be sure to set the vehicle in park with the emergency brake on and wheels securely 
chocked. 
Be sure that the vehicle and the jack are on a hard, level surface.


Assembly


If two piece handles are provided, assemble the upper 

ƐĞĐƟ

on into the lower sec

ƟŽŶ͕


line up the holes, insert and 

Ɵ

ghten the screw. 

Insert the 

ďŽƩŽŵ

 end of handle into handle fork and securely 

Ɵ

ghten the bolt and 

washer. Ensure the handle can turn freely. 


Li

Ō

ing 


Turn the handle/release valve clockwise to the closed 

ƉŽƐŝƟŽŶ͘

 Do not over 

Ɵ

ghten. 

WŽƐŝƟŽŶ

 the jack under the spec

ŝĮ

ed 

ůŝŌ

 point. 

Begin 

ůŝŌŝŶŐ

 by pumping the handle up and down. 

Immediately 

ĂŌ

er 

ůŝŌŝŶŐ͕

 support the vehicle with appropriately rated jack stands. 

Turn the handle/release valve slowly counterclockwise to lower the vehicle onto jack 
stands. 

Lowering


Turn the handle/release valve clockwise to the closed 

ƉŽƐŝƟŽŶ͘

 Do not over 

Ɵ

ghten. 

Pump the handle up and down to li

Ō

 vehicle 

Žī

 jack stands. 

Remove the jack stands. Do not get under or let anyone get under the vehicle while 
lowering. 
Turn the handle/release valve slowly counterclockwise to lower the vehicle onto the 
ground


Summary of Contents for ATD-7317

Page 1: ...erall Width Saddle Diameter Shipping Weight 2 Ton 2 3 4 24 49 1 4 36 15 1 8 4 106 LB Contents Page 1 SpeciĮĐĂƟons 2 Safety Warning ŶĨŽƌŵĂƟŽŶ 3 4 Setup OperĂƟŽŶ PreveŶƟve Maintenance 5 InspĞĐƟon Storage TroubleƐŚŽŽƟŶŐ 6 Exploded View Replaceable Part Numbers 7 Warranty ŶĨŽƌŵĂƟŽŶ 8 PreveŶƟve Maintenance Record Log OpĞƌĂƟng InstrucƟŽŶs Parts Manual ...

Page 2: ...king sure that the operator comprehends their contents AcƟŽŶs to help prevent dangerous ƐŝƚƵĂƟŽŶs Study understand and follow all instruĐƟons before ŽƉĞƌĂƟŶŐ this device Do not exceed the rated capacity stated Use only on hard level surfaces This item is to be used as a ůŝŌŝŶŐ device only Immediately aŌer ůŝŌŝŶŐ support the vehicle with appropriate means Do not move or dolly the vehicle while it i...

Page 3: ...hten the screw Insert the ďŽƩŽŵ end of handle into handle fork and securely Ɵghten the bolt and washer Ensure the handle can turn freely LiŌing Turn the handle release valve clockwise to the closed ƉŽƐŝƟŽŶ Do not over Ɵghten WŽƐŝƟŽŶ the jack under the specŝĮed ůŝŌ point Begin ůŝŌŝŶŐ by pumping the handle up and down Immediately ĂŌer ůŝŌŝŶŐ support the vehicle with appropriately rated jack stands T...

Page 4: ...p the handle rapidly several ƟŵĞƐ Reinstall oil Įller plug Turn the handle release valve clockwise to the closed ƉŽƐŝƟŽŶ Pump the handle ƵŶƟů the ůŝŌ arm reaches maximum height and conƟnue to pump several Ɵmes to remove trapped air in the system Turn the handle release valve counterclockwise in one full turn and lower ůŝŌ arm to the lowest posiƟon Use force on saddle if necessary Carefully and slo...

Page 5: ...Jack should be stored in a dry locaƟŽn on a level surface TroubleshŽŽƟngΎ Symptom Possible Causes ŽůƵƟŽn Jack will not ůŝŌ the load 1 Release valve not ƟŐhtly closed 2 Low oil level 3 DefeĐƟǀe or worn internal parts 4 Load exceeds maximum allowance 1 Tighten release valve 2 Check and add oil Follow Check and ZĞĮůů Oil instrucƟons on Pg 4 3 DisconƟnue use and contact a local repair center 4 Use a h...

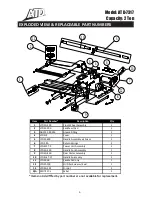
Page 6: ...D2G 100 Front Wheel Assembly 2 2 LYD2K 300 Saddle w Pad 1 3 GB1152 89 M6 Grease Fitting 1 4 LYD3J 3 Cover 1 5 LYD3F 600 Handle Assembly w Foam 1 6 LYD2 9A Return Springs 2 7 LYDBI 2T 3 Power Unit Assembly 1 8 LYD3G 300 Handle Fork Assembly 1 9 LYD3G 400 Rear Caster Assembly 2 10 LYDBI 3T 17 Handle Foam only 1 11 LYD2K 3B Saddle Pad only 1 12 LYD3F 100 Oil Filler Screw w Seal 1 13 LYD3G 101 U Joint...

Page 7: ...over scratches superficial dents and other abrasions to the paint finish that occur under normal use Subject to the law in your state 1 Your sole and exclusive remedy is repair or replacement of the defective product as described above 2 ATD Tools Inc is not liable for any incidental damages including but not limited to lost profits and unforeseeable consequences 3 The repair and replacement of th...

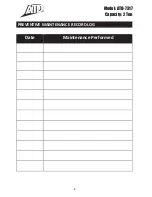
Page 8: ...7 1 3 7 D T A l e d o M n o T 2 y t i c a p a C 8 PREVENTIVE MAINTENANCE RECORD LOG Date Maintenance Performed ...

Reviews: