background image

AX2G4A Quick Start Guide

www.atcom.cn

Email: [email protected]

6

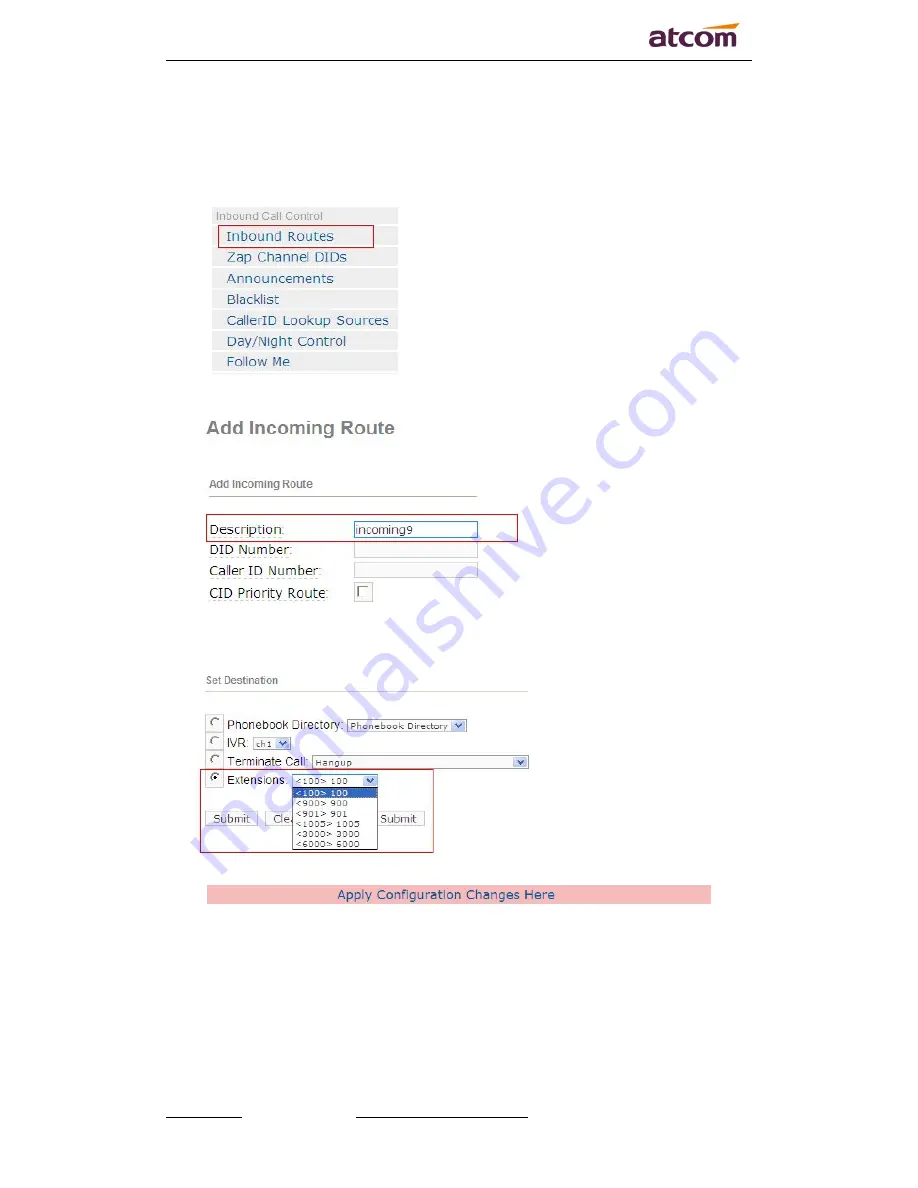
4) Add an Incoming Route

Add an incoming route, it will help you get incoming calls.

a) Click on “Inbound Routes” bar.

b) Input incom9 in the textbox of Description as the following screen:

c) Click the Extensions textbox, choose an extension number from the drop down selection box.

Then click submit. Please refer to the following illustration:

d) Click the “Apply Configuration Changes Here” bar in the top of the screen.

5) Add outbound route

Add an outbound route, it will help you get outbound calls.

a) Click on “outbound Routes” bar.

Summary of Contents for AX-2G4A

Page 1: ...AX2G4A Quick Start Guide with Elastix2 4 0 Version 2 0 2013 06 03...

Page 2: ...AX2G4A Quick Start Guide www atcom cn Email support atcomemail com Release note Version Changed note Editor Date 1 0 First Release 2 0 Release the Quick start Guide Daniel 2013 06 03...

Page 3: ...stix2 4 0 1 1 Download the driver 1 2 Install the driver 1 3 Compatibility with the driver 1 2 HOW TO CONFIGURE YOUR PBX 2 2 1 Log into the Elastix webpage 2 2 2 Detect the hardware 2 2 3 Configurate...

Page 4: ...the competitive IP phone and other terminals for IP PBX softswitch IMS NGN providers and carriers supplying the competitive total VoIP solution for SMB market We keep improving the customer s experien...

Page 5: ...he script Normally the script will install the driver automatically root localhost src tar zxvf ax2g4a_elastix2 4 0 tar gz root localhost src cd ax2g4a_elastix2 4 0 root localhost elastix_ax2g4a_drive...

Page 6: ...x2 0 3 configure webpage So the following instruction will be an example to Elastix OS 2 1 Log into the Elastix webpage Please open the browser and input the server IP address And then clink on the su...

Page 7: ...stly users will get the following illustration 2 3 Configurate your PBX 1 Configure the PBX Click the PBX button to jump into the pbx configuration page 2 Add an SIP Extension Click the Add an extensi...

Page 8: ...AX2G4A Quick Start Guide www atcom cn Email support atcomemail com 4 Then Click the Apply Configuration Changes Here bar in the top of the screen...

Page 9: ...Trunk a Choose the Add Zap Trunk DAHDI compatibility button b Set the Trunk Description enter the name what you have set Then choose the Dial Rules Identifier g0 click on submit in the following illus...

Page 10: ...m9 in the textbox of Description as the following screen c Click the Extensions textbox choose an extension number from the drop down selection box Then click submit Please refer to the following illu...

Page 11: ...he following screen c In the Dial Patterns please input 9 it will help you get calls before you called number Please refer to the following illustration d Choose the Trunk Sequence ZAP g0 Then click s...

Reviews: