

UVEP692_ATT121140829-4_UV_WG_Swap_3800_3801 wo_Voice_IFC_RELEASE
UVEP692_ATT121140829-4_UV_WG_Swap_3800_3801 wo_Voice_IBC_RELEASE
Set up
Approximate time: 10 minutes
1.
Please note that your U-verse TV and Internet will not operate during this process. This includes
recording TV shows.
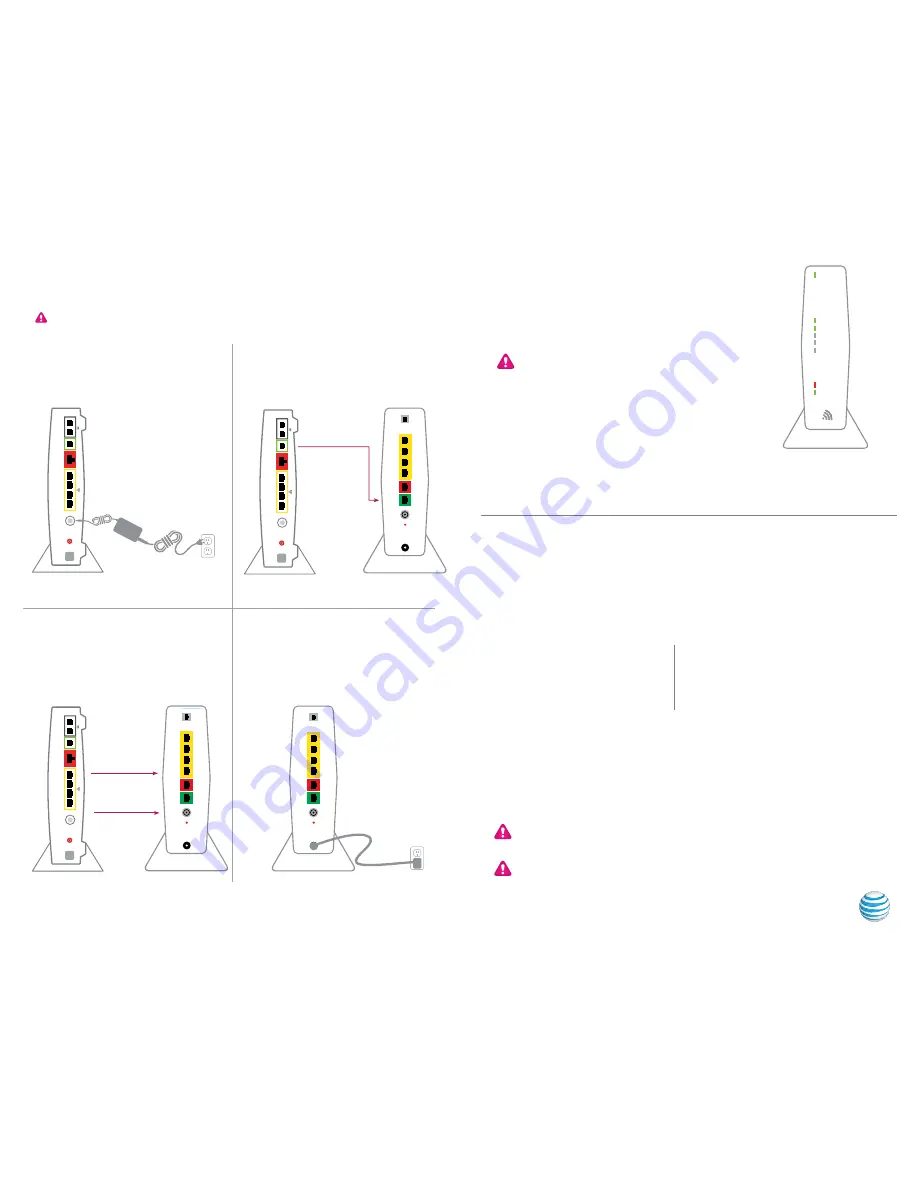
New Wi-Fi Gateway indicator lights on
front panel. Lights may vary with setup.
Power up
Approximate time: 1–5 minutes
2.
PHONES
LINES 1
&
2
PHONE LINE
AU
CAL ETHERNE
T
RESE
T
PO
WE
R
2
3
4
1
OK
MENU
LINK
HD
RECORD
USB
TO TV
(VIDEO OUT)
NETWORK
Pb
Y
S-Video
Optical
USB
HDMI
Video
Audio
Pr
Frame 6
Local
Ethernet
12
3
4
DS
L
Br
oadband
ONT
Voice 1 & 2
Cabl
e
R
eset
Phone
Lines
Cable
Line
1 & 2
USB
Ethernet
1
2
3
4
DSL
Broadband
ONT
R
eset
Phone
Lines
Cable
Line
1 & 2
USB
Ethernet
1
2
3
4
DSL
Broadband
ONT
R
eset
Phone
Lines
Cable
Line
1 & 2
USB
Ethernet
1
2
3
4
DSL
Broadband
ONT
Reset
Phone Lines
Cabl
e
Line
1 & 2
USB
Ethernet
12
3
4
DS
L
Br
oadband
ONT
Reset
POWER
PHONE
LINES
1
&
2
ETHERNET
BR
O
ADB
AND
CABLE
·
Stand the new Wi-Fi Gateway next to the
existing Wi-Fi Gateway
·
Disconnect the green data cable from the
existing Wi-Fi Gateway and connect it to
the new Wi-Fi Gateway
·
Unplug the existing Wi-Fi Gateway from the
electrical outlet
·
Set the existing power cord aside—do not use
·
Plug your new power cord into the Power port
of the new Wi-Fi Gateway
·
Plug the other end of the power cord into an
electrical outlet
·
Move the remaining cables from the existing
Wi-Fi Gateway to the new Wi-Fi Gateway
Existing Wi-Fi Gateway
Electrical
outlet
Green Data Port
New Wi-Fi Gateway
Existing Wi-Fi Gateway
Yellow Ethernet Ports
New Wi-Fi Gateway
Existing Wi-Fi Gateway
Coax Port
New Wi-Fi Gateway
Electrical
outlet
OK
MENU
LINK
HD
RECORD
USB
TO TV
(VIDEO OUT)
NETWORK
Pb
Y
S-Video
Optical
USB
HDMI
Video
Audio
Pr
Frame 6
Local
Ethernet
12
3
4
DS
L
Br
oadband
ONT
Voice 1 & 2
Cabl
e
R
eset
Phone
Lines
Cable
Line
1 & 2
USB
Ethernet
1
2
3
4
DSL
Broadband
ONT
R
eset
Phone
Lines
Cable
Line
1 & 2
USB
Ethernet
1
2
3
4
DSL
Broadband
ONT
R
eset
Phone
Lines
Cable
Line
1 & 2
USB
Ethernet
1
2
3
4
DSL
Broadband
ONT
Reset
Phone Lines
Cabl
e
Line
1 & 2
USB
Ethernet
12
3
4
DS
L
Br
oadband
ONT
Reset
POWER
PHONE
LINES
1
&
2
ETHERNET
BR
O
ADB
AND
CABLE
PHONES
LINES 1
&
2
PHONE LINE
AU
CAL ETHERNE
T
RESE
T
PO
WE
R
2
3
4
1
PHONES
LINES 1
&
2
PHONE LINE
AU
CAL ETHERNE
T
RESE
T
PO
WE
R
2
3
4
1
A.
C.
B.
D.
POWER
ETHERNET
WIRELESS
HOME PNA
PHONE 1
BROADBAND
SERVICE
PHONE 2
Your Wi-Fi Gateway is now powering up. During this time, the Broadband light will turn
red and the Power light will turn solid green.
Wait up to 5 minutes for the Service indicator light to turn solid green.
During this time (up to 5 minutes), do not unplug the power cord or the green
data cable, as this can permanently damage the Wi-Fi Gateway and significantly
delay your service activation.
If the Service light does not turn solid green or continues to blink after 5 minutes,
see
Need more help?
on the back of this guide.
For U-verse TV, restart your TV receivers after the Service light is solid green.
Go to each TV and hold down the Power button on the U-verse receiver and DVR
for 10 seconds.
NOTE:
Live TV may take a few minutes to display. If TV does not respond, refer
to
Need more help?
on the back of this guide.
A.
B.
Go Wi-Fi
Approximate time: 1–5 minutes
New Wi-Fi setup:
NOTE
: Any custom settings made for security cameras, game consoles, etc.,
on your original Wi-Fi Gateway will also need to be made on your new Wi-Fi Gateway.
NOTE
: If Wi-Fi settings did not transfer or to use new Wi-Fi Network Name and Password,
refer to the
Need more help?
section on the back page of this guide.
·
Open a browser and go to
ufix.att.com/restore
·
Log in to your U-verse account. If you forgot your User ID (primary AT&T email address) and Password,
help can be found on the account log-in screen.
·
Follow the onscreen instructions to transfer the existing Wi-Fi settings.
·
Record existing Network Name and Wi-Fi Password on separate yellow sticker from kit.
·
Place new yellow sticker over your new Wi-Fi Gateway’s yellow sticker.
B.
A.
Select only one option to begin the Wi-Fi Setup
Option 1: Connect using PC
·
Connect laptop or PC with an Ethernet cable
to your Wi-Fi Gateway
·
Continue to
B
Option 2: Connect using smartphone/tablet
·
Establish a temporary connection using new Wi-Fi
settings located on yellow sticker on new Wi-Fi Gateway
·
Open your device’s Wi-Fi connection settings and
select your Wi-Fi Network Name and enter your Wi-Fi
Password to connect to your network
·
Continue to
B
3.


