AT&T TL7810 Quick Start Manual Download Page 14

1

Headset attachments

Earbud

There are a total of six earbuds provided. One of them has been 
attached to the headset. They come in three sizes of which there 
are two types: one normal and one providing a deeper fit. Follow 
the steps below to change the earbud.

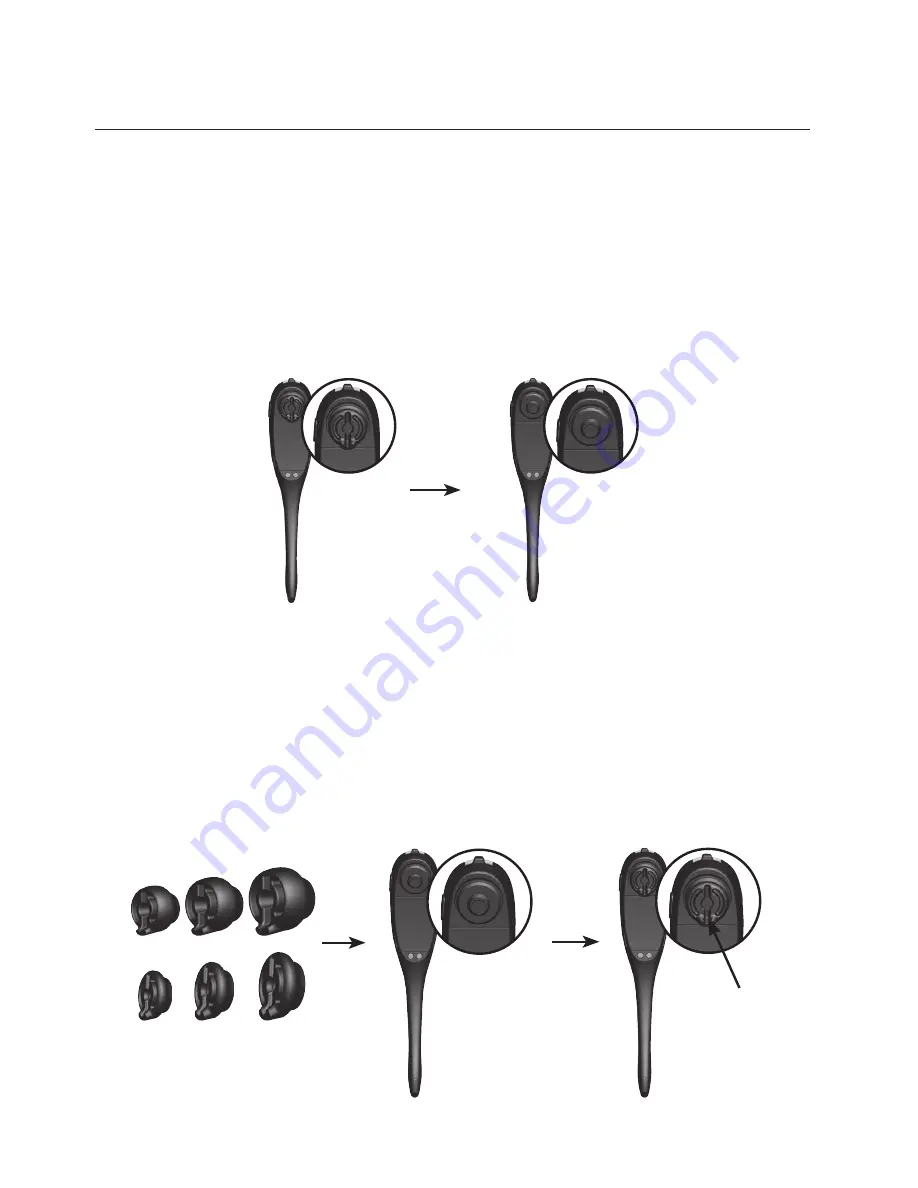
To remove the earbud from the headset earpiece:

Hold both sides of the earbud. Twist and pull the earbud until it 
separates from the earpiece.

To attach the earbud to the headset earpiece:

Choose an appropriate earbud.
Position the earbud on the earpiece as shown below.
Press the earbud down on the earpiece until it clicks into 
place. Move the earbud around so that the protruding bump 
on the earbud is pointing towards your mouth when placed on 
your ear.

1.
2.
.

Protruding 
bump

Summary of Contents for TL7810

Page 1: ...Quick start guide TL7810 DECT 6 0 cordless headset...

Page 2: ...t base and the USB cable to your PC You can make and answer VoIP calls through SkypeTM or Microsoft Lync or landline calls using the AT T Softphone Call Manager Visit www smbtelephones att com downloa...

Page 3: ...r attached Remove to replace the battery VOL VOL Slide the volume switch to the right or left to adjust the headset ringer volume while in idle mode or the listening volume while on a call FLASH Press...

Page 4: ...n and light VOLUME MICROPHONE Press the volume keys on the side of the headset base to adjust the speaking volume when on a call CORDED HANDSET CONNECTED YES NO Choose the setting based on whether you...

Page 5: ...k green dot CORDED PHONE CONNECTION jack blue dot This jack is only used to connect the corded phone connection cable Corded handset audio adjust switch Use this switch to adjust the corded handset au...

Page 6: ...ore use When fully charged the headset battery provides approximately 12 hours of talk time or 5 days of standby time When the headset is not in use recharge it by returning it to the headset base NOT...

Page 7: ...ement battery pack model BT191665 To order visit our website at www telephones att com smb or call 1 800 222 3111 In Canada dial 1 866 288 4268 Plug the small end of the headset base power adapter int...

Page 8: ...1 Connect the headset to a telephone wall jack through the line splitter provided see page 8 Option 2 Connect the headset to a corded phone using the corded phone connection cable provided see pages...

Page 9: ...jack Telephone line cord Plug the other end of the telephone line cord into the line splitter Line splitter Corded or cordless phone Plug the line splitter into the telephone wall jack or a DSL filte...

Page 10: ...ne connection cable into the CORDED PHONE CONNECTION jack blue dot at the back of the headset base A DSL filter not included is required if you have DSL high speed Internet service The DSL filter must...

Page 11: ...tch at the bottom of the headset base for optimal sound quality To adjust the corded handset audio Lift the corded handset and then press on the headset to check for a dial tone If there is no dial to...

Page 12: ...the telephone line cord into the TEL WALL JACK red dot at the back of the headset base Headset base installation Option 3 Connect the headset to your computer Connect the headset base to your computer...

Page 13: ...ake sure AT T DECT Headset is selected under the playback and recording settings in your Windows system b Audio settings in Skype Launch the Skype program Click on Tools then Options Click on Audio se...

Page 14: ...ove the earbud from the headset earpiece Hold both sides of the earbud Twist and pull the earbud until it separates from the earpiece To attach the earbud to the headset earpiece Choose an appropriate...

Page 15: ...ps below to attach an ear hook to the headset To position the headset to wear on the left or right ear Make sure the ear hook loop is positioned as shown in Figure 1 on the right Attach the ear hook t...

Page 16: ...Insert the earpiece into the ear hook loop as shown in Figure 3 Press the edge of the ear hook loop towards the earpiece until it clicks into place as shown in Figure 4 4 Hook the headset onto the des...

Page 17: ...and to the headset Make sure there is no headset attachment except the earbud connected to the headset Insert the earpiece into the loop of the ear pad as shown in Figure 6 Push the earpiece into the...

Page 18: ...the ear pad as shown in Figure 9 Gently press the earpiece inward until it clicks into place as shown in Figure 10 Place the neck band around your neck and over your ears Adjust and rotate the angle...

Page 19: ...times and you hear three beeps when it is being powered off Prolonged exposure to high volume levels using the headset may damage your hearing PHONE mode and PC mode Before using the headset you may c...

Page 20: ...he corded handset from the telephone base Press on the headset Follow the instructions in your telephone user s manual for making calls Do not hang up the corded handset until you are ready to end the...

Page 21: ...ack installation option 1 Press on the headset or place the headset in the headset base When the headset base is connected to your corded phone installation option 2 Hang up the corded handset then pr...

Page 22: ...are trademarks of AT T Intellectual Property licensed to Advanced American Telephones San Antonio TX 78219 The Skype name is a trademark of Skype Microsoft Lync is a registered trademark of Microsoft...

Reviews: