background image

EN 7

YOUR OVEN

Accessories

Your appliance is accompanied by a range of accessories, depending 
on the model. Only use original accessories; they are specially suited 
to your appliance. 

Note:

 not all accessories are suitable/available for every appliance 

(it may also differ by country). When purchasing, always provide the 
exact identification number of your appliance. Please see the sales 
brochures or check online for more details about optional accessories.

Accessories that can be supplied with your appliance (depending on the model)

Enamelled baking tray;

 to be used for pastries and cakes.

•  Do not use the enamelled baking tray for microwave functions!
•  Suitable for pyrolysis cleaning.

Oven rack;

 mainly used for grilling. A steam dish or pan with food 

can also be placed on the oven rack.
•  The oven rack is equipped with a safety peg. Lift the rack slightly 

at the front to slide it out of the oven.

•  Do not use the oven rack for microwave functions!

Deep enamelled baking tray;

 to be used for roasting meat and 

baking moist pastry. It can also be used as a drip tray. Place 
the deep baking tray into the first level for use as a drip tray 
during grilling.
•  Do not use the deep enamelled baking tray for microwave 

functions!

•  Suitable for pyrolysis cleaning.

Glass baking tray;

 for microwave and oven use.

•  NOT suitable for pyrolysis cleaning.

Pyrolysis guide rails;

 only use these guide rails to clean an 

enamelled baking tray during pyrolysis (replace the guide rails / 
telescopic guide rails with these special pyrolysis guide rails).
•  Please note: the high temperature during pyrolysis may cause the 

pyrolysis guide rails to discolour.

Summary of Contents for ZX6511C

Page 1: ...Instructions for use Oven ZX6511C ZX6592C ...

Page 2: ...EN 2 EN Instructions for use EN 3 EN 28 Pictograms used Important information Tip ...

Page 3: ...tional functions 17 Cleaning Cleaning the oven 20 Removing and cleaning the guide rails 20 Removal and installation of the oven door 21 Removing the oven window 22 The Cleaning function pyrolysis 22 Replacing the oven lamp 24 Solving problems General 25 Your oven and the environment Disposal of the appliance and packaging 27 Cooking test Food tested in compliance with the EN 60350 1 standard 28 ...

Page 4: ...y time This manual shows how you can best use this oven In addition to information about operating the oven you will also find background information that may be useful when using the appliance Please read the separate safety instructions carefully before using the appliance Read this manual before using the appliance and keep it in a safe place for future use Installation instructions are supplie...

Page 5: ...fan 10 ECO cooking 11 Defrosting 12 Pyrolysis 13 Display cooking information and timer 14 Child lock 15 Oven lamp 16 Temperature 17 Timer 18 Start Stop 19 Selection dial Note For the best touch response touch the buttons with the main part of your fingertip Every time you press a button during use a short signal will sound 7 6 5 4 8 9 10 19 14 15 16 17 13 1 2 3 12 11 18 ...

Page 6: ...number of shelf levels can have fully retractable telescopic guide rails depending on the model Pull the telescopic guide rails out of the oven cavity completely and place the oven rack baking tray steam dish on them Then slide the oven rack baking tray steam dish on the telescopic guide rails back into the oven cavity Only close the oven door when the telescopic guide rails have been returned com...

Page 7: ...r grilling A steam dish or pan with food can also be placed on the oven rack The oven rack is equipped with a safety peg Lift the rack slightly at the front to slide it out of the oven Do not use the oven rack for microwave functions Deep enamelled baking tray to be used for roasting meat and baking moist pastry It can also be used as a drip tray Place the deep baking tray into the first level for...

Page 8: ...e seconds Using your oven The oven has 10 oven functions and 1 cleaning function Consult the table to select the correct oven function for the dish 1 Place the dish in the oven For most dishes you should first preheat the oven 2 Turn the oven function dial to the desired setting The selected pictogram will appear on the display 3 Press the temperature button 4 Set the oven to the desired temperatu...

Page 9: ...shes you use must be able to withstand temperatures of 275 C Oven settings Use the table to select the right oven function Also consult the cooking instructions on the food packaging Function Description Recommended temp C Quick preheat Use this function to heat the oven quickly to the desired temperature This function is not suitable for cooking food The preheat process is complete once the oven ...

Page 10: ...ccordance with EN 60350 1 On this setting the oven does not display the actual temperature in the oven 180 Defrosting The air circulates with no heaters activated Only the fan will be activated This is used to slowly thaw frozen food Pyrolysis This function allows automatic cleaning of the oven cavity interior using high temperature approx 460 C which incinerates the fat residues and other impurit...

Page 11: ...set temperature will be displayed You can alter this temperature Note Preheat will begin after you have started the oven using the start stop button Preheat is complete when the set temperature is reached and a signal sounds Top heat bottom heat Heat is generated by the heating elements at the top and bottom of the appliance This setting is suitable for traditional baking and roasting 2 The baking...

Page 12: ...ickly Preheat the oven for 5 minutes Large grill The heat comes from the top element and the grill element This setting is particularly useful for dishes and baked food that require a real bottom crust or browning Use this just before the end of the baking or roasting time 2 4 For grilling place the oven rack on the fourth guide rail level and the baking tray on the second guide rail level Smal gr...

Page 13: ...he grill rack is usually placed at level 4 and the baking tray at level 2 Keep an eye on the cooking process At high temperatures meat can burn quickly Preheat the oven for 5 minutes Hot air bottom heat Food is heated using a combination of hot air and bottom heat This setting is used for a crispy and browned result 2 The baking tray or the grill rack is usually placed at level 2 Preheating is rec...

Page 14: ...d is ideal for baking 2 Place the tray at level 2 Preheating is recommended Bottom heat fan The bottom element heats the dish and the heat is distributed by the fan This setting is used for baking yeasted pastry and preserving fruit and vegetables 2 Place the tray at level 2 Preheating is recommended Hot air Bottom heat and fan USE ...

Page 15: ...ure in the oven Place the tray at level 3 Defrosting In the defrost function the fan circulates the air No heat elements are switched on Use this function for slow defrosting of frozen dishes cakes biscuits cookies bread bread rolls and frozen fruit If desired set a different defrost time by pressing the timer button and setting the time using the selection dial Turn the food over after half the d...

Page 16: ...ds to operate cooking time Setting the end time In this setting you can set the time the oven should switch off A cooking time first needs to be set Ensure that the clock is set precisely to the current time Example Current time 12 00 Cooking time 2 hours End of cooking 18 00 hours First set the cooking time for example 2 hours The sum of the current time and the cooking time is displayed automati...

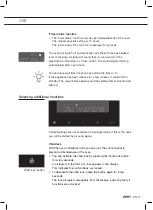
Page 17: ...nutes it will switch to standby The current time appears and the selected timer function will light up Selecting additional functions Certain settings are not available for all programmes if this is the case you will be alerted by a sound signal Child lock With the oven s childproof lock you can lock the control panel to prevent unintended use of the oven You can activate the child lock by pressin...

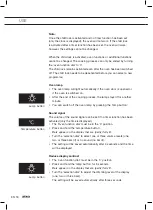
Page 18: ... lamp stays lit for another minute You can switch off the oven lamp by pressing the lamp button Sound signal The volume of the sound signal can be set if no timer function has been activated only the time is displayed The Oven function dial must be in the 0 position Press and hold the temperature button Bars appear on the display that are partly fully lit Turn the selection dial to select one of t...

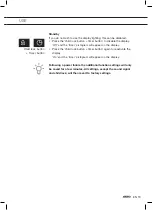
Page 19: ...gram will appear on the display Press the child lock button timer button again to reactivate the display On and the timer pictogram will appear on the display Following a power failure the additional function settings will only be saved for a few minutes All settings except the sound signal and child lock will then revert to factory settings Child lock button Timer button ...

Page 20: ...faces with a soapy cloth Wipe afterwards with a clean damp cloth and dry the surfaces Clean the interior of the oven Important Take care that NO water enters the vents NEVER use abrasive cleaning materials or chemical solvents ALWAYS ensure that the door seal stays clean This prevents accumulation of dirt and allows you to close the door properly Removing and cleaning the guide rails Only use conv...

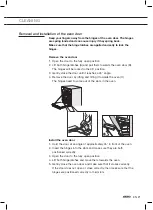
Page 21: ... close the door until it reaches a 45 angle 4 Remove the door by lifting and tilting it towards the oven C The hinges need to come out of the slots in the oven B A C Install the oven door 1 Hold the door at an angle of approximately 45 in front of the oven 2 Insert the hinges into the slots and make sure they are both positioned correctly 3 Open the door to the fully open position 4 Lift both hing...

Page 22: ...l can be removed by lifting this carefully and removing it Also remove the rubber seals around the glass To replace the glass pane observe the reverse order The markings semicircle on the door and the glass pane should overlap Pyrolysis Instead of cleaning manually you can clean the oven space or an enamelled baking tray using the Pyrolysis oven feature During pyrolysis the oven space is heated to...

Page 23: ...the special pyrolysis guide rails in position Wipe the baking tray with a damp cloth and slide the baking tray into the oven on Level 2 Remove these special pyrolysis guide rails after the cleaning process 3 Turn the oven function dial to Pyrolysis The cleaning intensity level and time are displayed 4 To choose the desired cleaning intensity level press the temperature button and turn the selectio...

Page 24: ...st remove the baking tray oven rack and guide rails Cut the power to the appliance by removing the plug from the socket or switching off the fuse in the fuse box Please note the lamp can be very hot Use protection to remove the lamp Rear wall lamp 1 Turn the cover to the left to remove it 2 Turn the bulb out of the fitting Side wall lamp 1 Use a flat blade screwdriver to snap and remove the lamp c...

Page 25: ...t Check whether the temperature has been set The display will be reset following power failure Remove the plug from the socket and put it back in again Set the time again There is condensation on the interior of the oven This is normal Wipe the oven clean after use The fan keeps working after the oven is switched off This is normal Once the oven has been switched off the cooling fan may continue t...

Page 26: ... service technician If maintenance is required remove the plug from the socket and contact ATAG customer services Have the following information to hand when you call The model number and serial number stated on the inside of the oven door Guarantee details A clear description of the problem Choose a clean dry place if you have to store the oven temporarily as dust and moisture can damage the appl...

Page 27: ...ubbish bin with a cross through it This indicates that household appliances must be disposed of separately This means that the appliance may not be processed via the regular waste flow at the end of its useful life You should take it to a special municipal waste depot or a sales outlet that offers to do this for you Collecting household equipment separately prevents harm to the environment and pub...

Page 28: ...e level Shallow enamel coated baking tray 3 150 160 20 35 Cupcakes two levels Shallow enamel coated baking tray 1 3 140 150 30 45 Cupcakes three levels Shallow enamel coated baking tray 2 3 4 140 150 35 50 Sponge cake Round metal mould diameter 26 cm Oven rack 2 160 170 20 35 Sponge cake Round metal mould diameter 26 cm Oven rack 2 160 170 20 35 Apple pie 2 x round metal mould diameter 20 cm Oven ...

Page 29: ...EN 29 ...

Page 30: ...EN 30 ...

Page 31: ...EN 31 ...

Page 32: ...have the complete type number to hand You will find the addresses and phone numbers of the service organisation on the guarantee card The appliance rating label is located on the inside of the appliance 596409 VER 1 06 09 2017 596409 596409 ...

Reviews: